DIY paper sombrero: master class with photos. Making a Mexican costume with your own hands: poncho, sombrero Video: Straw sombreros
Sometimes you need to come to a holiday in costumes of different peoples of the world. Here parents will have to carefully consider the national costumes and choose the one that will look impressive, and which will be easier to make. In this article we will look at a version of the Mexican New Year's costume. This outfit is more suitable for a boy. The suit actually consists of the upper part. You can wear any dark pants, even jeans will do.
Cape
One of the elements of the Mexican costume will be a striped poncho. This is a woolen cape that the people of Mexico wear during the cold season. It’s not difficult to make, you just need to buy striped dense material, preferably bright, perhaps with a geometric pattern. A double measurement from the child's shoulder to mid-thigh will be sufficient.
You can even make it shorter, but so that the belt is covered. The fabric is folded in half and a neckline is cut in the center of the fold. The neckline is trimmed with piping, and laces with pom-poms are tied on. A ribbon with fringe or tassels should be sewn onto the bottom edge of the Mexican costume. The width of the poncho is the distance from the middle of one shoulder to the middle of the other. The cape should hang from the shoulders.
Vest
For a Mexican costume for a boy, you can sew a vest instead of a poncho. The material is also striped. It is desirable that the traditional colors of Mexican national costumes be present. These are brown, red, black, yellow, orange, green. Also, complete with a vest, you need to make a red wide satin belt for the Mexican costume, which is tied on the side with a bow.

Sewing a vest is easy; you can use a standard pattern. If you don’t have one, then take an old children’s vest and outline it on a newspaper, then cut out the pattern along the outline and sew all the parts together with internal seams. Any mother who has ever held a needle and thread in her hands can do this. You don't need any special skills to sew a Mexican costume for a boy. To prevent the vest's hems from coming apart during the dance, you can sew a bright cord with a pom-pom on each half and tie both halves together with a bow. It is better to wear black trousers for this outfit. You can sew a ribbon with pompoms or tassels onto the side seams of the pants. Under the vest, wear a loose-fitting white shirt with wide sleeves at the cuffs.
Belt
The belt for a Mexican costume needs to be wide and bright. It is better to buy a piece of red satin. Cutting the belt is easy. This is a long strip folded in half. Sew the fabric along the wrong side so that the seams are not visible. The edges of the belt can be made into an angle. The belt for a Mexican costume is not sewn up completely so that it can be turned right side out. The remaining section is closed with an internal seam, carefully so that the threads are not visible.
DIY sombrero
For such a New Year's outfit, a boy can pick up a wide hat in any store. A lot of them are sold for the holiday, just like Santa Claus hats. Chinese industry is doing great before the holidays. But a hat does not always go well with an outfit, especially when you need a Mexican costume.

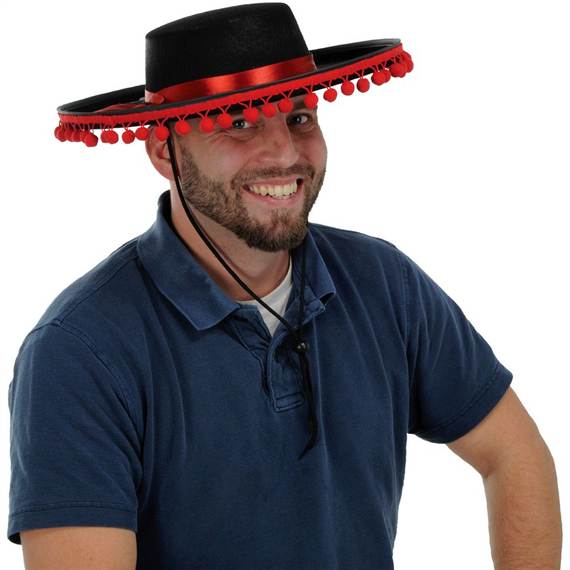
The first option for making a sombrero with your own hands will be the following: you can buy a black hat and sew a red satin ribbon in a circle. Then the edge of the sombrero can be trimmed with a ribbon with pom-poms, which is also red. Paired with a bright vest or poncho and a red belt, this headdress will look great.
Sombrero made of colored paper strips
To make such a spectacular one, you need to prepare sets of colored tissue paper in the brightest colors. As a basis, you can take a real straw hat, which is found in almost every closet. The height of the central part of the headdress can be increased due to a truncated cone cut from foam rubber. It needs to be glued, or better yet, secured with stitches using a needle and strong thread. Then we begin decorating work. Strips of paper are cut to equal widths and the edges are thickly cut into “noodles.” Then the entire surface of the hat is covered with paper in layers. You can sew it on.

Work begins with the brim of the headdress and ends at the top. The inside is left unchanged so that the child’s hat does not rub the child’s skin.
Homemade hat
If you don’t have a hat at home, or it’s new and beautiful, which you don’t want to turn into a sombrero, even if only temporarily, don’t worry. It’s great to make such a stylish ethnic hat for a Mexican costume with your own hands. To do this you will need a sheet of Whatman paper, thick PVA glue or colored paper. A circle is drawn in the center on a piece of Whatman paper. After trying it on your head you can adjust it. Next, using a compass or a round object (for example, a pan lid), draw the outer contours of the hat. The result was a blank in the shape of a wheel. The next step is to fold a cone around the boy’s head and fasten the edges with a stapler. The bottom is cut along a straight line, the top of the figure is also cut. This cone is inserted from the inside of the “wheel” and glued from the inside using PVA glue and strips of paper. A round lid is cut out and glued to the top of the truncated cone.

All that remains is to cut out a long strip-rim for the sombrero and attach it with strips of paper. To make the hat bright, you need to paint it with gouache or decorate it using appliqué. To keep the hat on the child’s head, you can thread a thin rope at the base that matches the color of the coloring book.
As you can see, it’s not difficult to make a Mexican costume with your own hands, you just need to show the desire and spend a couple of hours making the outfit, but at the matinee the boy will have the most spectacular and bright costume, and the minimum amount of money will be spent.
The Mexican sombrero is a practical and very atmospheric accessoryWe are accustomed to thinking that a sombrero is a Mexican hat. When you mention it, your imagination involuntarily pictures a landscape with a hot desert, tall cacti, cowboys in wide-brimmed hats galloping on horses. But the roots of this headdress are found in the Spaniards. It was they who first put on a hat that protected almost the entire body from the scorching rays of the sun. After all, the word “sombra” means “shadow” in Spanish. Hence the name of the national wardrobe item.
A little history
Over time, the sombrero acquired many varieties. Each nation created it for itself, subject to its own traditions and characteristics of the region of residence. It is logical that the hat begins its march around the world from hot countries.
In hot weather, a wide-brimmed sombrero will replace your beach umbrellaIn Spain, a sombrero is any hat with a wide brim. In the classic version, it is characterized by a high crown and ties under the chin; sometimes the edges can be slightly turned outward. Both the poor and the rich wore the hat. But if the former could only afford a headdress made of straw, the latter wore sombreros made of all kinds of expensive fabrics (felt, velvet and others). This item has only one thing in common: it has always been made by hand.
 Straw sombrero can be dyed in different colors
 Luxurious velvet sombreros
In honor of the sombrero, a hat festival is held in the state of Texas, USA. Since 1986, the Sombrero Festival has been held annually in February. Leading designers don't forget about the sombrero either. A hat made from natural materials often complements exclusive designer collections, adding splendor and chic to them.
Sombrero Festival in Texas
How the sombrero was used
In its homeland, the hat played the role of protection from the sun, wind, dust, rain and other weather conditions. In addition, thanks to its wide brim, the hat also served other functions. For example, it is convenient to use it to knock down a fire that has started or, conversely, to fan the smoldering coals of a fire. You can protect yourself from a poisonous snake by throwing a sombrero over it. Cowboys watered their horses from their hats; this was very convenient in places where there were no rivers or streams.
 Depending on the design, the hat could be used for different purposes
By covering yourself with a sombrero, you can remain incognito in crowded places.In bullfighting, the hat is used to tease the bull. Also, this headgear is an excellent protection against his horns and good protection for the head when the rider falls to the ground.A real sombrero can save the life of its owner; a hat can protect you from being hit by a machete or knife.
 The image of a Mexican bandit in a sombrero has become a kind of stereotype.
Types of sombrero
Born in Spain, the fashion for wide-brimmed hats migrated to Mexico. There, the appearance of the hat was slightly transformed, the brim became even wider, and the crown elongated and began to look like a truncated cone. While the Spaniards wore a hat with a low, flat crown.
- Sombrero Charro (sombrero charro) is the name of the Mexican headdress.

 The sombrero charro is decorated with bright embroidery
- Sombrero vaquero (sombrero vaquero) is a typical cowboy hat with a low crown and upturned brims. Initially, it was worn by shepherds - vaqueros.

- Sombrero vueltiao – Colombian black and white sombrero. It differs from its ancestors in that it is woven from reed arrows. It is worn by dancers in national performances and worn by artists.

 Source material in a skein and finished sombrero
- Sombrero pintado. This is the name of the hat among the inhabitants of Panama. Its margins are curved slightly downwards. A piece of clothing woven from the finest fiber is considered rich, that is, the more turns the craftsman made when making a sombrero, the more expensive it becomes.
 Handmade sombrero pintao
Making the Sombrero pintado
An interesting fact is that the Spaniards have the term Sombrero russo - this is what they call the Russian earflaps.
Wide brim hat and fashion
What suits you is fashionable. This famous phrase has both supporters and opponents. Only famous couturiers do not listen to anyone and create new images inspired by the awakening nature. Now it is difficult to say what is fashionable and what is not. Collections are created to suit every taste. Even the most fastidious fashionistas find something interesting for themselves in them.
 Real fashionistas can afford bright experiments
A recent discovery in the fashion world is the sombrero. It would seem, what do, for example, urban style and this hat have in common? Designers have proven to everyone that the Mexican accessory can be combined with a large number of clothes, creating the brightest and most noticeable ensembles. The hat goes well with a sundress, a short dress, a baby doll style dress, a tunic with ethnic motifs and a poncho.
By choosing a pantsuit and wearing a sombrero, you will look elegant and sophisticated. Everyone around you will notice and appreciate your inherent sense of style.

Wicker sandals and maximally open sandals complete the Mexican look.A hat is not worn in the cold season.
 Although designers use sombreros even in autumn shows
Sombrero for a Mexican party
In the modern world, real sombreros are popular among tourists. In addition, a light hat with large brims is a salvation in the summer heat. To protect yourself from the sun with this hat, you don’t have to go to Mexico; you can make a sombrero with your own hands.
 Tourists often choose a larger sombrero
 A huge number of these hats are sold in Mexico every year.
For this you will need: Elements of a cardboard sombrero
Stage I. Making a crown
There are two ways to make this element.
- Roll a paper cone and cut off the top. Learn a hat with a high crown.
- You can use a plastic flower pot of a suitable size as a crown. If you choose this option, then the pot must first be painted white and left until completely dry.
Stage II. Making fields
For this part, you can use colored paper or white paper, and then paint it in the desired colors.
- In the center of the sheet we draw a circle equal to the diameter of the crown (you can simply trace it along the contour).
- Inside the resulting circle we draw another one, moving 3-4 cm from the edge.
- The third circle determines the width of the margins.
- Cut out the smallest circle. We make cuts every 1.5-2 cm from this edge to the borders of the middle circle. The resulting cloves need to be folded upward.
- We make teeth along the edge of the future hat, but the cuts should be at a distance of 4-5 cm. We bend it up and glue the places where the teeth intersect.
Simple cardboard sombrero
Stage III. Connecting parts
Everything is simple here. Using double-sided tape, attach the crown to the brim so that the teeth are inside. The sombrero is almost ready!
All that remains is to apply the patterns. These can be zigzag lines running along the entire circumference of the brim or crown, or ordinary colored lines. The hat is decorated with fringe, appliqués, small pompoms, and everything you can imagine.
 Mexican traditions allow for a combination of the brightest colors
Now you can safely go to a themed party or just play cowboys with your children. And it doesn’t matter if after the games the hat turns out to be a disposable craft, because now you know how to make a sombrero. Maybe next time it will be stronger?
Sombrero is a great option for relaxing on the beach or in a fun company. In a straw hat, you can take an evening promenade without attracting the attention of passersby hurrying towards you. Without chasing style, realizing the appropriateness of each item in the image, even the most fashion-averse person will be able to express his individuality.
Paper sombrero
- double sided tape;
The manufacturing algorithm is as follows:


Here are some more options:
- glue a piece of fabric;
- wind lace or twine;
- tie a satin ribbon.


Cardboard version


Then the only thing left to do is to decorate your sombrero as you please. For decoration, you can use paints, colored paper, you can add three-dimensional elements made of fabric or colored cardboard, you can tie the crown with threads or ribbons. Do whatever your heart desires!


Video on the topic of the article
The video below will help you get inspired.
We will need:
- paper;
- flower pot;
- scotch;
- scissors;
- ruler;
- paints;
- decorative cord.

 |
 |
 |
Are you planning a fancy dress costume? Are you wondering how to make a paper helmet, a pirate's cocked hat, a hat for a witch or a cowboy? Use step-by-step instructions and master classes to help you learn how to make a paper hat. Such simple homemade hats will be a good alternative to store-bought costumes, and will look no less bright and original.
DIY paper hats
DIY paper hats are an easy way to spice up your fancy dress costume. Using glue and scissors, you can easily make an original Mexican sombrero, a pirate cocked hat, an elegant top hat or a snowman's cap. The famous blue Dunno hat, trimmed with fabric, will make the simplest costume of this fairy-tale hero recognizable. The instructions for making each headdress will tell you how to make a hat from cardboard, paper and other additional materials at hand.
Pirate
Let's learn how to make a pirate hat with your own hands from paper. To implement our plan we will need:
- black paper (1 sheet of A3 format);
- hat elastic;
- scissors;
- awl;
- glue;
- White paper;
- black felt-tip pen or pen.
Instructions:
Sombrero
DIY paper hats are crafts that successfully use other available materials. To make a Mexican sombrero, we will need the following materials:
- thick red paper (painted Whatman paper);
- plastic flower pot;
- wrapping paper;
- decorative cord.
How to make a Mexican hat out of paper? Using tape, paints, a ruler, scissors, and a compass, we begin making:

Cylinder
Top hat is a universal hat. It is suitable for the costume of Dracula, the Snowman, and the old woman Shapoklyak. This hat with a veil will be a flirty addition to many ladies' masquerade outfits. The main thing is to decide on the height of the crown and the width of the brim, and then create the headdress itself for a specific character. For the cylinder we will need the following materials and tools:
- whatman;
- glue;
- colored fabric (paper);
- scissors.

Instructions on how to make an elegant paper hat:
- We draw a rectangle on whatman paper (one side is the height, the other is the circumference of the crown). Cut it out.
- We glue the pipe by connecting the part along the edges of the height of the rectangle.
- We draw a crown around the circumference on a new sheet of whatman paper.
- We outline the resulting circle with another one at a distance equal to the width of the fields of the future cylinder.
- We draw a small hole from the inside, stepping back one and a half centimeters from the contour of the circle.
- Cut out this small circle.
- From its edge to the drawn line of the inner circle we make notches and fold the paper along the drawn contour.
- Again we draw a crown around the circumference on a new sheet of whatman paper.
- We cut out the part along the contour, stepping back about one and a half centimeters outward for notches - this is the top of the crown.
- We make cuts with scissors and bend the paper along the drawn contour.
- We glue the crown-tube with the round top part.
- Glue the fields to the cylinder (we apply the notches from the inside of the cone).
- We cover the hat with colored paper or fabric.
- We decorate as desired (brooches, feathers, veil, ribbons, etc.).

For the snowman
A paper hat for a Snowman costume is the simplest version of a masquerade hat if you make a cap. A light hat made of corrugated paper - a crooked and crumpled cylinder - will be original. We already know how to make this version of the headdress. Let's try to make a cap. To make it we will need:
- whatman:
- paints with brushes;
- colored paper;
- glue;
- hat elastic;
- scissors.
- We draw a circle on whatman paper, the radius of which is equal to the height of the cap.
- We measure the volume of the future Snowman's head.
- We measure this number of centimeters along the length of the drawn circle.
- We put marks - in the center of the circle, the beginning and end of the measured line (head volume).
- We draw two lines from the marks on the circle to the center of the circle.
- Cut out the resulting sector.
- Roll up the cone.
- We glue it or fasten it with a stapler.
- We paint with paints or paste over our cap for the Snowman with colored paper.
- We attach a hat elastic to it.
Find out from plastic cups.
For Dunno
For the Dunno hat we will need the following tools and materials:
- cardboard;
- blue (blue) fabric;
- superglue or stapler;
- yellow corrugated paper;
- hat elastic;
- paints or brushes.

Manufacturing:

How to make from paper
How to make hats for children from paper using an old unwanted newspaper? A light cap or cap with a visor can be made in just a few steps, without the need for glue, scissors, or any additional materials. For training, you can try the technology on standard A4 sheets, and at the same time decide on the size of future newspaper hats.
Cap
This instruction will tell you how to make a paper hat from newspaper when you don't have a Panama hat on hand. For an adult, you will need a large sheet of newspaper (A3 tabloid); for a child, half a spread will be enough. Let's look at how to make a cap out of paper, using a standard A4 sheet as an example:

Cap
Are you not satisfied with a simple cap? Let's learn how to make a newspaper cap - a lightweight hat with a sun visor. To make such a hat, we only need a sheet of newspaper:
- Take a sheet of newspaper (A3 format) and place it with the long side facing you.
- We bend the upper corners towards the center and towards ourselves so that we get a triangle.
- Fold the free lower rectangular strip in half up and in the same way again.
- Turn the hat over backwards.
- We wrap the triangles protruding beyond the edges of the product from the folded strip inward (toward ourselves).
- Fold the right and left edges of the hat towards the middle.
- We bend the lower free rectangular strip upwards, butt-joint with curved edges (see the previous paragraph).
- We form the visor by making small bends on the sides.
- We tuck them under the resulting envelope on the hat.
- Turn the cap with the bottom side facing you.
- Fold the top of the hat down and tuck it under the lapel.
- We straighten the cap, open it, try it on.
Also check out:
Have you decided to play wild prairie heroes with your child or are you getting ready to? Then it won't hurt you to get into character by wearing a luxurious sombrero. And it is not at all necessary to spend money on purchasing this accessory, especially since you will only need it once. Simple to make, but at the same time an original paper sombrero, you can make it yourself. The child will be happy with such a gift, because now you can dress up and play to your heart's content, without fear of ruining your headdress.
In the master class below we will tell you how to make a Mexican sombrero hat with your own hands from scrap materials.
We will need:
- paper;
- flower pot;
- scotch;
- scissors;
- ruler;
- paints;
- wrapping paper or thin fabric;
- decorative cord.

 |  |  |
Having a little time left, you can experiment with sombrero decor. A variety of ribbons of different colors, applications of small triangles, fringe, small buboes - all these elements will turn your craft into an original headdress.
Video: How To Make A Top Hat, DIY Steampunk Fashion Pattern Tutorial
Video: Decorative Sombrero Hats
Video: Straw sombreros
Video: Sombrero
A newfangled trend has emerged in many kindergartens and schools - organizing masquerades. I want the baby to look special, bright, not like everyone else. What about such a colorful character as the Mexican? Many boys will definitely like this look, and your hero will look very bright and unique at the matinee. First of all, you need to remember what attributes are needed to create the image of a native Mexican. Their list is not that long. These are maracas, ponchos and, of course, a sombrero - a large wide-brimmed hat of a characteristic style. To create a poncho, a small blanket or thick scarf is suitable, rattles left over from toddlerhood can be used as maracas, and it’s easy to make a sombrero yourself. This article contains tips on how to make a sombrero with your own hands.
Paper sombrero
A paper sombrero is the easiest way to make this accessory. This option is perfect if you want the child to carry out the idea on his own, or if there is no time to prepare and complete the work, because such a sombrero is made quickly and very easily. Also, when choosing this version of the product, you do not need to waste time and money on preparation and materials.
For the entire process of creating a sombrero you will need:
- sheets of colored paper (the paper should be bright colors; orange or red will look best);
- tools for work: scissors, brushes;
- mayonnaise bucket (you can use other available materials, those that are available);
- colored paints, it is better to use gouache;
- double sided tape;
- decorative elements: beads, braid, feathers, laces, etc.
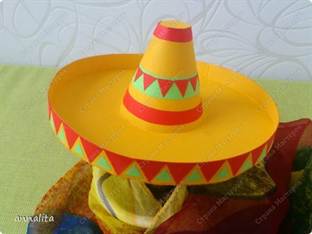
The manufacturing algorithm is as follows:
- From colored paper you need to cut a circle with a diameter of 40 cm (the diameter can be different, it all depends on how wide-brimmed the hat should be in the end).
- Inside the circle cut out in step 1, draw a circle whose diameter is 0.5 cm less than the diameter of the mayonnaise bucket.
- Cut a hole inside the drawn circle. The radius of this hole should be one centimeter less than the radius of the drawn circle.
- We make cuts from the inner hole to the drawn circle. This is clearly shown in the photo below.
- Attach a circle of colored cardboard to the mayonnaise bucket with glue. The notches are glued overlapping onto the walls of the bucket.
- Leave the product and let the glue dry
- After drying, we move on to decorating the mayonnaise bucket with paints. The typical pattern for Mexican sombreros is horizontal stripes of black, green, red, yellow and orange.

To ensure that the edges of the strips are even, you can limit them before painting with masking tape, but it is very important to dry each previous layer, otherwise all the paint will remain on the tape after it is removed.
- Leave the product to dry the paint.
- We attach a cord or rope to the inside of the sombrero, which will hold it on the head.
- We decorate with a crown (the crown is the cone-shaped part of the sombrero that rises above the brim). The main task will be to hide the place where the brim is attached to the crown. This seam can be hidden under decorative tape glued on top with glue.
Here are some more options:
- glue a piece of fabric;
- glue a flat strip of colored paper;
- wind lace or twine;
- tie a satin ribbon.
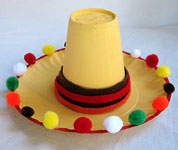
This simple master class will allow you to create a beautiful and unique paper sombrero on your own or together with your child.
Cardboard version
A cardboard sombrero is more labor-intensive, but requires fewer materials to create.
To make such a headdress you will only need cardboard, tools and various decor.
First of all, patterns are made from a sheet of cardboard, as in the photo.
The size of the pattern pieces depends on the desired size of the product and, of course, on the head size of the person who will wear this accessory.
In the second stage, the parts are cut out and assembled together.

After completing the second stage, you should end up with something similar to the one shown in the picture below.
Have you decided to play wild prairie heroes with your child or are you preparing for one? Then it won't hurt you to get into character by wearing a luxurious sombrero. And it is not at all necessary to spend money on purchasing this accessory, especially since you will only need it once. Simple to make, but at the same time an original paper sombrero, you can make it yourself. The child will be happy with such a gift, because now you can dress up and play to your heart's content, without fear of ruining your headdress.
In the master class below we will tell you how to make a Mexican sombrero hat with your own hands from scrap materials.
We will need:
- paper;
- flower pot;
- scotch;
- scissors;
- ruler;
- paints;
- wrapping paper or thin fabric;
- decorative cord.
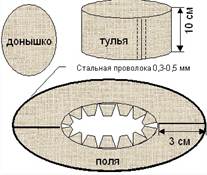
- Take a flower pot and paint it with a coat of white paint. Let it dry thoroughly.
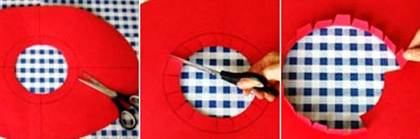
- On a piece of red paper, trace the outline of the top of the flower pot with a pencil. Using a compass, draw another one inside the circle, but with a smaller diameter (3-4 centimeters). Then draw a third circle, the diameter of which will determine the width of the sombrero brim. To do this, you can draw two perpendicular lines through the center of two existing circles.
- Cut out the smallest circle, and from its edge towards the middle circle, make small cuts. After this, bend all the resulting cloves upward.
- Process the edges of the sombrero in the same way, but make the teeth at a distance of 4-5 centimeters from each other. Glue the overlapping teeth together.
- On the pot, draw horizontal stripes with bright colors and a wavy line along the bottom of the crown. Then, when the paint dries, cover the edge of the pot with double-sided tape.
- Connect the pot with a piece of paper and, if necessary, hide the joints with paint. All you need to do is attach a decorative cord to the sombrero, which will serve as ties. A colorful sombrero in the Mexican style is ready!
 |
 |
 |
 |
 |
 |
 |
 |
 |
 |
 |
 |
 |
 |
 |
|
 |
|
Having a little time left, you can experiment with sombrero decor. A variety of ribbons of different colors, applications of small triangles, fringe, small buboes - all these elements will turn your craft into an original headdress.
A newfangled trend has emerged in many kindergartens and schools - organizing masquerades. I want the baby to look special, bright, not like everyone else. What about such a colorful character as the Mexican? Many boys will definitely like this look, and your hero will look very bright and unique at the matinee. First of all, you need to remember what attributes are needed to create the image of a native Mexican. Their list is not that long. These are maracas, ponchos and, of course, a sombrero - a large wide-brimmed hat of a characteristic style. To create a poncho, a small blanket or thick scarf is suitable, rattles left over from toddlerhood can be used as maracas, and it’s easy to make a sombrero yourself. This article contains tips on how to make a sombrero with your own hands.
Paper sombrero
A paper sombrero is the easiest way to make this accessory. This option is perfect if you want the child to carry out the idea on his own, or if there is no time to prepare and complete the work, because such a sombrero is made quickly and very easily. Also, when choosing this version of the product, you do not need to waste time and money on preparation and materials.
For the entire process of creating a sombrero you will need:
- sheets of colored paper (the paper should be bright colors; orange or red will look best);
- tools for work: scissors, brushes;
- mayonnaise bucket (you can use other available materials, those that are available);
- colored paints, it is better to use gouache;
- double sided tape;
- decorative elements: beads, braid, feathers, laces, etc.

The manufacturing algorithm is as follows:
- From colored paper you need to cut a circle with a diameter of 40 cm (the diameter can be different, it all depends on how wide-brimmed the hat should be in the end).
- Inside the circle cut out in step 1, draw a circle whose diameter is 0.5 cm less than the diameter of the mayonnaise bucket.
- Cut a hole inside the drawn circle. The radius of this hole should be one centimeter less than the radius of the drawn circle.
- We make cuts from the inner hole to the drawn circle. This is clearly shown in the photo below.

- Attach a circle of colored cardboard to the mayonnaise bucket with glue. The notches are glued overlapping onto the walls of the bucket.
- Leave the product and let the glue dry
- After drying, we move on to decorating the mayonnaise bucket with paints. The typical pattern for Mexican sombreros is horizontal stripes of black, green, red, yellow and orange.

To ensure that the edges of the strips are even, you can limit them before painting with masking tape, but it is very important to dry each previous layer, otherwise all the paint will remain on the tape after it is removed.
- Leave the product to dry the paint.
- We attach a cord or rope to the inside of the sombrero, which will hold it on the head.
- We decorate with a crown (the crown is the cone-shaped part of the sombrero that rises above the brim). The main task will be to hide the place where the brim is attached to the crown. This seam can be hidden under decorative tape glued on top with glue.
Here are some more options:
- glue a piece of fabric;
- glue a flat strip of colored paper;
- wind lace or twine;
- tie a satin ribbon.


This simple master class will allow you to create a beautiful and unique paper sombrero on your own or together with your child.
Cardboard version
A cardboard sombrero is more labor-intensive, but requires fewer materials to create.
To make such a headdress you will only need cardboard, tools and various decor.

First of all, patterns are made from a sheet of cardboard, as in the photo.

The size of the pattern pieces depends on the desired size of the product and, of course, on the head size of the person who will wear this accessory.
In the second stage, the parts are cut out and assembled together.

After completing the second stage, you should end up with something similar to the one shown in the picture below.

Then the only thing left to do is to decorate your sombrero as you please. For decoration, you can use paints, colored paper, you can add three-dimensional elements made of fabric or colored cardboard, you can tie the crown with threads or ribbons. Do whatever your heart desires!


Video on the topic of the article
The video below will help you get inspired.