Knitting summer children's Panama hats with knitting needles. Panama hat with knitting needles, a selection of beautiful models with descriptions and diagrams. Knitting crown and band
In summer, everyone needs a hat - both children and adults. A light openwork hat will not only protect your head from the merciless rays of the sun on a hot day, but will also add an elegant zest to the summer look of a girl, girl, woman! An original hat, crocheted by your beloved mother or grandmother, will also appeal to mischievous little boys who prefer to spend most of the day outside.
Tags:
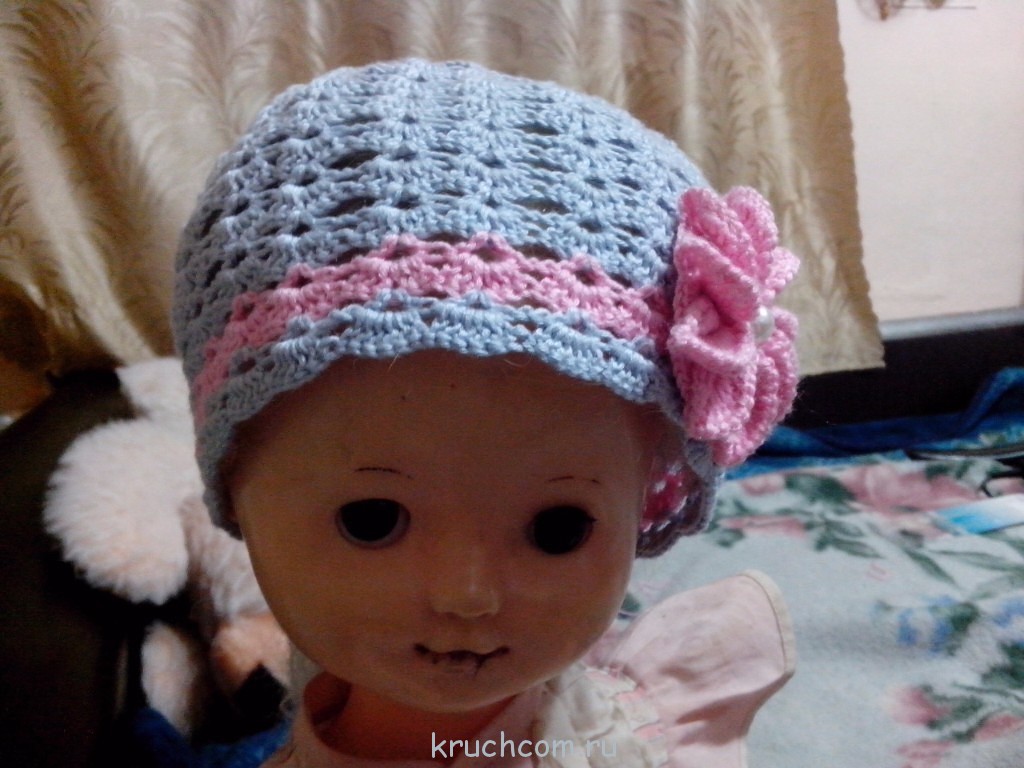
Competition work No. 33 - Knitted Panama hat with a flower (Larisa Petrova) ()
Knitting is my hobby and additional income. I absolutely love crocheting, but I also knit with knitting needles.
To knit a hat you will need: bamboo yarn, hook number 2
Cap size: for 2 years

Competition work No. 28 - Set for a 5-year-old girl “Swan” (Shestakova Elena Vladimirovna)
Good day everyone. My name is Shestakova Elena Vladimirovna. So I decided to take part in a crochet competition. Crochet works have fascinated me since childhood. My cousins and aunt created incredibly airy and beautiful things. Now I decided to try myself in this type of needlework.
The set consists of a top, a skirt, a hat, and a hair tie.

Description of the Swan kit
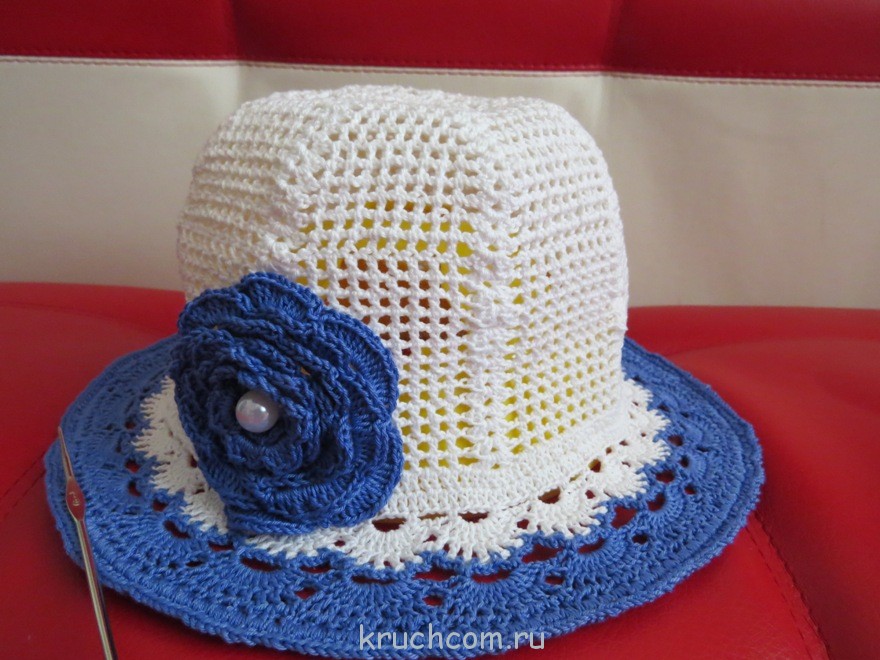
Competition entry No. 23 – Knitted Panama hat with a flower
Good evening. I have been contacted by another panama hat for my goddaughter for the competition.
The threads are still the same COCO, hook 1.25.


Competition entry No. 22 – Panama “Butterfly”
Panama “Butterfly”


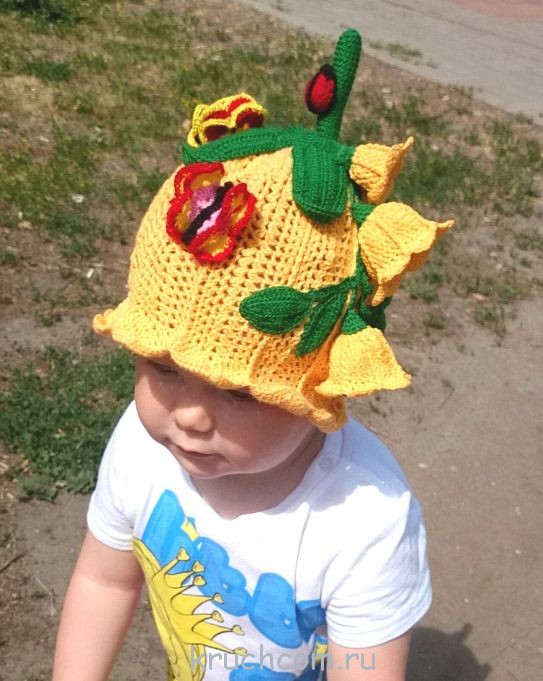
Competition work No. 21 - Panama “Chamomile Field”
Panama “Chamomile Field”
Yarn: Classic cotton yarn 100% mercerized cotton, 250 m, 100 g.
Hook: 1.75

Panama hat scheme:


Competition entry No. 19 – Panama hat “Caterpillar”
Panama hat “Caterpillar”

Yarn: spring, 100% mercerized cotton, 250 m, 100 g. Pekhorka
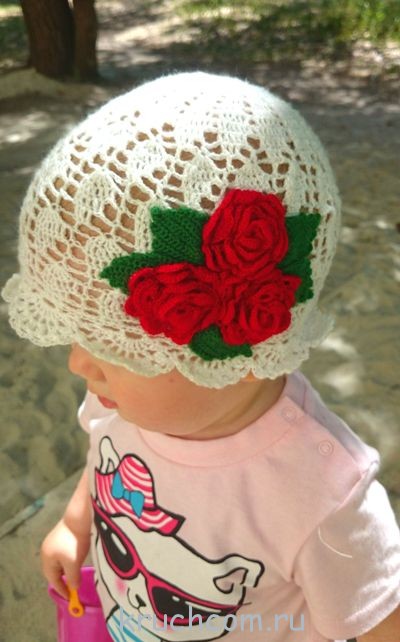
Competition entry No. 17 – Panama hat “Bouquet of Roses”
Hello. My name is Marina Voronova. I have been interested in knitting for a very long time. I am 24 years old. I have a little daughter. I love to please her with gifts in the form of new knitted things.
I present to you the summer bucket hat “Bouquet of Roses”. This Panama hat is very suitable for walking in hot summer weather.
Panama hat “Bouquet of roses”

Competition entry No. 16 - Summer Panama hat “Flower”
Hello. My name is Marina Voronova. I have been knitting since I was 12 years old. My mother taught me this art. Now I am 24 years old, I have a little daughter. I am happy to please her with new things that I knit with my own hands.
I present to your attention Panama hat "Flower". It is perfect for an evening walk on a summer evening. The Panama hat is very bright and your little one will not go unnoticed in the children's park. I hope you enjoy it.


For spring-summer you can knit these wonderful ones for little fashionistas Panama hats. Bright and floral, they will be a beautiful addition to any baby's outfit.
We will need:
yarn - YarnArt Begonia 169m/50g (consumption for the hat itself - 1 skein);
hooks - No. 2.1 and No. 2.5.
Abbreviations:
v.p. - air loop
СС - connecting post
RLS - single crochet
CH - double crochet
С2Н - double crochet stitch
С3Н - double crochet stitch
We take this pattern as a basis, but during the knitting process we will make our own adjustments.
The hat is obtained for OG 48-50 cm. 
Notes
Each row starts with 4 ch. - 3 lifting loops and 1 ch. for the arch. The hat pattern itself is knitted in the form of the so-called. “tick” - 2 dc, separated by 1 vp. into the arch of the previous row. The expansion of the bottom to the required diameter occurs by uniformly adding 6 “checkmarks” in each row. So that the corners in the places of increases do not stand out sharply, the increases in each next row are made offset by half a segment relative to the previous one.
So,
4 v.p. close it in a ring.
1r. - 4 v.p. (3 lifting loops and 1 ch for the arch), 11 CH.
2 rub. - in each arch of the previous row we knit 2 dcs, separated by 1 ch. It turns out 12 t.n. "tick".
3 rub. — we begin to make “tick” increases. In each subsequent row there will be six such increases. The essence of this increase is to knit an additional “tick” between the arches of the previous row.


4r. - make 6 tick increments every 3 ticks of the previous row.
5 rub. - make 6 tick increments every 4 ticks of the previous row.
6r. - we knit without increments. In each arch of the previous row we knit 2 dcs, separated by 1 ch.
7r. - make 6 tick increments every 5 ticks of the previous row.


8 rub. - we knit without increments. The bottom begins to round out a little.
9r. - make 6 tick increments every 6 ticks of the previous row.
This is where the increases end and we continue to knit the hats to the required depth without them. I'm pretty good with the number Pi; my bottom is 13 cm.
I got 26 rows from the beginning of knitting and the height of the hat to the brim is 17 cm.


For the fields we knit 2 rows of sc. In the second row we make increases in every 5th column. In the next row, in each top of the column of the previous row, we alternately knit 1 embossed column and 1 DC. That. crochet number 2.1 we knit three rows of fields. Then we change the hook to No. 2.5 and knit 2 more rows. The photo shows that the brim becomes perpendicular to the hat itself from the first row of knitting. We knit the last row in crab step with crochet number 2.1. In the last photo I showed what the seam looks like. The hat is ready!


NOTES
Perhaps this pattern will help someone when knitting fields. One Osinochka sent it to me in the form of a question. Option #1 is correct. We knit it in one column - embossed, in the second - regular, etc. 
The fields can and even need to be steamed.
Increases for fields can be made more often, the main thing is to ensure that they diverge evenly and do not go in waves.
ROSE
yarn - YarnArt Begonia 169m/50g;
hook - No. 2.5.
The size of the rose directly depends on the chosen yarn, hook and the initially selected number of chain stitches. in a chain. I never type them by sight, because... I often tie the same hats and “a little more - a little less” doesn’t suit me. But the first time, of course, you need to go through experience.
We take this diagram as a basis.

We collect a chain of 69 vp.
1r. - we knit a dc into the 5th loop of the chain. Then through one loop into the next ch. we tie the chains with 2 dcs separated by 1 ch. We knit that way. to the end of the row.
2 rub. - knit 3 ch. lifting and turning the work. In the first arch we knit another 1 dc, 3 ch. and 2 dc. Then, to the end of the row, we knit 2 dc, 3 ch, 2 dc in each arch.


3 rub. - we knit 9 dc into each arch of the previous row. We start the first petal with 3 ch. We roll up the rosette, and that’s it. It really takes a long time to knit the 3rd row, but it’s worth it.


LEAVES
We knit a chain of 15 ch. We knit a sc into the second loop of the chain. Then in each loop to the end of the chain - half-column, 2 CH, 2 C2H, 3 C3H, 2 C2H, 1 CH, 1 half-column, 1 RLS. We turn the leaf and knit in the opposite direction in a mirror order - 1 sc, 1 half-dc, 2 dc, 3 dc, 2 dc, 2 dc, 1 half-dc, 1 sc. We connect with the help of SS to the tip.


Next, using a SS (only through the leaf), we knit a groove in the middle of the leaf. We knit an additional 25 ch. - 10 v.p. for the stem and 15 vp. for the second leaf, which we knit similarly to the first. We return to the beginning along the stem using the same SS.


We dial 15 v.p. for the third leaf and knit it in the same way as the previous two. The branch of leaves is ready. In the last 2 photos I showed how you can twist them. The first one shows a standard branch peeking out from under something. In the second photo the leaves are located as on the 3rd hat from this MK. 

FLOWER
We take this diagram as a basis. We won't change practically anything. But I always have room for the 7th leaf, although there are six of them in the original. Well, in the original the flower is in bud, but mine is always in full bloom.

You can start with 2 ch. and in the first of them knit 12 RLS. Or you can make a lazy loop like I did and first knit 1 ch from it, and then 12 sc and pull the free end. That. You can tighten the middle tighter.
Next we connect it into a ring using a SS and knit a ch from the first tip. and RLS. 


We knit 11 ch. (10 v.p. - the base of the future petal and 1 v.p. rise). We knit a sc into the second loop of the chain, then into each top of the chain - 1 half-column, 6 dc, 1 half-column, 1 sc. (All columns are knitted into 1 half-loop of the chain, because then you will need to tie the second half-loop so that the third one peeks out.) Attach the petal to the base-middle, knitting one from two columns of the base. We collect a chain of 11 vp. and knit the second petal in the same way. That. All subsequent petals are also knitted.


The binding can be made in a contrasting color, or the same color. We attach the thread and, using the sc, tie all the petals one by one behind the back half-loop. At the top of each petal we knit 3 ch. Probably so that the ends are sharp. Look like that's it.


I made the headband on the last hat by twisting 6 threads of different colors into a rope, pulling it through the hat, tying the ends and weaving them into a braid, which I twisted with a monogram and sewed on. The monograms themselves can be made in different ways. You can knit chains from vp. and sew them on, or you can use a chain stitch. This is something closer to someone. On holey hats, I like to lay it out the way I want, and then sew it.
Panama "Bee's Happiness" and its derivatives


 You will need:
Yarn - Yarn Art Begonia, 100% cotton, 169 m/50 g. For OG 48-50, consumption is 1 skein.
Hooks - No. 1.5, 2.1.
Notes:
The Panama hat consists of 16 reports and is designed for a width of 48-50 cm. To increase or decrease it by 1.5-2 cm, you can add or remove one report. Each row begins with 3 lifting loops.
So, let's begin.
Hook No. 2,1.
5 v.p. close in a ring.
1st row - 3 v.p. lifting, 15 CH.
2nd row - from each column of the previous row we knit a relief column and separate them with 1 ch.


3rd row - in each vertex of the column of the previous row we knit simultaneously 1 dc, 1 relief column, 1 ch. = 1 report.
4th row - DC, vp, relief column, vp. That. from the dc of the previous row we knit a dc, from the embossed column - a raised one.


5th row - from 1 dc of the previous row we knit 2 dc, 1 ch, from a relief st. - embossed, 1 v.p.


6th row - from 1 dc we knit 2 dc, then sequentially into each end of dc, 1 ch, relief stitch, 1 st. P. 

8th row - from 1 dc we knit 2 dc, then into 2 ends of dc before. row - 2 dc (we skip the 4th vertex), 1 ch, relief st., 2 v. p. Starting from this row, the pattern will shift due to knitting 2 dc in the first vertex and not knitting dc in the fourth.
Then we knit all rows like the 8th to the required depth. I got 25 rows. 
Change the hook to No. 1.5 and knit 2-3 rows of sc. In the last row we make increases in every third column. Next, from each column of the previous row we knit 1 CH, 1 relief. art., 1 CH, 1 relief. Art. etc. The brim should vaguely resemble a 1x1 rib when knitting.
That. Using hook No. 1.5 we knit 3 rows of fields, then change the hook to No. 2.1 and knit three more rows. We tie the fields with a crochet step with crochet number 1.5. Panama hat is ready. The Panama hat needs to be steamed. If desired, the fields can be starched a little. Mine are unstarched. 
 Schemes for daffodils and bees:


 We wish everyone endless inspiration and sunny mood!
Evgenia Smirnova
To send light into the depths of the human heart - this is the purpose of the artist
Content
Craftswomen know that knitting panama hats is considered an easy task that does not take time and does not require deep knowledge. You will need basic basics, which can be used to knit an original headdress that protects the child from the sun and wind. There are many patterns that are knitted using simple patterns.
How to crochet a baby hat
The classic and simplest crochet hat for a girl is always made of two parts: first, the bottom is crocheted to the top of the head, and then the fabric of the hat itself is crocheted. To determine the depth of the product, measure the circumference of the head at the widest point, then subtract up to 5 cm for the density of the cap. Crocheting panama hats for girls suggests that the second measurement is taken as the length from the top of the head to the line just above the height of the eyebrows - this will be the length of the fabric.
There is a simplified scheme for calculating the parameters of knitted panama hats:
- product depth = head circumference/3 + 1 cm;
- if a child with a head circumference over 50 cm, then add 1.5 cm;
- there are special tables on the Internet that show the dependence of the depth of the cap and the diameter of the bottom on the age of the child, as well as online calculators;
- To make knitting easier, you can make a full-size pattern so you can refer to it as you make the Panama hat.

The bottom diameter is defined as the circumference at the widest point divided by Pi. The general principles of creating a knitted Panama hat come down to knitting the bottom in a circle with adding loops; after reaching the desired diameter, the increases stop, and the height of the crown is determined during fitting. If the Panama hat has a brim, then in the 1st row at the bottom of the crown, increases are made by knitting 2 stitches in every second loop. To give the product a shape, a rigid fishing line is inserted into it, starched, and decorated with ribbons and flowers.
There are many options for knitted panama hats for babies for the summer, so you can get acquainted with the popular ones:
- hats decorated with flowers;
- small headbands;
- Panama hats with edging;
- two-color hats;
- openwork with ribbons;
- light beret;
- with margins;
- with holes for hair pulled back into a ponytail;
- bandanas.

Crochet Panama hats for girls with patterns
Many mothers say that a crocheted Panama hat for a girl is a way out of a situation when you want to please your child with a beautiful new thing. You can buy a similar product in the store, but it will be more expensive. Hand-knitted panama hats and crocheted hats for girls will cost less, will take a couple of evenings to make, and their variety will delight any young fashionista. There are many hat knitting patterns, photos and detailed video tutorials that can be found online. To make it easier, we use the following conventions:
- VP – air loop;
- RLS – single crochet;
- CH – double crochet;
- RS – relief column.
Panama hat with holes for crochet ponytails
To knit a simple Panama hat for a girl, you will need a 2.5 mm hook and 50 g of natural fine Iris cotton yarn. Master class on creating a cap with holes for hair:
- Dial the required number of VPs and connect them into a ring.
- Knit 5 cm in a checkerboard pattern alternating 3 ch and 3 dc.
- Continue knitting along ¼ of the length of the hat until the desired height is reached.
- Sew the edge of the strip to the rim to form a base.
- To create holes for ponytails, you need to tie the edge according to the pattern: in the first row - 3 lifting VPs, for the pattern you need to alternate RLS, 5 VPs, again RLS and 4 VPs. In the second row, 9 DC and RLS are knitted over 5 VP, in the third row - 3 VP, 7 DC alternate with 6 VP.
- Tie the edge with contrasting color threads in single crochets.
- Knit the fields like the edges of the CH openings, expanding the circle, tie the edges with white thread, like the main part.

Openwork summer panama crochet
You can diversify panama hats for girls with an openwork pattern of daisies. This model includes 16 repeats, each row of which should begin with 3 lifting loops. Master class on creating an openwork product:
- Using tool No. 2, cast on 5 ch, create a ring, knit 15 dc.
- In the second sequence, the column turns into RS, separated by 1 VP.
- In the third, rapport follows - each top of the column of the previous row is knitted simultaneously with CH and RS, and a VP is added.
- Fourth – CH, RS, VP.
- The fifth is repeated as the third.
- Sixth - 2 CH are knitted from CH, then repeated as the third.
- The seventh is like the sixth.
- The eighth is like the sixth, but the 4th vertex is skipped so that the pattern shifts.
- Knit 25 sequences as the eighth, change the tool to No. 1.5.
- Work 3 sequences of single crochets, increasing in every third stitch in the last row, knit an elastic band, alternating 1 dc with 1 dc.
- Tie the fields with a crawfish step - the job is ready.

Crochet Panama hat with brim
Mothers admit that crocheting a panama hat for a girl with a brim is not easy, but for beginners there is a master class with a detailed explanation of each step:
- Using tool No. 2.5, dial 6 VP, connect with a half-column.
- Knit 6 sc, 1 connecting half-stitch, 1 lifting loop.
- In the second sequence, each loop is knitted with 2 sc.
- In the third, 2 RLS and 1 RLS alternate, in the fourth, 1 more RLS is added to the pattern.
- This is how several sequences are knitted with alternating multi-colored threads.
- When the desired diameter of the bottom is reached, rows alternate with increases with and without sequences - by 1.5 cm.
- After this, the main fabric is made without any additions.
- To knit the fields with the same thread, you need to knit a sequence of single crochets, adding 1 sc to each 3 loops, repeat the 2nd row with an addition in each 5 loop, and 3 in each 7. Knit 9 sequences without adding.
Video: how to crochet a Panama hat
Found an error in the text? Select it, press Ctrl + Enter and we will fix everything!They find their place until the next autumn-winter season.
Despite the fact that the hot summer will not come soon, the spring sun may very well heat up your baby’s head and cause heatstroke. Therefore, be sure to make sure that your child’s wardrobe includes panama hats and summer berets by the end of the winter period.
When the bright sun is shining outside, put a light wide-brimmed Panama hat on your child's head, which will not only protect against sunstroke, but also save the delicate areas of the neck and ears from sunburn.
Today you can buy very beautiful sewn panama hats for boys and girls. But you can knit comfortable and original hats for the summer with your own hands. Lightweight Panama hats for children, crocheted from cotton yarn, are very comfortable and allow the scalp to breathe well. Children are very active and often the baby’s head under a purchased hat is simply wet with sweat after active street games! A crocheted Panama hat (or a hat with a visor) will help avoid such problems.
Absolutely any woman can crochet a stylish and child-friendly baby hat! It is enough to master the simple basics of crocheting and learn to read diagrams describing the stages of work. In this material you will find step-by-step master classes for beginning needlewomen on crocheting panama hats for children with diagrams, detailed descriptions, photo and video lessons. It is also important to learn how to choose the right quality yarn suitable for knitting children's clothes and a hook of the appropriate size (by number). Knitted headwear for a child can be additionally decorated with elegant decorations (flowers, butterflies for girls or airplanes, cars for boys), which are also very easy to knit with your own hands.
For boys, more classic and formal Panama hats with various “boyish” decorations (cartoon characters, trains, boats, cars) are often knitted. Models of hats for children with and without brims, with a visor in the form of a cap, look very stylish. Panama hats for girls are often decorated with strings, designs, and flowers in the kanzashi style.
2. USEFUL TIPS FOR BEGINNER KNITTERS. PREPARATION FOR CROCHETING CHILDREN'S PANAMAS
10 tips:
If you are crocheting for the first time, then choose a plain light yarn. Melange threads consisting of several different colors are not the best option for a beginning knitter, since the loops are not very clearly visible while working.
Before you buy the yarn you like for knitting hats for children, be sure to study the composition of the yarn. It is not advisable to buy fleecy angora, mohair, threads with lurex, or polyamide for knitting children's clothes. The less synthetics in the yarn, the more suitable it is for knitting clothes for children. Composition of yarn for summer children's hats may include cotton, high-quality acrylic and viscose, silk (for warm hats - alpaca wool or merino wool). To knit children's panama hats for the summer, you can choose yarn consisting of 55-60% cotton plus a little acrylic and silk viscose (to improve the wearability of the knitted product and safe washing).
When choosing yarn for crocheting, be sure to pay attention to how the thread is twisted. On sale you can find yarn consisting of poorly twisted 3-4 threads. It is very difficult to knit with such threads, since during work individual threads get caught and you need to constantly control each hook with a hook.
Choosing a suitable crochet hook. It is best to use a metal hook with a plastic handle. It is important to choose the correct hook number (which corresponds to the thickness of the tool). The upper part of the hook should not be too rounded (since it is difficult to pierce the knitting fabric with such a hook), and also not too sharp so as not to injure your fingers. During operation, the hook is held in the same way as the handle and the upper part of the tool is directed towards you.
While working, the end of the thread must be thrown over the index finger on the left hand (if the hook is in the right) towards yourself and held with the thumb. The loops on the hook can be held with the middle finger of your right hand
Be sure to knit a sample of the future product before starting work. Knit the fabric in the form of a small rectangle. You can wash, steam the sample, and let it dry. This way you can more accurately select the size of a hat for your child. , taking into account the density of the knitting.
In the process of knitting panama hats and many other hats, the napkin principle is used. At the very beginning of the work, you can make a self-tightening ring or a ring of air loops (if you want there to be a hole at the top of the headdress).
You can wind the end of the thread around your finger several turns and knit 6-8 single crochets, inserting the hook into the resulting loop. All you have to do is pull the thread a little and it will tighten. After this, you can continue knitting according to the pattern of any napkin (for example, with a fillet mesh). In order to accurately select the size of the bottom of a Panama hat, you can measure the circumference of the child’s head and divide the result by 3.14. The diameter of the flat part of the headdress is approximately 16-21 cm.
Start gradually reducing the increases after the edges of the future panama hat begin to bend. Knit a few more rows and do not add any more loops, forming the depth of the children's Panama hat
If you do not plan to knit the fabric, forming fields, then you can knit several columns in a circle (taking, for example, yarn of a different color - more contrasting).
If the Panama hat model includes brims (especially important for protecting very young children from the sun), then continue knitting the fabric, adding loops to the desired width.
If you want to make a visor instead of a continuous brim of a Panama hat, then knit single crochets so that it is denser and holds its shape. Closing the loops is done gradually from the edges to the center, and not simultaneously.
Crocheted bucket hats for children will look especially stylish and modern if you decorate them with thermal appliqué, embroider several figures on the top of the hats, or sew crocheted flowers to the brim (models for girls).
Basics for beginner needlewomen:
- How to form a chain of air loops with crochet, as well as knit double crochets, double crochets, half double crochets, knit stitches and purl stitches.
- What do the symbols mean on knitting patterns?
- What simple patterns to start learning crochet with.
Now let's move on to the crochet lessons with a description of the stages of work with photos for beginner knitters.
3. DESCRIPTION OF CROCHETING STEPS AND PATTERNS. MK ON KNITTING MODERN PANAMAS FOR BOYS AND GIRLS
Master class 1
Master class 2
KNITTING WITH YOUR OWN HANDS
Summer panama hats for girls - a lot of MK and patterns
How nice it is to look at kids dressed beautifully and fashionably! Today I want to show you what kind of panama hats you can knit for your child. Of course, the choice of hats in stores is huge, but what could be nicer than making your son or daughter a comfortable and practical headdress with your own hands!
|
|
|
|
|
|


For the fields we knit 2 rows of sc. In the second row we make increases in every 5th column. In the next row, in each top of the column of the previous row, we alternately knit 1 embossed column and 1 DC. That. crochet number 2 we knit 2 rows of fields. Then we change the hook to No. 2.5 and knit 2 more rows. We knit the last row in crab step with crochet number 2.

The flowers are connected according to the pattern:


Panama *freedom of ponytails*


Hook No. 2


We knit according to pattern 1.

Here are my strings!

Begin!


3rd row

4th row

5th row

6th row

7th row

8th row


10th row

11th row

12th row

13th row

14th row

15th row

16th and 17th row

Wedge diagram

18th and 19th row

Rows 20 and 21


Scheme No. 2


Hook: No. 2


Hat pattern:

Field scheme:

Daisy pattern:

8.


10.
11.


17.
The hot season has come and all mothers know very well that it is better not to go outside without a panama hat and a hat. Of course, you can buy a beautiful Panama hat in a store, but if you know how to crochet, then it is better to knit a Panama hat from 100% cotton yarn. And most importantly, in the case of knitting, your imagination can be combined with the interests of the child; in this selection of knitted panama hats and hats you will see this.
You can even knit more than one panama hat, because there are different occasions and outfits. Or you can tie various removable decorations to one hat and then your one hat turns into several at once. So let's choose the most beautiful panama hat and start knitting...
A very delicate snow-white Panama hat with a flounced brim will look good with beautiful, elegant dresses.
Your little one will love the playful frog hat, and the mesh pattern is perfect for summer hats.

For lovers of the cartoon “Smeshariki”, fashionista Nyusha has found her embodiment in this perky hat.

A very cute hat with square motifs in white and yellow tones that will suit almost any summer outfit.

Competition entry No. 47 – Panama hats for a 6-year-old girl (Elena Vdovina)
Panama hats for a 6 year old girl
Materials: 1 skein of Semenovskaya Kable yarn 430 m/100g white 100% cotton, Kable yarn 430 m/100g pink 100% cotton, hook No. 3, decoration (for example a flower from a hair elastic)


Competition work No. 43 – A set for a girl for the summer: a sundress, a blouse and a Panama hat (Yulia Reznitskaya)
Suitable for approximately 9-18 months, but I think a girl can wear it longer.


Competition entry No. 8 – Knitted sundress and hat for a 1-1.5 year old girl (Yulia Pavlenko)
Hello! My name is Pavlenko Yulia Viktorovna, I have been disabled in group 1 for 4 years. I knew how to knit since childhood, both with crochet and knitting, and now I took up this business with a vengeance.
Set for a girl 1-1.5 years old (length 42 cm). And the same sundress in yellow.

|
|
|
|
|
|
“Any fashionista knows: you can never have too many hats!!!”
This hat is knitted on the ob. heads 50-52. The work used Lotus threads (100% mercerized cotton, 100 g/250 m) and hooks No. 2 and No. 2.5. The hat took about 70 grams of thread.
According to this pattern, we crochet No. 2.5 with a crown to the required depth.
For the fields we knit 2 rows of sc. In the second row we make increases in every 5th column. In the next row, in each top of the column of the previous row, we alternately knit 1 embossed column and 1 DC. That. crochet number 2 we knit 2 rows of fields. Then we change the hook to No. 2.5 and knit 2 more rows. We knit the last row in crab step with crochet number 2.
The flowers are connected according to the pattern:
(for a smaller flower in row 1 I typed 5 vp, not 7 - further by analogy with the diagram).
The middle is knitted sc: make an “amigurumi ring”
dial 8 sc, close the row, tighten the “amigurumi ring”. Row 2 - increase in every 2nd stitch. 3rd row - knit without increases, i.e. 12 sc. Collect flowers and sew on hat. The hat is ready!!!
Panama *freedom of ponytails*
I knitted it like this: I started from the top of the head. I knitted a rectangle 8 cm wide and 16 cm high, then, without breaking the thread, I picked it up in a circle to the desired width (you can try it on at the head), and then knitted it in a circle according to the same pattern to the desired depth.
The frill is knitted according to the well-known pattern without row 5 (pattern not mine).
The flower is crocheted from 5 petals. Connect all the petals along the wrong side with 4 single crochets. Steam the entire flower and sew on a bead.
I knitted a hat for a head size of 48-50 cm.
Hook No. 2
- COCO yarn (Vita Cotton) Composition: 100% mercerized cotton. Thread length 240 m. Skein weight 50 g.
Well, let's start knitting! We will need 1 skein of 50 g 100% mercerized cotton (I will knit with Pelican 50 g - 330 m) and hook No. 1
We knit according to pattern 1.
Here are my strings!
Begin!
We collect a chain of 8 v. p., close it in a ring
2nd row - you get 8 wedges, if you have thicker threads, you can try 7 wedges, then we knit into a ring not 24 st/n, but 21 st/n
3rd row
4th row
5th row
6th row
7th row
8th row
We knit the 9th row no longer according to the pattern where we knit the wedge 5 st/n 1 in. p 1st/n 1v. clause 1st/n 1c. clause 1 art./n 1st century. p 5 dc, between the wedges also 3v. P.
Starting from the 10th row, we knit 5 st/n in wedges on the sides, and between them we knit a fillet mesh, increasing each row by 1 st/n, still 3 in between the wedges. P.
We knit from row 10-14 as I wrote above
10th row
11th row
12th row
13th row
14th row
15th row
Let's continue! I knitted with an increase until the 15th row, then we begin to decrease, the 16th row - we reduce the number of st/n in the wedge by one - I had 9 st/n, it became 8 st/n, etc., i.e. we decrease in each subsequent row number of st/n in a wedge for one. Next, from the 17th row, we begin to knit the fillet mesh between the wedges: in the 16th row we had 3 ins. p between the wedges, and in 17 - 2c. p, 1 st/n, 2 v. etc., increase the number of dc between wedges by 1 in each subsequent row, good luck, photos later!
16th and 17th row
Wedge diagram
18th and 19th row
Rows 20 and 21
Scheme No. 2
If the depth of the cap is not enough, you can knit several rows of fillet mesh.
Take a closer look at the photo of the white hat, I have 5 rows down to the brim, if you have enough depth, then start knitting like this:
1st row - 2 dc in each cell of the grid, skip the jumper between the cells (if you knit a larger number of dc, for me personally the volume of the hat has even increased too much);
2nd row - for every 4 dc - 3 dc and 1 st. etc. etc
Rows 3, 4 and 5 are like the 2nd, only in a checkerboard pattern;
We knit the fields according to pattern 2 without changes
The bottom diagram is not complete, there should be another row with an extension, where the extension goes through 3 fans. I’ll try to explain in words, because I’m unlikely to be able to draw better. For the bottom, the repeat of the pattern in height is repeated 4 times, the first time by 6 fans, the second by 12, the third by 18, the fourth by 24, and then it is knitted without increases, i.e. 24 rapports are just enough to fit the head circumference. The expansion is due to an arch of 3 ch, which is knitted in a row between fans of 7 dcs. (then in the next row the hdc is knitted into this arch). First these extras. the arches are knitted between each fan, then after 2, then after 3. In words it seems a lot and complicated, in fact everything is very simple, I didn’t even tie the bottom, the first time and without any pattern, this extension of the pattern worked out well for me
Flowers for decoration are also by eye. 6 v.p. close in a ring.
2nd row: *2dc, ch 7*, repeat 6 times.
3rd row: each arch of 7 vp. tie *sc, hdc, 10 dc, hdc, sc*, sl st in dc of previous row.
Tie a flower with a contrasting thread *SS, ch*
Panama hat is knitted from chamomile yarn, hook number 2, head circumference approx. 50cm.
After the Panama hat is knitted to the required depth, the row that comes after the fans (3 sc, 5 ch) is tied with sc, then a row of arches is knitted, 5 ch each. (2 pieces per 1 pattern repeat). And then the fields according to the fan pattern. At the base of the fan I knitted 9 DCs, in the last row I replaced 3 DCs tied together with 2 DCs together, and then tied the fans with arches of 3 chain stitches. I also stretched a ribbon along the last row of the pattern.
Head circumference: for any circumference.
Yarn: “Ivushka” Semenovskaya yarn (50% cotton, 50% viscose, 430 m/100 g).
Hook: No. 2
Description: Crochet Panama hat for girls
We start knitting a children's panama hat from the top of the head.
To do this, fold the thread into a ring.
1st row: tie a ring of thread. 3 chain lifting loops, *chain loop, double crochet* - repeat 13 times, chain loop, connecting loop (we close the knitting in a circle). Tighten the ring by pulling the non-working end of the thread.
We knit a circle according to the pattern to the required diameter.
After knitting a circle of the required diameter, we knit without increments: *double crochet, chain stitch* to the required depth. We insert the hook under the arches of air loops.
Then use white yarn to knit 3 rows with single crochets.
Tie the edge of the Panama hat with openwork scallops.

Pattern for crocheting the edge of a Panama hat.

The hats are knitted for 5-6 years, for a head circumference of 52-53 cm. Threads are 100% cotton, Lily from Yarn Art Turkey. Hook No. 1.5.
crochet knitted hats
Hat pattern:
Field scheme:
Daisy pattern:
I hope you like my work too.
8.
10.
11.
17.
Crochet Panama Hat
Panama hat "Gloxinia". This is the name given to this model of Panama hat, because... she reminds me very much of this flower.
Crochet a summer openwork panama hat for a little girl.
Head circumference: 49 cm.
Yarn: Etamin (100% acrylic, 250 m/50 g).
Hook: № 1,5
Description of work: Summer crochet hat for girls
We start knitting a children's panama hat from the top of the head.
To do this, fold the thread into a ring. Tie a ring of thread with 9 single crochets.
Tighten the ring by pulling the non-working end of the thread. Close it into a ring with a connecting post.
2nd row: 3 chain stitches, *1 chain stitch, 1 double crochet in the next stitch of the previous row.

Crochet pattern for a Panama hat.
Then tie the Panama hat with 3 rows of single crochets.
Tie the edge of the Panama hat with openwork scallops.

Pattern for crocheting the edge of a Panama hat.
Photo: Summer crochet hat for girls:

Attention! If you liked our crocheted Panama hat model and you crocheted it for yourself according to its description, and now you want to show your work - you can place it yourself on this page under the description of this model - click on the green button "Add a photo of your work". We would like some brief information from you - what is your name (name or nickname), what city are you from, what materials were used and how the work progressed (was it easy or were there difficulties), wishes and suggestions.
We are waiting for your works!
Your works
 "My name is Olga, I am 34 years old. I found a description of a children's Panama hat on your website (exactly what I was looking for), thank you very much!!! I am sending you a photo of my work. I knitted a Panama hat for the first time, so don’t judge too harshly."
  "My name is Elina, I am 25 years old. I really liked the Panama hat model. Knitted in one go! Thanks a lot!"
  Catherine
 Alsou
Alsou
“I really liked the hat, this is what I got.”  Svetlana Cheboksary city
"25 years. COCO yarn, hook No. 2. Thank you for!!!"  Natalia from the Moscow region.
“When I saw your Panama hat, I fell in love with it. I knitted two hats at once in one go. And I’ll probably knit more than one. It’s a pleasure to knit it. Thank you very much for the pattern and description!”  Irina, Tallinn (Estonia)
"Thanks for the idea!"  My login on the site: KrishnaRama
"I knitted a panama hat from Pelican threads 100% cotton 50g/330m. The color is peach, the threads are very thin, not the whole skein is gone, there is a little left. The hook is 1.4 mm."  Elena Moscow
“This is how I got the ALIZE DIVA yarn hook 1.5. Thank you very much for the detailed description, I would like more models for children.”
Thanks to everyone who sends photos!
Size: 6-7 years, head circumference - 51-52 cm
You will need: 50 g lilac yarn (100% mercerized cotton, MAXI, weight: 100 g, length: 565 m), hook No. 1, satin ribbon, regillin.
Description of work:
Cast on 6 air loops, close them in a ring and knit according to pattern 1 until the bottom reaches the required diameter, in our case 16.5 cm.


Now let's move on to the fields. We knit the fields according to pattern 2.
Flower
Knit according to the pattern, make the core of the flower using the technique described below, and sew it into the center of the flower. Make the middle of the flower according to the principle of the Irish berry: wind the thread around a pencil 8-10 times, carefully remove the resulting ring from the pencil and tie it with a st. b/n, inserting the hook into the center of the ring. Connect a row of connections. column. Next, continue tying the row in a circle, st. b/n, inserting the hook not into the loops of the previous row, but into the center of the ring.


Insert the ribbon into the fillet mesh, sew on the flower and your hat is ready!

Crochet summer children's hat with “Rose” brim

Size: 2 years, head circumference - 48-49 cm
You will need: 50 g of pink yarn (100% mercerized cotton, Alize Miss, weight: 50 g, length: 280 m, No. 170) and 5 g of milky color (No. 62), hook No. 1, regiline, satin ribbon.
Description of work:
Cast on 8 chain stitches with pink thread, close them in a ring and knit according to the pattern

We knit regilin into the last row. In order for the fields to hold well, it is better to use two regiline fishing lines at once. We measure the required length close to the fields of the regilina, make a “double” ring (I carefully connected the fishing line with a thin layer of tape). And we tie it with single crochets in a circle.
Roses (2 pcs.)
Tie 2 roses: pink and milky.
For the rose, dial 59 ch.
1st row: 3 ch. rise, st. s/n in the fourth loop, vp, * st. s/n in the next loop, vp, st. s/n in the same loop - it turns out the letter V, ch. * - repeat until the end of the row. It should be 30 V.
2nd row: 3 ch. rise, st. s/n, 3 vp, 2 tbsp. s/n in the same arch of the letter V, * 2 tbsp. s/n, 3 vp, 2 tbsp. s/n in the next arch of the letter V * - repeat until the end of the row.
3rd row: 3 ch. rise, 8 tbsp. s/n in the arch of the double letter V, * 9 tbsp. s/n in the next arch * repeat 6 times.
Twist the resulting braid in a circle and sew it with thread, as in the photo.
Sew roses to the hat.
To shape the hat, I sprinkled it with water and pulled it onto the shape (jar, ball, ball).
Pull the satin ribbon in and tie it with a bow at the back.
The hat is ready!!!

