Original crafts for Easter. Easter. Easter crafts Easter. Easter crafts
Good morning everyone! Just a little more and another Orthodox holiday will come, which will be celebrated by all residents of Russia, and not only. We are talking about Easter, namely about what crafts can be done together with children of preschool and school age for this day.
You can make such wonderful souvenirs and creations with your children right at home, because all you need is your desire and desire. Therefore, I suggest you think about this topic now and choose what you would like to do, and then give it to someone or simply decorate your home.

If you want to find a more complex thing, then perhaps you will like this version made from salt dough.

I also love compositions that have a lot of toys and are bright and eye-catching.

Master class on making eggs from foamiran
Are you familiar with this fabric material? I think yes, how cool it is, just like felt, I’m in love with it. I suggest making this craft in the form of a refrigerator magnet. You can, in principle, hang it on a string like a pendant.
We will need:
- Styrofoam egg - 1 pc.
- scissors
- cutter
- foamiran (1 mm) 2 colors - yellow and white
- magnet
- glue gun
- factory eyes

Stages of work:
1. Take a hairdryer and heat the fabric, and you need to do this quickly, and stretch it over the egg.

2. They pulled it like this, and then applied a hairdryer, held it for 11 seconds and that’s it, turned it off, waited until the fabric cooled down.

3. These are the blanks you will get.

4. Now, using a cutter or utility knife, cut the stencil in half.

5. First put the egg into the yellow foamiran.

6. And then cut off the excess fabric into white.

7. Then cut the white one in half, you can imitate cracks as if by cutting them in a zigzag, there are also special wavy scissors.

8. Then prepare the eyes, make the legs and beak themselves.

9. Well, now the most important thing is the assembly. Carefully glue the yellow template first.

10. Then move on to the white.

11. After starting to design the legs, eyes and mouth, glue the parts with a glue gun.

12. What a wonderful baby he turned out to be, pee-pee-pee.

13. Glue a magnet on the other side, you can take a vinyl one.

14. You get two young weirdos, you can make a boy and a girl, and pin on more bows or other patterns to your taste.

As an option, you can do something else, for example, such a charm in the form of a flower with a handle.

Original crafts for Easter for a school competition
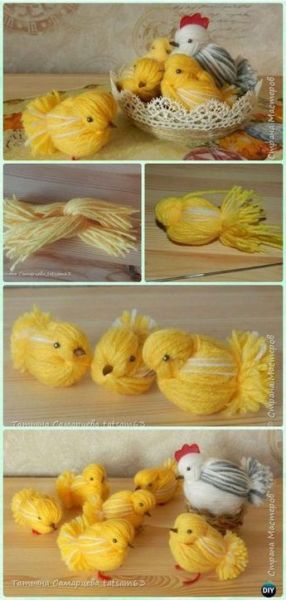
Any student approaches this issue quite responsibly and he really wants his work to become the best. You can come up with a whole lot of options. But, of course, it will be better if you make Easter symbols. For example, these funny chickens, which are made from ordinary woolen knitting threads.
You can use this step-by-step instructions as a basis.

You can use another option. In any case, the result should please you. Here they even made a mother chicken, and also wove a stand in the form of a plate from the same threads.
You can also make Easter eggs from threads, are you surprised? But I don’t, after watching this video you will learn how to make things.
For elementary school children, you can make a mischievous cockerel, which is made from a paper cylinder.

Or I was still hooked by such a brilliant idea, to make chicks out of what they say was. And I had cases for Kinder Surprise. Here is such a funny family that turned out to be yellow))).


You can also make something like this in the form of chicks from cardboard and thread.

And if you want to make a splash on everyone, then make a product from plaster. I think that the commission and jury will definitely appreciate such a cool souvenir and reward it with a gift.
There are also ideas for souvenirs and gifts made of beads, but I will say this too, a lot of work and skill, I remember as a child I was fond of this type of activity, now I don’t have enough hands to sit down. But just for you, I found an easy way of weaving, or rather, it will be specifically for beginners, you just have to put beads or beads on a thread, and then glue the eggs onto the surface.
Of course, this will make your actions much easier. After all, you can also weave, but to do this you need to understand the diagrams and all the symbols. And here, any beginner can handle it, so catch it.

The main thing is to take a very good glue, for example PVA, and one more thought, you can not put it on the thread, but simply glue each bead separately, but this is more difficult.

As for the patterns themselves, in case you are a master and know how to weave, I suggest making a grid like this.

It turns out just great, class!

Or do you like the mosaic technique? I have a diagram from her).

How do you like this work? Wow, it’s breathtaking.

But if you still have any questions, then it’s better to take this model and do the work together with this author of this master class.
Of course, if you are interested in needlework or knitting, then you can also make a souvenir, for example this one. If you need a diagram, I will be happy to send it to you, it was taken from one magazine. What cute and cheerful little beadies they turned out to be, or little Easter cakes for needles.

But, by the way, you can also make knitted lilies of the valley, because it already smells like spring!

If you are good at drawing, then make a picture out of paints.

Or with the help of glue and cardboard, as well as all kinds of cereals, such an Easter masterpiece.

And here’s another thought for you: if you have multi-colored pasta lying around the house, then you can also make this kind of work out of them. What a delight, isn't it?!

How to make quick and easy Easter gifts from paper
In my opinion, these are the types of works that are most popular, because these are the materials everyone has in their home. The first thing that comes to my mind is egg cups. Well, they drew it, cut it out, then gave it to the kids to color and another children’s miracle masterpiece is ready.


Make these oddballs yourself, cut out the details and paint them, if you need templates, please ask, I will send them by email for free. Not really funny little animals.


Well, as always, you can’t do without my favorite vytynanki. This is just a custom or tradition. See what Easter bunnies can come out, plus decorate them with satin ribbons, if you need a template, write at the bottom of the article, I’ll send it for free.

In general, it will be cool and cute.


You can also take any sheet, fold it and glue it into a cone and the result will be something that resembles a bird.

With our youngest kindergarten representatives, I suggest making a paper craft using a base in the form of circles.

And those who are older will like the hatched chick.

The work is also good in the form of an applique; you can do one in a labor lesson with elementary school students.


You can, of course, combine two types of activities: Art and Technology.

By the way, you can just take regular colored pencils and do this, I also have a template for this stand in my piggy bank, so if anyone needs it, write to me.


You can make a product in a very original way without using glue, but instead take a stapler and fasten the parts together, see what comes out.

What do you think of this idea for a stand? It looks really cool, and can you imagine how much pleasure your kids will have making it?

I can also suggest printing out such a blank template.


Or this black and white version on your printer.

A great option would be a souvenir on a stick.


Or this green meadow with birds.

I also liked such a simple idea as a refrigerator magnet that can be decorated with rhinestones or scrapbooking materials.

Well, in conclusion, I would like to show the stages of work of a three-dimensional craft.

Step-by-step instructions for creating crafts from cotton pads and sticks for Easter for children
We'll probably start creating right away a small and very charming little yellow naughty boy called Tsypa. We will need a bunch of cotton swabs, or rather their tips. You will need to paint some yellow by dipping it in gouache, and leave some white. Make this craft, that is, make the base from plasticine, and then simply stick the sticks into it.
Important! You can draw the eyes yourself or find a picture and print them out.

For the next job you will need your good mood and, of course, materials.
We will need:
- cotton pad
- disposable spoon
- colored paper
- felt-tip pen
Stages of work:
1. First of all, make the blanks, that is, cut out the beak and scallop from colored paper. In this photo everything is visible and shown.

2. Next, draw the wings and then glue them onto a cotton pad. Place a spoon in the center and cover with a second cotton pad. Draw a face and voila, such a beauty can sit in your pot with your favorite flowers and crow).
What other interesting things can you do? I had ice cream sticks lying around, so I connected them together and glued on the eyes and beak, it turned out to be a wonderful animal. By the way, don’t forget about the paws either.

The easiest option would probably be this product, which can also be made with a child of any age; you need to paint the discs with gouache or watercolors, and then build such beauty.

You can design this in the form of an applique, and using cereals, it also looks great, and it resembles the painting A bird pecking at grains.

In general, choose according to your taste and color, and do not forget to write your reviews and wishes.


Look what a baby chicken it turned out to be, though it’s white.

You can also make a picture, together with willows and also from cotton pads. Doesn't it really look cool? Yes, it’s unusual and beautiful!

Beautiful crafts for Holy Sunday for kindergarten
Of course, preschoolers need ideas for what is easier. so that the kids themselves can cope with the task and can amaze everyone.
What could be easier and faster if you teach them this funny toy, also called a walker. Once, by the way, we did it with you, remember? When it came to puppet theater, I gave you ready-made templates.


Ha, and when I saw this face, I actually blossomed, I never cease to be amazed that so many crafts have been invented from the ordinary little hands of our kids, it’s simply too many to count.

You can, together with the children in the preparatory or senior group, engage in visual arts and make just such a chicken (cockerel) that will have multi-colored wings.

And for children of the second junior and middle group, here is such a simple masterpiece. In just one thing, you can repeat what kind of bird this is, and where its eyes and other parts of the body are.

Or this funny design made from a baby’s leg and paints.

You can also make applique on regular paper plates.

Here's another unusual pencil holder.

You can even make it using the origami technique, although you only have to fold the sheet once. Just right for young talents.
And finally, this type of work such as felting or dipping anything, for example, a dish sponge or soft balls. Moreover, this can be done with an ordinary clothespin. It looks bright and stylish, simply beautiful and original.
I also liked the idea of a fun family activity that you can do with your kids as a group.

By the way, you can combine paper products with threads, or use cereals instead of threads.

I was also captivated by this work, so simple and at the same time original.

And I propose to make this beauty a common or joint activity at school or kindergarten.

Easter crafts made from felt
In general, felt toys have become in demand not only among children, but also among adults, because sewing such a gift is always easier than taking any other material; felt in this regard is an unpretentious material that is easy to work with because it does not crumble. And even beginners can make patterns.
I had a separate one on this topic, from it, if you are interested in this type of activity, you will find a lot of useful information, I am sure it will be useful to you.
In this post I will show you finished products. How do you like this family?

But, I still want to show you one master class that may be useful to you someday.
We will need:
- scissors
- needle and thread
- buttons and rhinestones
- cotton wool or padding polyester
- lace
- vinyl magnet

Stages of work:
1. Draw a sample egg, or you can print it out on a printer.

2. Then attach the stencil to the felt and outline with a pencil. Cut out the resulting parts with scissors; you need to make two eggs.

3. Then take and cut the template into three parts, as shown in this picture.

4. Place the center on the green felt and trace it, then cut it out.

5. Sew this green decoration onto the egg.

6. Sew and decorate, one might say decorate with lace or some other decor. It looks amazing right away.

7. Then draw the letters with a pencil and embroider the inscription, you can probably guess what it is, of course ХВ.

8. Then sew on buttons, sequins, or you can take beads for scrapbooking, basically whatever you have.

9. Go through the edges with a seam, but you can also put padding polyester or cotton wool inside, and then proceed to the next step.

10. Take Moment glue and glue a vinyl magnet, this will be a gift for you or your friends on the refrigerator.

Of course you can do it on sticks.

And also in the form of a pendant or keychain.

In general, such beauty will not leave anyone indifferent, that’s for sure.

Master class using improvised materials Easter tree at home
I want to tell you right away that you can make such a craft quite quickly if you use these step-by-step instructions.

In fact, the work will be quite creative and your children will also not be able to resist this task.
Just don’t forget to wash the eggs well with water and soda. For 1 liter of water, take 2 tablespoons of baking soda.

Use a toothpick for piercing and acrylic paints for coloring.


Prepare everything you need for work:

Then place the napkin in front of you and twist it into a rope in this way. Secure the middle with threads.

And then turn the product over to the opposite side.

And voila, crumple it in half.

A couple more touches and hand movements:

And you will see an animal that resembles a bunny.

Give him eyes and a tail.


And needlewomen can still sew carrots quite well.

Video on how to make an egg from pasta for a competition
I’ll tell you honestly, I was shocked when I saw this awesome video, can you imagine it’s really true, such a miracle, it’s just amazing and out of ordinary noodles. Cool! Share this information on social networks, just click on the button at the bottom of this article.
Well, in conclusion, I was about to say goodbye to you and came across such a masterpiece, which is made of papier-mâché, I was very interested in this design, I’m showing it to you.

Still, sometimes you are surprised how something like this comes out of almost nothing.

DIY egg stand made of paper and sisal
You will get a very wonderful and cute little thing if you use this MK, which is presented in pictures with a description and sequence of actions.


That's all for me, I'm ending this post. See you in the next articles. Write reviews, comment, come visit more often, a lot more interesting and completely new things await you that you have no idea about. Goodbye everybody!
Sincerely, Ekaterina Mantsurova
How to make crafts for Easter in kindergarten? Easter is a very colorful holiday, filled with childish, cheerful traditions. The process of preparing for it brings pleasant excitement to the baby’s life, anticipation of joyful moments and surprises.
Minutes of creativity will help the child pass the wait and better reveal the atmosphere of the upcoming celebration. For example, you can make charming crafts for Easter in kindergarten and congratulate teachers and comrades in the group with them.
Easter crafts made from kinder surprise eggs
Making Easter crafts with your own hands is an interesting and exciting task for children. Children's crafts for Easter can be made in a variety of techniques: applique, drawing, modeling from plastic material, scrapbooking, embroidery and many others. We propose to create custom souvenirs on an Easter theme.

From floss threads, shells and a Kinder Surprise egg you get an adorable chicken in a nest.

You can build a whole nest with chicks from plastic eggs.

You can make a real Easter bouquet from plastic eggs.

Watch the video on how to make an Easter wreath from Kinder Surprise eggs:
DIY Easter bunnies
Another Easter favorite is the bunny. The easiest way to make an Easter bunny is to glue it together from disposable paper plates.

You can make a wonderful Easter bunny from a plastic egg.

A charming Easter bunny is made from a cardboard roll and colored paper.

Easter bunnies made from socks
A very interesting rabbit is made from a white sock. The rabbit's face can be embroidered with threads. The inside of this rabbit is stuffed with padding polyester.

Watch how to make an Easter bunny from a sock in the video:
You don’t have to tie the rabbit’s head with a thread, but you can still make a funny tail out of a pompom for the rabbit.

DIY Easter baskets
Foarmin or colored cardboard makes a lovely Easter basket.

Foamiran can be cut in the shape of a circle, make cuts on it and glue it along the edges. We will get a small basket for one egg. If we weave three strips into a braid, we will get a handle for the basket.

Adorable Easter baskets - chickens are made from disposable paper cups.

Easter baskets - chickens
A cute Easter basket is made from a cardboard egg cell.

The base and handle for the Easter basket can be made from cardboard tape. The decor can be very different, for example, an egg basket in the shape of a green lawn looks very beautiful.

Egg basket “Green lawn”
An interesting Easter basket is made from disposable paper plates.

A very good idea is an Easter basket made from a plastic container and ribbons:
Easter basket made of paper as part of an Easter composition. The lower part is made of a cardboard box covered with green paper.

Easter basket made of felt, decorated in the shape of a green lawn.

Easter basket made of foamiran “green lawn”
Applications for Easter in kindergarten
In honor of Easter, you can make a large number of bright and colorful crafts made using the applique technique. The first option is the “Easter Basket” applique. Using potatoes, we make colored prints on a sheet of paper. We wait until they dry and cut them out. Paint half a paper plate brown and glue beige stripes onto it. We glue one strip to the top, making the handle of the basket. We fill our basket with eggs.

Colored Easter eggs can be used as room decoration.

Take note of the Easter cake applique. Willow branches are made from twisted paper tape. We make the willows and lights themselves from rolled paper (using the quilling technique).

Easter cake applique
Colored cardboard, ribbon and pieces of plasticine make a charming Easter decoration.

Beans, peas or corn can be used to make a wonderful Easter chicken applique.

Easter applique "chicken"
Another wonderful Easter craft made using the appliqué technique is a chicken on a stick.

The Easter chick can be placed in a paper pocket. Cut out the shell and all the details of the chicken from colored paper. Glue all the elements and decorate with flowers.

One of the sides of the testicle can be connected with a movable hinge. Then the chick can be “opened and closed” in the testicle. We make the chicken itself from felt and decorate it with a feather. The chicken does not need to be glued to the base, then it can be taken out and placed in the egg. The kids will love this Easter craft!

The chicken applique can be made from painted cotton balls.

“Chicken” applique made from cotton balls
Another version of the applique for Easter is “Easter Easter cake”. Cut out the napkin like a snowflake. Glue it and a cake made of brown paper.

Glue the eggs and the base of the candle. We make the flame and the top of the cake from rolled paper. Decorate the Easter cake with pieces of plasticine and glue flowers.

“Powder” for Easter cake and flowers
Another original craft for Easter is button applique.

DIY Easter cards
Using adhesive tape you can make a very delicate Easter card. Strips of adhesive tape are glued to the back layer of the card. Glue onto it the front layer of white paper with an egg-shaped hole. Decorate with a delicate flower - your Easter card is ready!

A voluminous paper Easter card can be a very unusual craft for Easter. Fold the base of the card - thick paper according to the pattern.

Folding the base of the card
We decorate the “steps” of the postcard with Easter and spring attributes.

A very beautiful Easter card can be made using the scrapbooking technique. To do this, you can use colored paper, ribbons, flowers or napkins, as well as use special kits for scrapbooking.

Easter card with ribbons
Watch the video on how to make a beautiful Easter card with your own hands:
Crafts for Easter using quilling technique
A charming Easter card made using the quilling technique. The basis of the craft will be cardboard folded in half in the shape of an egg.

For the postcard we will need special paper strips for quilling. We cut two of them (yellow) with special scissors, making a fringe on one of the edges. Now we twist our strips into rolls - we get the body and head of the chicken.

By twisting other strips we form flowers, a sun and a cloud and a wing. Glue all the details of the Easter card onto the base.

Another wonderful craft for Easter using the quilling technique is a three-dimensional egg with a chicken. We wrap the tennis ball in film and glue the white rolls one by one. Glue the rolls one to another.

We will get a blank that looks like half an egg shell. We fix the improvised shell on a stand (we glue the stand from round purple and compressed green rolls).

Easter craft from paper balls “Temple”
In order to make such a craft, we need thin paper. A regular napkin works very well. We cut the paper into fairly large strips, apply liquid glue to it and roll it into tight balls.

We roll white, blue and orange balls. We dip each ball in glue and glue it onto thick cardboard.

When all the balls take their places, we should have a temple. Now we need paper quilling tape. We roll small spirals from white paper strips. Fix the edge of the paper tape with glue. We squeeze the paper spirals on one side - we should get small white droplets.

Glue strips of brown paper. We place paper droplets along the edges - we should get very delicate willow branches around the temple. We decorate the top of the temple with a cross made of golden paper. Our beautiful white-walled temple is ready!

Easter craft “Temple”
Crafts for Easter from eggshells
You can use dyed and regular eggshells to make adorable Easter chicks.

You can make a small Easter applique from eggshells.

And here is a stunning Easter composition made from eggshells “cockerel and hen”. For this craft, you can use a whole boiled egg or a whole eggshell. We glue eyes, a comb and a beak onto the testicle - we have a cockerel.

We decorate the chicken with a bow and rope hairs.

We cut out the bottom of a plastic bottle and wrap it in colored paper - we get the basis for an Easter basket. We tie the basket with a ribbon and place corrugated paper straws in it. We plant a cockerel and a hen in this cozy nest. Easter craft for kindergarten - ready!

Easter souvenir in an egg shell
A very touching Easter souvenir can be made right in an eggshell. First we need to make a hole in the raw egg. The contents should flow out carefully. Wash the testicle and let it dry. We should be left with a clean, dry shell.

We make a hole in the top of the shell with an awl and thread a rope through it. We tie the rope in a knot so that the egg can be hung.

Fill the shell with sisal or thin paper shavings.

We put fluffy Easter chicks and small Easter eggs inside. Ready! All that remains is to hang the souvenir by the string.

The kids will be delighted with the “chicken” Easter egg tray. Cut out a chicken from cardboard.

Place the chicken on a cardboard egg tray. Place a corrugated paper straw at the bottom.

We paint the eggs, draw eyes, attach combs and beaks - we will get yellow chickens. Easter tray for eggs - ready!

Watch the video on how to make a very impressive Easter “chicken in an egg” craft:
For children in the junior and middle groups of kindergarten, a craft made from salt dough “Hatched Chicken” is suitable. The slightly colored dough is very popular with children and is completely safe, even for the smallest creators.
An adorable Easter chick can be made from paper rings or a cut cardboard roll.

Easter crafts made from threads
The kids will be delighted with this Easter craft made from threads. The easiest way to make a thread craft is to make it from pompoms. You can see how to make a pompom in our article ““. Once you master the technique of making pompoms, you can make an Easter-themed craft, such as a little yellow chicken.

Another option for making an Easter pom pom craft is to make it using a small balloon. We wrap it tightly enough with thick threads and cover the threads with glue. After the glue has dried and the threads have become dense, carefully pierce the ball and remove it. We should still have the frame of their threads - this is the future body of the Easter chicken.

Glue the eyes, nose and legs to the frame. Easter thread craft - ready!

If you use floss threads and small balloons as a base, you can make a very impressive Easter composition from openwork eggs.

The eggs can be hung with a string, then we will get unusual Easter pendants.


DIY Easter drawings
Crafts for Easter in kindergarten can be done using a combination of drawing and appliqué techniques. We create a three-dimensional Easter basket in a very interesting way: we make cuts on the main sheet into which we insert strips of corrugated cardboard.

Teachers who are decorating an Easter corner in a kindergarten may find the Easter drawing “chicken in a clearing” useful.

For school we offer a drawing with Easter cakes in a basket. First we make a pencil sketch.

We color the basket, Easter cakes, eggs and bow. Draw out the outlines on the basket with a marker.

Paint the chicken with yellow paint. We draw him brown legs.

We highlight the bow, eggs, basket and Easter cakes with color. We wait until the paint dries. We highlight the basket and bow along the outline with a marker. Spread the top white part of the Easter cakes with glue and cover with sprinkles. Drawing for Easter - ready!

Another version of the Easter pattern is a hen with a chick. First, we make a pencil sketch.

Pencil sketch of "chicken chicken"
We color the hen and chick with paints.

We add a gentle green meadow with flowers and herbs to the hen and chick. We put the drawing in a frame and we have a lovely Easter decor.

Painting as a gift for Easter “Hen and Chick”
Drawing "Easter egg"
For Easter you can draw a beautiful Easter egg. The main plot of the drawing. may become symbols of spring - birds and flowers. And patterns located on horizontal lines are convenient for coloring. First we make a pencil sketch.

Drawing "egg" in pencil
Then we paint the egg with paints.

Drawing "Easter egg"
Look at the video “how to draw an Easter egg”:
This Easter drawing reflects all the symbols of Easter - the church, basket, Easter cake, eggs, spring twigs and flowers.

A charming Easter basket with Easter can be made from ordinary plasticine. First we make a concave Easter basket. We sculpt a thin flagellum from plasticine.

Fold the flagellum in half and twist it.

Carefully glue the flagellum along the edge of the basket. We will get a very interesting wicker basket effect.

Roll a thick yellow sausage out of plasticine.

We cut the sausage into two parts - this is the future basis for the Easter cakes. On each base we place a white round cake - “glaze”.

Easter cakes with “glaze”
For this craft we will need small real branches.

We glue elongated gray lumps of plasticine onto the branches - we will get a very realistic willow. We put Easter cakes and willow branches in the basket, and complement the composition with colored eggs.

Sprinkle the cakes with food powder. Plasticine Easter craft - ready!


Very delicate Easter egg pendants can be made from salt dough.
Easter chick made from ribbons and felt
A very cute Easter chick can be made from ribbons and felt. We cut the ribbon into squares and fold it according to the pattern, fixing the workpiece with glue. The technique of making crafts from small pieces of ribbon is called kanzashi.

We glue the lower green part of the flower from the blanks. Using the same technique, we glue together the purple blanks for the flower itself. We glue them together. Place a bead in the center. Putting the composition together.

Glue yellow felt onto the cardboard base. We make chicken preparations from yellow ribbons.

Glue the tuft and wings from yellow ribbons to the base. Glue on the beady eyes and beak. All that remains is to decorate the chicken with a flower and a bow. We have a very impressive Easter souvenir!

The most famous and favorite craft for Easter is a wreath. It can be made as a decoration for a hall or room. The base of the wreath is made from branches that are connected to each other using tape.

We wrap the wreath with a garland of artificial flowers and greenery. We fix the garland using double-sided tape.

Decorate the wreath with ribbons. We paint plastic eggs with bright Easter patterns and secure them to the wreath with double-sided tape. The final touch to the Easter wreath is the fluffy chicks.

Easter wreaths made from branches can be decorated with feathers, flowers and willows.

Do-it-yourself willow branches from cotton wool
A craft that will be very useful to you for Easter is willow branches. With these branches we can decorate an Easter wreath or make a luxurious Easter bouquet. We dilute the starch with hot water.

We form future willows from cotton wool and starch. We color the willows gray. Don’t get carried away with coloring; a light and uneven application will give the willows a natural look.

Glue the colored cotton balls to a real branch using a glue gun. On the bottom side under each willow we glue a “pocket” made of felt.

Our willows are ready! All that remains is to create a spring Easter bouquet!

DIY Easter tree
Since the bright holiday of Easter symbolizes the blossoming of new life, in some countries a tradition has appeared to decorate the Easter tree. After all, it is the tree that personifies nature and the ability to be reborn after a long winter. We take the sawed testicles and carefully pierce them on two opposite sides. Their contents can be blown out using a straw.

Coloring the eggs. Using a stick, insert the ribbon into them.

We tie the ribbon on one side with a bow. Leave a loop on the other side. Easter eggs are ready. All that remains is to make the base of the craft - the tree itself. We make it from colored twigs tied together. Pour plaster into a small container and insert the branches into it. All that remains is to hang the eggs on a tree. Our Easter tree is ready!

DIY Easter tree (video):
Felt chicken Easter basket
A very beautiful Easter basket “Chicken” is made from felt. We cut out the chicken parts according to the model in the photo.

We sew the parts together. Leave the edges free at the bottom and top. The bottom will be sewn into the bottom. We will place the eggs in the upper part.

Sew on the bottom piece.

Place eggs in an Easter basket.

You can decorate your Easter composition with a yellow chicken. It is very easy to sew it from felt. We cut out 2 oval parts for the body from felt and sew them together, not forgetting to stuff them with padding poly (you can immediately sew a tuft between the body parts). Sew on the wings. Glue on the factory eyes and beak. Easter chicken with felt chicken - ready!

An interesting Easter idea - DIY soap in the shape of chickens for Easter!

A very beautiful Easter basket craft is made from pasta. To make it, we need to inflate a small balloon and paste it with pasta in the shape of a “horn”.

Leave the hole in the front part unpasted. We color the pasta and decorate the hole with pasta in the shape of a “bow”.

The Easter stand will be the best decoration of the Easter exhibition.

Happy Easter to you and your children!
Crafts for Easter in kindergarten reviews:
Beautiful crafts! Happy Easter) (Nadezhda I)
I really like eggs made of thread, an original technique and very popular now (Dashulya)
Easter is approaching, which means you can prepare for it with your children by creating gifts for your family and friends with your own hands. We have a selection of ideas that your child can implement both with your help and independently.
1. Applications made of colored paper according to templates. This craft can be done both at home with children and in the older group of kindergarten. All the necessary parts are cut out using the template. Separately glue the parts for the chicken or bunny, and separately for the Easter egg. Moreover, the latter needs to be glued in such a way that it turns out to be a “pocket” where you can put cute little animals:


2. Like this easter wreath Without much effort, you can do it in no time. From multi-colored cardboard, which can be bought at any hobby store, we cut out Easter eggs according to the template. Cut out the middle from a white cardboard disposable plate, leaving only the rim. We glue our colorful Easter eggs onto it. You can decorate the resulting wreath with ribbon or other decor of your choice.


3.Easter wreath made of eggs from Kinder Surprise will require the participation of an adult. Only yellow plastic eggs are suitable for use. These are our future "chickens". Using an awl, you need to make two holes in each egg along the opening line of their top part. Now you can start decorating each chicken: using glue, woolen thread, a felt-tip pen and other improvised means, make beaks, eyes, paws, forelocks and bows for the chicks. Then thread a yellow wool thread through the resulting holes to each, thus connecting our “chickens” into a ring (wreath).

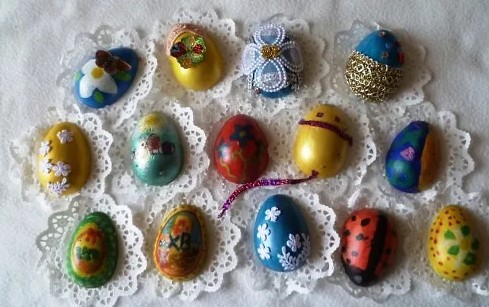
4.Create an Easter egg from cardboard and decorative tape even the smallest creativity lovers can do it. The operating principle is very simple. Strips of different decorative tape are glued one by one onto the cardboard as shown in the photo. Then an egg-shaped oval is cut out from the resulting blank. And by gluing a loop of ribbon to the top, you can decorate your room or kitchen with the craft.


5. Crafts in the shape of Easter eggs, which even kids in the younger group of kindergarten can easily cope with. All you need is scissors, paper, colored napkins, colored paper, cardboard, pencils or markers and a little imagination, which children have more than enough of.


6. Easter garland will undoubtedly bring a festive mood to your home. Moreover, it is so easy to make. All you need is paper or cardboard, thread, glue.


7. Easter pictures can be done using potato stamps. To do this, cut the potato in half and use a stationery knife to cut out the desired image along the contour. Its template can be applied using a felt-tip pen or pencil. For convenience, you can make a handle for the stamp. By squeezing the top of the potato outside the stamp, we prepare containers for paint. These should be flat or with a fairly wide neck from the container so that it is convenient to dip our stamp into them. To apply paint to stamps, it is convenient to use an ordinary dishwashing sponge. And now the main thing is to stock up on a bunch of white sheets to enjoy the process to the fullest.

You can also use toilet paper tubes as stamps:

8.Bags for sweets and other treats in the shape of a carrot. They can be made from paper or other materials. For example, from fabric.


9. Easter cards DIY ones will be the best gift for grandparents.


10. Craft for Easter in the form of topiary not as difficult to manufacture as it seems at first glance. The Easter tree egg blank is attached using a special cementing solution to the base (in a decorative pot into which the mixture is poured. The base of the egg itself is a decorative foam blank of the appropriate shape. After the mixture hardens and our future “tree” will stand firmly in the pot , you can start decorating. Using tailor's pins with a decorative head, we attach multi-colored buttons of various sizes over the entire surface of the foam blank. The result should be something like this beauty.

These are just some of the ideas that you can implement with your children. Encourage your children to create, even if it means sacrificing your own peace of mind. Try to get the most out of this process. After all, time spent with children is priceless!
What kind of crafts do your children like? Share your ideas in the comments.
Good afternoon. Today we continue to prepare for Easter, and we will make something new and unusual. Of course, the basis will be rabbits, chickens, all kinds of stands and baskets, pendants and Easter trees. After all, this is something that is constantly in demand.
I most of all want to dedicate this collection to children of different ages, because they are the ones who like to do everything themselves. Well, teachers, be on guard, because no one has canceled competitions in schools and kindergartens.
For you, my readers, I have selected (thanks to the Internet) a bunch of different and interesting, new and festive options, so that you can take a prize in the competition, decorate your ordinary interior at home, and also please your loved ones with an extraordinary gift. And remember, all the work is done from scrap materials!!
Let's start with a very interesting selection of souvenirs intended for school-age children. After all, it is in educational institutions that most often they organize various competitions, where both children and parents take part.
I wanted to find something truly new and colorful for you, and so that everything could be done easily and using improvised means. I hope I managed to do this.
And the first work is a yellow hen with chicks. Make the chicken itself out of paper into a cone, cutting the feathers into strips. And the chicks can be sculpted from plasticine, and the testicles can be made from kinder surprise, covering them with sparkles.

Here is a beautiful basket using the appliqué technique, plus felt decorations.

Here is a version of an excellent Easter wreath, it is made simply from thick threads and real ones, and is also complemented with various decorations.

The next decoration, a pendant or wreath, is made using the quilling technique, which we already know. It turns out very nice.

And look how cute the bunny is?! Such a simple paper craft, but it makes a good stand for paints. The work, by the way, was taken from the Country of Masters.

You can also make various three-dimensional Easter cards; for example, this is a very exciting activity for primary schoolchildren.

And look what tenderness can be made from cotton swabs, discs and corrugated paper!! Just beautiful!!

Fluffy chicken and chicks made from napkins, what do you think of this idea?! And the birch log house is very much in keeping with the theme, it looks natural. Flowers and grass can be made from woolen threads.

Here is another great egg stand in the shape of a bunny. The work is done using the origami technique, the diagram is attached below.


Interesting idea with willows. The craft itself can be made from plasticine or salt dough. It turns out to be a kind of Easter tree.

What bright cockerels!! Where would we be without them on this bright holiday!! You can use a paper tube as a basis, and then paste it over and decorate it with paper and cardboard.

In fact, the most popular crafts for Easter, as you already understood, are egg coasters. Therefore, I want to show you how easy it is to make a “Chicken” stand from salt dough, because this is an excellent material for children’s creativity.

We will need: salt dough, knife, stacks, garlic press, vegetable peeler, manicure file, toothpick, black allspice peas, brushes, paints, colorless quick-drying varnish.
Work process:
Now I suggest you watch a detailed video on this topic. The author presents a real master class. Look and remember)) And the technique is artichoke.
And a couple more pictures on this topic.
- Yellow chicks

- Easter

- Delicate stand

- Gift in the form of a painting

- Easter topiary

- Flowers for a basket

- Silk eggs


- Very bright chicken

DIY Easter crafts from plastic bottles
If you have a large stock of plastic bottles, then you have come to the right place. We will learn how to make souvenirs from them.
- Plastic basket
You will need: plastic bottles, iron, paper, glue, awl.
Work process:
1. Cut the bottom of the bottle to a height of 7 cm. Cover them with white paper and iron them so that the cuts are not sharp. Cut strips for the handle from the flat part of the bottle.

2. Using a hot awl, glue the handles.
3. Using braid and fabric, decorate the product by gluing everything with glue.

This is what the crafts look like at the end of the work.


What else can be made from plastic bottles, you ask?! Yes, whatever your heart desires: churches, animals, and any decor.
- Church

- Testicle stand

- Rabbits


- Option for decorating spring leaves

The most interesting craft ideas for Easter 2019
Well, we are coming to an end, and I want to summarize a little. When choosing this or that craft, be sure to think about what material you will make it from, and remember that the product should be clean, light, bright and cheerful, like the Easter holiday itself.
And for you there is still a small announcement of what else can be created!!
- Bead work

- Fabric bunnies

- Crafts using quilling technique

- Festive panel

- Fabric toys

- Stand options


- Pendants

- Nest

- Crochet work

- Painting eggs, putting them together to make a bouquet

- Bunnies treat bags

- Drawing and decorating with beads

- Topiary

- Souvenir made of threads

Now we can finish. I hope you liked the craft options and you will definitely find something new and interesting for yourself. Write what you will be making this year for Easter. And by the way, do you give gifts for such an event?? We usually just color eggs and bake Easter cakes with ))
Why do we love holidays? Probably because it’s nice to prepare for them: think about gifts, set the table. But there are special, bright celebrations in our lives, such as Easter. On Easter, people give each other small Easter gifts: painted eggs, Easter cakes, baskets, Easter souvenirs. Children love to prepare crafts for Easter with their own hands; they are so interested in taking part in the preparation and work. We have selected the most interesting master classes for children and adults from a variety of crafts.
We offer crafts for Easter from the simplest materials, the purchase of which does not break your pocket; they are always available in any regular store.
This interesting basket for eggs can be easily made from a disposable plate, wooden clothespins and tape.
Cut a disposable plate with scissors:

Glue the sides together and seal the top with paper or tape. Separate the clothespins and glue them with Moment glue. We secure the top with a thin braid.

We cut strips of paper into the bottom and make a handle from cardboard. Decorate with a bow or several.

We print out the bunny template or draw it on a sheet of cardboard or thick paper. We paint on both sides, glue and place a beautiful Easter egg in the paws.


We make chickens from disposable spoons, cotton pads, and colored paper.
You can make the same funny bunnies:


More Easter-themed crafts: unusual egg plates. How beautiful multi-colored eggs will look on such an original plate! Cut out 4 legs and a bunny's head from white paper, and decorate the face. We put clothespins on a plate and glue paper paws to them. Place chopped white paper on the bottom of the plate.

We make a plate with chicken in the same way. Differences: yellow paper and the size of the paws.

DIY gifts for Easter
There are so many ideas for gifts for Easter, you’ll get tired of choosing. I would like to hope that our master classes will help you in your choice.
From paper
An Easter basket for the upcoming holiday can be made from a regular paper bag. Or from beautiful wrapping paper, maybe you have leftover candy boxes. There are many options. Multi-colored Easter eggs or delicious treats will look original in such an interesting basket.

To work you will need:
- Paper.
- Scissors.
- Ruler.
- Hot-melt gun or regular paper glue.
- Pencil.
If you took a bag for work, you need to cut off the bottom of it. Cut the side. Using a ruler and pencil, draw the paper into strips 3 cm wide.

We bend all the strips in half along the entire length.

We begin to weave a basket from the strips, as in the photo.


To prevent the parts from getting tangled, glue the strips to the top of the basket, then cut it all off. Glue the handle and glue the top of the basket.


We will make an interesting chicken stand for Easter eggs as a gift. There are several recipes for making dough.
Recipe for wheat flour dough:
- Flour - 2 cups.
- Extra salt - 1 glass.
- Cold water - 250 grams.
- Bag for storing products.
- 1 tbsp. spoon of sunflower oil.
Recipe for products made from rye flour:
- 3 cups (300 gr.) wheat flour.
- 1 cup (100 gr.) rye flour.
- 2 cups (400 gr.) fine salt.
- 250 ml water.
Rye flour gives the figures a warm bread color. To prepare any dough, mix flour and salt, then gradually pour in cold water and mix again. The degree of readiness of the dough can be determined as follows: if the dough stretches and sticks to your hands, it means there is a lot of water in it. Therefore, you need to add more flour.

To work you will need:
- The dough is salty.
- Stack.
- Peeler.
- Toothpick.
- Manicure file.
- Black peppercorns.
- Paints, brush.
- The varnish is transparent.
- Garlic press.
Roll out the flatbread to a thickness of 0.5-0.7 cm, this will be the chicken’s nest itself. We make the side parts of the nest using a garlic press. We form a “straw” by moistening it with water.

Leave the work to dry for 1 day so that the dough holds its shape well in the future. Let's start sculpting the chicken. We sculpt the body blank. We need the chicken as a stand for an egg, which means we need to make a recess for the Easter egg. We take a round shape, make a notch, and sculpt the breast and neck of the chicken. Use a vegetable peeler to feather the breast.

Insert a toothpick into the chicken's neck, leaving 1.5 cm. Connect the nest and the chicken's body. Roll out the dough, make wing blanks 1 cm thick. Draw the plumage with a vegetable peeler, attach it to the body of the chicken, moistening it with water.

Next, our task is to give the chicken a beautiful tail. We take an oval cake 0.7-1 cm thick as a basis. We make the plumage with a vegetable cutter. We trim the edges of the tail with a knife to resemble the pattern of feathers. Make the cuts neat, smoothing them with your fingers. Attach the tail to the chicken's body. Place something under your tail, such as a ball or an apple. After the product dries, remove the apple.

Roll into a round ball for the head. We shape the scallop using our fingers and a stack, giving it the desired look.

To make the eyes, you need to mark their location. Make dents for the eyes with a stack. Next, use a vegetable peeler to make dents so that the eye becomes shaped.

Insert a peppercorn instead of the pupil. We make a beak and sculpt it to the head.

We fasten the head and body by putting the head on a toothpick. We attach a small strip of dough to stabilize the head. Decorate the chicken neck with dough feathers. You can make “earrings” for the chicken from pieces of dough.

We sculpt chickens in the same way. Don't forget to wet the parts for better fastening.

We leave the product to dry for 1-2 days, placing them in a distant place, maybe even on a closet. After a day or two, when the chickens and chickens have hardened, we finalize the work: we plant the figures on leaves, moistening the centers with water. Leave it in the air for 1-2 days. We dry the products first in air, and then put them in the oven at a temperature of 50 degrees for 1 hour. After drying, paint and cover with clear varnish.

Another option: dough figures: we make Easter bunnies, hens, chicks. You can make fridge magnets out of them, or pendants on willow branches.
The fastest gift option is multi-colored paper napkins and ribbons. Wrap the boiled egg in a napkin and tie with a ribbon. Can be replaced with corrugated paper.

This funny and interesting Easter chicken can be crocheted.

To work you will need:
- Yellow yarn, 100% cotton or 50/50,
- Some orange and white yarn.
- Hook number 3.
We start knitting from the body. First 7 rows:
1st - 8 sc in an amigurami loop
2nd - knit 2 sc in each loop (16 sc)
3rd - 1 sc, 2 sc, and so on (24 sc)
4th - in every third loop add: 2 sc, 2 sc (32 sc)
5th - in each 4 p. add: 3 RLS, 2 RLS (40 RLS)
6th - in every 5 p. add: 4 RLS, 2 RLS (48 RLS)
7th - in every 6 p. add: 5 RLS, 2 RLS (56 RLS)


15th - knit the 5th and 6th stitches together (40 sc)
16th - we knit 2 rows without decreasing (40 RLS)
18th - knit the 4th and 5th stitches together to decrease (32 RLS)
19th - no decreases (32 RLS)
We fill the chicken with cotton wool or padding polyester.


20th - knit every 2nd and 3rd stitch together (16 sc)
21st - knit every two loops together (8 sc)
Cut the thread and carefully sew up the hole.
Wings (2 wings):
- 1st - dial 7 air. loops with yellow yarn, 1 sc in the second loop from the hook, 4 sc, 3 sc in one loop, 4 sc, conn. P.
- 2nd - 1 VP, 4 RLS, two times 2 RLS in one stitch, 3 RLS in one loop, two times 2 RLS in one loop, conn. P.
- 3rd - 1 VP, 1 sc in each loop
- 4th - 1 VP, 1 connection. p. in each loop
We knit the paws with orange yarn:
- 1st - 2 VP, 6 sc in the second loop from the hook (6 sc)
- 3rd - increase in every second stitch (18 RLS)
- 4th - row without changes (18 RLS)
Beak (1 piece)
1st - cast on 5 VP, 1 sc in the 2nd loop from the hook, half-dc, 1 dc, and 1 dc2h
Eyes (2 parts)
- 1st - 6 sc in amigurami loop (6 sc)
- 2nd - increase in each stitch (12 sc)
- 3rd - increase in every 2nd stitch (18 sc)
- The beads are different (colors are indicated next to the diagrams).
- 2 meters of thin fishing line or nylon thread.
- 2 beading needles.
We start weaving from the central row from number 1 to number 2, then we perform each part separately at different ends of the fishing line, using the table.

In the egg weaving pattern, notice the double rows (12 and 13 at the top, 13 and 14 at the bottom). For a chicken-shaped keychain in the upper part, we first weave the right wing (numbers 5 to 9), and then the left wing (numbers 10 to 16). Next, we move on to the design of the head (numbers 17 to 40).

What would Easter be without Easter cakes, Easter eggs, souvenirs and angels? You can make these original Easter angels with your own hands from ordinary pasta. Pasta can be anything: stars, cones, spirals, vermicelli. These angels can be hung on a willow branch or placed in an Easter basket.

To work you will need:
- Pasta.
- Ribbons or sticks.
- Hot-melt gun or Moment glue.
- PVA glue.
- Salt dough balls.
Use a glue gun to connect the head (dough ball) to the body. Next, glue the ribbon to the back. We select wings from pasta and glue on top of the braid.

Thickly coat the angel's head with PVA glue and dip it into small noodles or stars. This is the "hair" of an angel.

For hands, use openwork pasta. Apply glue thickly on the sides, near the wings and glue.

We paint with either simple golden paint or spray paint.

If you want to insert them into an Easter basket, insert a stick inside the pasta body and glue it, the crafts are ready.