Autumn leaf crafts: ideas for kindergarten and elementary school. Autumn crafts for kindergarten Queen autumn leaf craft how to make
And of course, educational crafts! In autumn it is easy to create with a child, because this time is so colorful, and from the street you can bring a lot of natural materials, which will become the basis for creativity!
But even if you don't have a herbarium yet, you can always draw, glue it out of paper and implement other creative ideas from our list!
Craft "Autumn Leaves"
To draw such a volumetric outline of the leaves, you need to mix PVA glue and black paint. Then let the baby trace the contour of the herbarium! Done! Let the drawing dry and then paint with colored watercolors!

Autumn tree for the little ones
For crafts you will need:
- colored paper
- cardboard
- double sided tape
- scissors
If your baby is still very small, make paper blanks yourself, and let him stick the leaves. Older children can be offered to cut out of paper and work with PVA glue.
Craft "Winter compote"
Apples cut into 2 parts can serve as very beautiful stamps for autumn crafts.
For crafts you will need:
- kraft paper
- thick white paper
- rope
- gouache
This craft will suit even the smallest! Mom only needs to make a blank jar template and show the child how to dip apple halves in paint.
Stamping with egg trays
This craft is done in the same way as the previous one, but to get the result we will make stamps using egg trays. If you have such material at home, do not throw it away!
You can also stamp on wood using:
- real leaves
- fingerprint
- halved potatoes
- kitchen brush
- a bunch of cotton swabs
- foam sponge
- bubble wrap
- disposable fork
- lego bricks
- crumpled paper
- old toothbrush
- cones and other natural materials.
Application "Hedgehog"
For the application you will need:
- colored paper
- scissors
- pVA glue
- felt-tip pens

We paint with wax and watercolors
Invite your child to draw autumn leaves on a white sheet of thick paper with a piece of candle or white wax crayon. Then apply water to the workpiece with a brush and add colors with watercolor!
The contour of the leaves will not be painted over with watercolors, so you can drip paint on it and go beyond the boundaries!
See the entire drawing process in the master class:
Application "Echinacea Flowers"
For crafts you will need:
- plasticine
- dry needles or maple spouts
- felt-tip pens
Such a craft can be done even with a baby! And if a child loves to sculpt from plasticine, then he will definitely like such creativity.

Application "Autumn forest"
For crafts you will need:
- thick white paper
- paints
- scissors
- sheet of cardboard
- colored paper
- spray bottles or toothbrush
You can spray on paper with a toothbrush if you don't have spray bottles at home. The application is perfect as a craft for kindergarten!
See the entire application process in the master class:
Autumn cut paper applique
You will need:
- colored paper
- paints
- scissors
- glue stick
Such an application can be done even with a 2-year-old child, since there are no boundaries for creativity and imagination! The child can choose how to glue the paper blank and how to place it on the paper.
See the entire application process in the master class:
Autumn application of crushed leaves
For crafts you will need:
- dry autumn leaves
- paints
- paper
- pVA glue
See the entire application process in the master class:
Autumn painting with masking tape for kids
The simplest, but at the same time original craft for the little ones! Give the child a sponge and a few "autumn" gouache colors, let him stamp a sheet of paper pasted over with masking tape.
When the drawing is dry, carefully remove the tape and draw bark and branches on the “trees”.
How to implement the idea, look at in a short master class:
"Autumn Kaleidoscope"
Many, many wonderful patterns can be made from bright autumn leaves. As in a kaleidoscope, you change a little, and a new flower appears, even more beautiful than the old one! For these floral designs, use dry fall leaves, seeds, tree fruits and berries.

Applique with pencil shavings
For crafts you will need:
- shavings from a red, yellow, orange pencil
- colored paper
- scissors
- pVA glue
See the entire application process in the master class:
Paper bag tree
This craft is perfect for a kindergarten craft contest or as a simple but original way to keep your child busy on an autumn day!

The wonderful autumn time pleases us not only with bright landscapes, but also with numerous gifts. They fall from the trees, and it becomes so pity that they will simply perish on the ground so that you want to give them a second life. How can you do this? There is a huge section of home art - autumn crafts from tree leaves. You can make a huge variety of beautiful works with your own hands. From the leaves of trees, you can create panels, applications, topiary, flower bouquets, wreaths and much more.
If you like to engage in creativity with your child, then you know how annoying classes with plasticine, paints, and paper are over the summer. Then it can be replaced by activities with tree leaves. You must first collect them for a walk. This activity can not only entertain the child, but also teach him new skills. The leaves must be collected beautiful and whole, and in the process of collecting you can tell your child the names of trees and curious information about nature.
Autumn leaf crafts will last much longer if made from dried leaves.

If the leaves are damp, let them air dry a bit. You can put them in a spacious box so that the leaves have access to air. This will help remove any mold on the leaves.
If you do not care that the leaves are smooth and even, then leave them like this in the basket until completely dry.
But if you want even leaves, you cannot let them dry completely. Place them between book pages, or sheets of paper / newspaper, but always under the press.

Thus, the leaves should dry completely in about two weeks.
There is a special herbarium press. In it, the leaves will dry much faster, and they will be ready for autumn crafts in a few days.
But you can also speed up the process by drying with an iron. Turn the iron on to the lowest temperature and iron a piece of wood between two sheets of white paper.

How to make DIY autumn crafts from leaves

If you have prepared and dried the leaves of the trees in advance, then you can start creating beautiful and original autumn crafts. They can create a cozy atmosphere in the home or be suitable work for an exhibition in a school or garden.
If you do not have enough imagination and imagination to create crafts from leaves, then you can use a selection of works and master classes.
Assess the age and skills of the child before you start creating an autumn craft from tree leaves with your own hands.
Related materials for working with leaves:
Colored cardboard and paper. Cardboard usually acts as a background and basis for work. If you glue the leaves on paper, it can bend and curl from the weight of the leaves, so it is better to use cardboard. Colored paper is useful for additional decoration (to make eyes or other parts of the body of animals).
How to glue the leaves: this can be done with ordinary PVA glue (it glues dry leaves well), and hot glue is also perfect.
DIY autumn crafts from leaves
The simplest leaf crafts are considered applications. For them, you can use leaves of different sizes, colors and shapes. The applications may also differ by subject. These can be pictures of animals, landscapes and figurines of people.
Tree leaf owl

We will need:
- Dark leaves (oak, willow, birch)
- Colored paper
- Cardboard
- Branch of any tree
Draw an owl on a piece of cardboard.
We cut it out.
For feathers, you can use willow leaves. Glue them in rows on the carved owl.
Use oak or birch leaves to make owl ears and legs.
Cut out the eyes and beak from colored paper. Glue them onto the owl's head.
Glue the owl to the tree branch as if it were sitting on it.
You can decorate your autumn leaf craft with a sprig of fish or thuja.

Panel of leaves
You can decorate a house with an application of leaves, making it not on paper, but on material for a panel.

We will use hot glue in this work, but small children can be involved in this work at the stage of collecting leaves. Choose the most beautiful and even leaves for crafts. Dry them beforehand.
We will need:
- Wooden board (plywood, chipboard)
- Leaves
- Twig
- Stain
- Brush
- Marker
1.Prepare a leaf of a tree by first sanding it and painting it with wood stain.
The stain dries quite quickly, so you won't have to wait long.
2. Draw a maple leaf with a marker.
3.Glue the leaves on the board in a fan-like manner. To make the panel three-dimensional, do not glue the leaves completely. Then the edges will be free and the effect of volume is created.

4. On each leaf after gluing, place a heavy book or other object as a press.

To make your picture clearer, you can trim the leaves a little along the edge of the picture, creating a clear outline.

There can be quite a few types of panels. You can attach leaves and twigs to a wide wooden frame.

A cute fairy can be made from colorful leaves and cardboard

Tree leaf crown
For a little princess or an autumn photo shoot, you can make a simple but interesting attribute.

Necessary materials:
- Colored leaves
- Thin twigs
- Tape tape
- Pliers
- Wire

Cuts off a wire the length of which is equal to the volume of the head + a few cm for the connection. The resulting hoop should fit your head easily.

Using tape tape, attach the leaves to the resulting wire hoop

You can alternate leaves with twigs or flowers

Maple leaf wreath
Beautiful large maple leaves can make a gorgeous wreath

The base for the wreath can be made of wire or willow twigs.

Attach the leaves to the base in a circle, twisting the stem of the leaf on it.

Leaves should be attached over the entire diameter of the base of the wreath

Such a wreath can be worn on the head or hung as a decoration on the door.
You can add other elements to the leaves, such as acorns and flowers.

Bulk leaf crafts
Fall leaves from trees can be used for more than just appliqués. You can make chic bouquets, lamps, compositions on the theme of Golden Autumn.
But in order to make voluminous crafts, the leaves must be subjected to special processing, and upon completion, the product must be varnished.

When creating home decor, you want the craft to last as long as possible. You can prolong the safety of autumn crafts from tree leaves using a special floristic spray or acrylic varnish. This method will allow you to leave the leaves fresh and beautiful for a long time.
Maple Leaf Crafts: Mask

We will need:
- Maple leaves of different sizes
- Cardboard
- Thread
- Scissors
1. Make a mask template on cardboard and cut
2. Make holes for the eyes

3. Insert an elastic band on the sides to put on the mask
4. Using glue, glue the leaves to the mask.
5. Trim any excess leaves inside the mask to keep them out of your eyes.

What gorgeous leaf masks you can make with your own hands.


If you have gathered beautiful leaves, then you can make unusual candlesticks from waxed paper.

Instead of paper, you can use a simple glass jar, decorating it with beautiful leaves.

Pendants and garlands of leaves:
In order to keep such a craft fresh for a long time, take the leaves and cover them with transparent varnish. Next, you should dip them in melted paraffin. Gather them in a bun or hang them on a string. In any case, they can last for a long time and decorate your home.


Autumn crafts from maple leaves
Maple leaves are considered the most beautiful gifts of golden autumn: yellow, red, burgundy and orange. A carpet of maple leaves can be seen in every park in the fall, and by choosing the most beautiful leaves, we get chic crafts on the theme of golden autumn.
Maple leaf rose: DIY craft

Roses made from autumn leaves remain very popular. For those who love flowers, this craft will be especially relevant. You can create a whole bouquet of roses or make a beautiful arrangement in a basket.

How to make a rose from maple leaves

1. Fold the top end of the maple leaf
2. Twist it by tucking the top edge to make the flower more voluminous.
.
Remember to keep the bud underneath to keep it from falling apart.
3. To make a large rose, you need more than one maple leaf. Choose leaves of different sizes and start with the smallest ones.
4. The edge of each leaf can be fixed with a stapler or wrapped with thread.
For making a rose from maple leaves, it is better to choose fresh material that is not dried up. After collecting the resulting flowers in a bouquet, spray it with hairspray.
Diy maple leaf plate

Maple leaves are ideal for many crafts due to their size and shape. It's quite simple to make a plate out of leaves, but such an unusual decor will take its place in your home or go as a gift to your friends.
Necessary materials:
- Leaves
- Brush
- Balloon
- A bowl
- Scissors

1. Prepare the leaves by cutting off a stalk.
2. Inflate the balloon to the desired size and place it in a bowl.
3.Spread it with a thin layer of glue.

Put a leaf on top of the glue and smear with glue. It should soften a little and stick to the ball.

We put the next sheet so that it partially covers the previous one, and in the same way we smear with glue.
Thus, we glue half the ball with leaves.

Burst the balloon gently to remove the resulting plate
You can decorate the front door in an original way by hanging a wreath of maple leaves on it. It is done simply by analogy with other wreaths.

Glue beautiful maple leaves onto the base, adding acorns, chestnuts and everything that you find under your feet on an autumn walk.

Kids crafts from maple leaves
Children are especially interested in making crafts from leaves on the theme of autumn with their own hands.
Maple leaf snail

We will need:
- Maple leaves
- Scissors
- Plasticine
- Scotch
- Eyes

- To make the base - the snail's body, take red plasticine and mold a sausage from it, so that one end is slightly thicker than the other.
- Make a cut at the thicker end and shape the cut halves to resemble the antennae of a snail.
- The body must be bent
- To use maple leaves for a snail house, cut cuttings with it.
- Fold the sheet to make a strip
- Twist the strip starting at the narrowest part
- To make the house more voluminous, twist a few leaves in this way.
- Fasten the house to the torso from plasticine
- Attach plastic eyes and outline your mouth

Turkey leaf: do-it-yourself children's craft

We will need:
- Cardboard
- Steppler
- Scissors
- Leaves
- Eyes

About 5-6 circles of different diameters must be cut out of cardboard
On the leaves, remove the stems, except for two leaves. They will come in handy for turkey legs
Attach each leaf to a cardboard circle
We stack the mugs one on top of the other using glue or a stapler
Glue a brown sheet to the back of the largest circle.
Cut out a triangle from a leaf to make a beak.
It must be glued in the center of the first sheet.
Attach the eyes of your turkey.
With the help of colored paper and leaves, you can make a fun family of owls.

Flowers from autumn leaves: beautiful DIY crafts
Flowers in any form are considered the most beautiful decoration of the home interior. Therefore, it is not surprising that they are made from all kinds of materials and autumn leaves are no exception.

Earlier, we looked at how to make roses from maple leaves. They are most suitable for creating beautiful and lush bouquets. To keep the leaves for a long time and not spoil, you can treat them with glycerin:
- Dilute 300 ml of glycerin in water (about 600 ml).
- Pour this liquid into a bag.
- Arrange the leaves neatly in the bag.
- The bag must be sealed and left for several days (about 3-5 days) in a dark place.
- Then take out the leaves and let them dry.
How to make flowers from leaves: a step-by-step description
We will need:
- Red and yellow leaves
- Twigs
- Scotch tape or tape - green tape
- Scissors
- Threads

Prepare the leaves in advance.
We begin to collect the flower from the core. To do this, take a leaf and fold it in half, facing outward.
Roll the leaf into a loose roll.
In the second sheet, wrap the protruding top.

Wrap the heart of the flower with a leaf, twisting it. Do not forget to pinch your future flower at the base.

Also do with other leaves, taking turns winding them around the bud

Continue until the flower is beautifully shaped.

Thread the twig through the base of the flower and start winding up the tape.


Autumn leaf crafts for kindergarten
The simplest crafts for kindergarten are applications. After all, this process is easiest for children to cope with under the guidance of parents. You can use ready-made templates.
Leaf craft templates

Lion from autumn leaves


Leaf turkey


And you can do interesting work that the kid will like.

We will need:
- White cardboard
- Dry leaves
- Black or brown paint
- Pencil
- PVA glue
1. Leaves must be chopped. Entrust this process to your baby.
2. Draw a tree trunk on a white sheet. Here you can help your child
3. Help him paint the barrel
4. When the paint is dry, you can proceed to the next step.
5. Apply glue to part of the trunk and branch
6. Sprinkle the chopped leaves over the glue.
Children are very fond of making animals, and the idea of \u200b\u200bmaking an applique of a hedgehog from leaves will appeal to them

And if you have gathered brightly colored leaves and flower petals, then thanks to a printed template or hand-drawn, you can create beautiful paintings.

Beautiful DIY leaf crafts
Autumn girl: craft from leaves
Girls love to dress their dolls from an early age. Why not come up with a leafy barbie outfit. You will get an original autumn craft.

Choose for her the most beautiful leaves collected during the walk.

We will need:
- Doll
- Leaves
- Cardboard

1. Dry the leaves with an iron using paper
2. Make a cone out of cardboard, which will act as a skirt.


3. Attach the cone to the doll by cutting off the top
4. PVA must be diluted with water 1: 1
5. Glue the leaves on the cone with diluted glue, starting from the bottom.


6. Do not forget about a headdress for a fashionista

7. The bottom of the dress can be decorated with rose petals

In a similar way, you can make an applique by first drawing a girl on cardboard, but make an outfit from leaves

Crafts from leaves to school: grade 2
What can you offer children in the second grade for creative development? Of course, we cannot do without applications and handicrafts made from natural materials. Indeed, at this age, it is important to acquaint the child with the world around him and teach him to work with different tools and materials.
It is fascinating for schoolchildren of this age to create silhouettes of animals familiar to them.
Elk from leaves

We will need:
- Leaves
- Maple seeds
- Brush
- PVA glue
- White cardboard sheet
- Black felt tip or marker
- Scissors
Lay out the elk's body on a piece of cardboard. To do this, you need two leaves: one large with a tail and the second smaller round.
Maple seeds are useful for our legs. Separate them and glue them in the right place to the body.
Use a felt-tip pen to draw the eyes, and our nose will be created from a dark leaf.

Oak leaves and maple seeds come in handy to make beautiful horns

You can complement the picture with a small tree

Many other leaf paintings depicting animals, birds and insects can be made similar to such an elk.
Owl made of leaves

Leaf hedgehog

Leaf butterfly

Leaf fish

Lion from leaves

Crafts from leaves in grade 3
In autumn, it is impossible to remain indifferent to the beauty of nature, and it is very important to teach children to rejoice and enjoy what it gives us.
Therefore, the topic of autumn crafts for elementary school has been relevant for many years and is unlikely to lose its popularity for many years to come.
There are many options for crafts on the theme of autumn for school.
Appliques that look like real paintings


You can do creative work with your child and create a beautiful house from leaves and other natural material, taking a cardboard frame as a basis

By combining the child's ability to draw and applique, real masterpieces can be obtained

Crafts from corn leaves
Another topic that is interesting for creativity was not covered in the article. Crafts made from corn leaves can be very beautiful and original.
Corn leaf flower
We cut out about 20 leaves from a pointed talash, and also prepare a substrate. We also need a strip of about 5 cm.

The strip must be rolled up and glued to the center of the backing. In a circle, now it is necessary to fasten the cut petals. We start with the smallest ones.

This flower can be used to decorate a gift or create a bouquet of leaves.
Rowan leaf crafts
In school work, rowan berries are often used to make their work brighter and more beautiful. But you can also use rowan leaves to create fall-themed crafts.

The autumn period is famous not only for rains, cooling, but also for the charm of the colors that are given by colorful leaves. By connecting imagination, with the help of the gifts of nature, it is possible to create delightful creative works. Crafts from leaves on the theme of autumn for kindergarten are an ideal option for parents to spend time with the child with benefit, open up new opportunities for him, and unleash creativity. The beauty of this handicraft is that all materials are free, and the result of the creative process is limited only by the imagination of the child and parents.
What craft to make from autumn leaves in kindergarten
The kindergarten regularly hosts exhibitions of handicrafts created by children and their parents. The main goal of such events is to attract moms and dads to classes with a child in order to reveal the creative potential of the baby, to acquaint him with the nuances of working with natural materials. Often leaves (oak, maple, linden, etc.) and dried flowers are used for such creativity. As a craft in the kindergarten, you can do:
- application of an animal (squirrel, bear, mouse, peacock), autumn forest, cars;
- topiary;
- wreath;
- beautiful autumn bouquet;
- ekibanu;
- garlands, pendants.
Step-by-step instructions for crafts on the theme "Autumn"
To create crafts based on autumn leaves, you do not need special knowledge, skills, the main thing is desire, a little imagination and materials necessary for work (as a rule, these are natural materials, glue, colored paper, felt-tip pens). To make your work look beautiful, work as carefully as possible, slowly - then your work will not be left without attention at the exhibition in the kindergarten. The workshops below will help you create the perfect autumn craft.
Application "Autumn forest" on paper
An unusual applique on the theme of "autumn" can be created using only dried tree leaves, felt-tip pens, glue, cardboard or paper. Even a child can cope with such work, and the finished result will give a sense of pride and pleasure to the little master. Use the step-by-step instructions for creating an autumn forest applique:
- On paper, use felt-tip pens to draw tree trunks in the forest.
- Choose beautiful leaves that resemble tree crowns and help create a realistic appliqué.
- Glue all the elements with PVA glue, and a beautiful craft for kindergarten will be ready.
How to make a "Bouquet of roses"
To please educators with an original craft, make roses using maple leaves. The beauty of such a composition is that it retains its original appearance for a long time, pleases the eye, and does not require any maintenance. Children can create this bouquet if you help them a little. For work, you will need a minimum of attributes, tools: maple leaves, threads, scissors.
Step by step instructions for making roses:

- Fold the maple leaf in half, twist it with a tube - the middle of the rose is ready.
- Wrap the second element around the middle, forming the second petal. To get volume, you should not press it hard.
- In the same way, wind a couple more elements to make a rose or its bud. The volume, splendor of the flower depends on the number of petals.
- Wrap the bottom of the flower well for fixation.
- Combine several roses in a bouquet, decorate with branches or petals to give the composition a complete look.
"Hedgehog"
It is possible to create a beautiful funny hedgehog using fir cones. For work, you will also need cardboard, which will form the basis of the craft, plasticine, glue, leaves of trees (or moss). To create a hedgehog, you need to make him a body. For this, plasticine or a plastic bottle can be used. Consider the option of creating a small hedgehog:

- Grease the cardboard well with glue and randomly glue colorful autumn elements (leaves, moss). Such a background will become an impromptu forest clearing, along which a hedgehog walks.
- Create an oval from plasticine, which will serve as the body of a hedgehog, and attach it to the "clearing". Stick the cones into it, leaving a place for the muzzle in front.
- With the help of a small piece of plasticine, make a muzzle, and for the nose and eyes, chokeberry berries or beads can be used.
- A beautiful hedgehog in an autumn meadow for kindergarten is ready.
Volumetric application "Owl"
The variety of autumn colors amazes the imagination, gives free rein to imagination. As a craft for a kindergarten, an original volumetric applique can be created - an owl, which, due to its layering, looks magnificent, interesting and quite realistic. To create a masterpiece, you need to prepare the following attributes:
- cardboard (colored or white - optional);
- dried autumn leaves are the main elements;
- pVA glue, a brush for it.

Step by step execution of work:
- On cardboard, you need to draw or print the outline of an owl. All that is needed is the outline without detail and color.
- Gradually along the contour, you should spread the glue with a brush (very carefully so that the work is as accurate as possible) and glue the leaves. Do this from top to bottom, whipping over the previous layers to achieve the desired volume.
- When the entire contour is filled in, you need to cut out the beak, eyes and glue them on the muzzle.
- The original applique is ready. To make the process of creativity not only interesting, but also developing, during work it is worth telling the child cognitive facts about the owl and her life.
How to make an applique "Rooster"
To create an original painting, you need desire and creative inspiration. A bright applique depicting a rooster will surely please a child and is ideal for an exhibition in a kindergarten. For creativity you will need:
- white cardboard;
- multi-colored leaves;
- pVA glue;
- scissors;
- ashberry.

Instructions for creating a rooster:
- Draw the outline of a rooster on cardboard (or glue the cut out blank). For more experienced craftsmen, the contours can be laid out immediately with leaves.
- Glue leaves of different shapes, sizes and shades, creating feathers for a rooster.
- Cut out an eye with scissors, glue an eyebrow to work, make a pupil using a rowan berry.
- When all the elements are glued, the work must be put under the press for several hours, and the wonderful applique will be ready.
Autumn wreath for children
From the autumn gifts of nature, not only applications, compositions or decorative elements can be created, but also an original wreath. In order for the decoration to keep its shape, for work you will need thin branches that bend well, do not break. In the creative process, it is necessary to use threads, glue, elements for decoration: leaves, branches of mountain ash, raspberries, cones, vegetables, fruits, etc.
Step-by-step instructions for creating a wreath:

- Make a circle out of the branches, fasten with a thread so that the product keeps its shape.
- Branches with berries or grapevines can be used to add volume.
- When the base for the wreath is ready, you should start decorating it. To do this, glue cones, leaves, flowers or other decorative elements in a circle. It all depends on the child's imagination and the availability of natural materials at hand.
- The original autumn wreath can be used for decorative purposes or as an element of a costume for an autumn festival.
Original postcard
You can congratulate your teacher or loved one on the holiday with a unique handmade postcard. In the autumn period, there is no need to buy special attributes for decoration. Nature took care of everything, creating a variety of materials for creativity. The postcard looks original, for the decoration of which dry leaves of birch, oak, maple, cherry or other trees, bushes are used. You will need glue and cardboard to work.
Step-by-step product creation:

- Bend a sheet of cardboard in half to make a postcard.
- Arrange leaves and flowers on the front side of the product, creating a beautiful composition. Do not limit your imagination, this will allow you to create an unbeatable postcard. It is important to ensure that everything looks harmonious (parents should help the child in this).
- If the desired result is achieved, and all participants in the process like the design, glue all the elements with glue and a brush so that the work is as accurate as possible.
- The original postcard is ready and can delight the addressee.
The craft in the form of a bird's heat looks original. It is difficult to name a clear list of materials that will be needed for work, it all depends on the creative imagination and vision of the child, parents. Consider the instructions for creating a unique composition for which you will need:
- cardboard, colored paper or a beautiful napkin for the basis of the composition;
- a variety of leaves, thuja twigs can be used;
- pumpkin seeds;
- pVA glue.

Step-by-step instruction:
- We select an element that looks like the torso of a fever bird, and glue it so that on one side there is room for the head, and on the other - for a chic tail.
- We glue a birch leaf that will serve as the bird's head.
- We make a tail using elements of the same color.
- We decorate the tail: we glue beautiful leaves of rowan or thuja to create volume, play of color.
- We make wings for the bird, use birch leaves.
- Glue the pumpkin seeds to the head as eyes. With their help, it is easy to decorate the tail or body of a bird.
- We glue a small twig of thuja to the head, creating a tuft.
Master class with step-by-step production of "Butterflies"
Using simple leaves of different shades, you can create a beautiful craft for kindergarten - a butterfly. The creative process will appeal to the child, will allow him to take a fresh look at familiar things and reveal his potential. For work, you need to prepare the following materials:
- leaves from trees of different colors;
- scissors;
- double-sided tape;
- glue stick or PVA;
- colored cardboard or paper;
- hole puncher.

Creating a butterfly step by step:
- Cut off the legs and middle parts from the leaves.
- Peel off the top layer from double-sided tape and glue a small leaf (butterfly head), the middle part - wings.
- Do the same with the middle part of the second maple leaf. It is recommended to use the legs as antennae, and an oblong thin element (part of the leaflet) for the body.
- Use a hole punch to make eye circles and wing decorations. Stick them on.
- Attach the butterflies to colored paper.
How to dry leaves for crafts
To prepare the leaves for appliqués and crafts, they must be dried, and you can do this in several ways:
- The classic version. Place items under the press or between the pages of a book. They should not be in contact with each other. To prevent natural materials from spoiling the book, place tracing paper between the pages of the book.
- Hot drying with an iron. Put paper on the ironing board, put the leaves on it, straighten them. Cover the fabric with one more page and iron using dry ironing without steam.
- To maintain the natural color and shape of the leaves, lay them out on a windowsill to dry. So the elements will retain their natural appearance, which will allow you to make the most realistic paintings or compositions.
How to make skeletonizing leaves with your own hands
Crafts for kindergarten, where skeletonized leaves are used, look original. Many people discard the idea of \u200b\u200bworking with such a material, fearing the fragile structure and not knowing how to make such beautiful elements. To create skeletonized elements does not take much effort, time, and the resulting result will delight not only the child, but also everyone who happens to contemplate the result of creativity.
For work you will need:
- leaves of trees;
- baking soda;
- cold water.

Workshop on creating skeletonized leaves:
- Make a solution: one liter of cold water and twelve tablespoons of baking soda. Boil the mixture and place the leaves in it for about 25 minutes.
- After the allotted time, rinse each element under cold water and remove the herbs with a toothbrush.
- Rinse again under running water and you're done.
Video
The creative process with natural materials will give not only a delightful ready-made leaf craft on the theme of autumn for kindergarten, but also a lot of pleasure while working. It is sometimes difficult for young children to correctly compose a composition or make an animal using the gifts of nature. Parents also sometimes have a creative crisis, and creating a simple job is difficult due to the lack of imagination. Check out below a selection of video tutorials on creating autumn crafts for inspiration, additional knowledge about the process.
A very simple craft for the kindergarten "Rybka"
Children's craft from natural material "Fox"
DIY "Hedgehog in the grass" of leaves and flowers
Photos of interesting crafts on the theme "Autumn" from leaves
Each child, together with their parents, having connected a little imagination, is able to create a unique craft on the theme of "autumn" with the help of leaves, chestnuts, acorns. Using elements of different shapes, shades, textures in your work, you can make a real masterpiece that will decorate an exhibition in a kindergarten. There are no rules and restrictions in creativity - everyone creates a craft due to their capabilities or the availability of materials that are at hand. To get some inspiration, find the right idea, and enjoy some delicious fall crafts, check out the photo.
Evening is an amazing time when the whole family gets together and unsuspecting parents find out that it is for tomorrow that you need to bring autumn crafts to the kindergarten. To prevent this situation from catching you by surprise, we recommend that you prepare in advance and familiarize yourself with the ideas of children's homemade products.
We have prepared for you many step-by-step and colorful master classes of various difficulty levels. We are sure that you will definitely find something worthwhile for yourself.
Did you know that the Soviet cartoon "Hedgehog in the Fog" 15 years ago was recognized as the best animated film of all times and peoples? You see what a difficult animal this hedgehog is. It is definitely worthy of repeated implementation using various natural materials.
Bulky hedgehog made from seeds and plasticine
A cheerful and thrifty hedgehog, cheerfully carrying mushrooms on its back, can come to visit your apartment in the fall. To do this, you will need to stock up on simple natural materials, an hour of free time and involve young assistants in the work.

For joint creativity you will need:
- foil;
- twine;
- black and brown
- unpeeled seeds;
- pVA glue;
- acorns and leaves for decoration.
Make the base of the hedgehog out of foil. You can immediately tear off a large piece of foil and form a drop-shaped blank from it. Or roll up a separate ball for a calf, a small cone for a spout and connect them together, wrapping them with foil.

Stick the hedgehog's body with black plasticine, and the muzzle with brown. This crucial stage can be safely entrusted to the child, nothing will be spoiled, and all the flaws will then disappear.

Lubricate the muzzle with a thin layer of PVA. Also moisten the twine a little with glue and tightly, row by row, wrap the face with it, starting from the nose. For now, you have to stop and let the glue dry. Remember this has to happen naturally. On a battery or when drying with a hair dryer, plasticine will melt.
The next stage is decoration. From the seeds you need to make a needle hedgehog. Start work from the head, arrange the rows of seeds in a checkerboard pattern. Stick the "needles" into the plasticine as tightly as possible to each other.

Decorate the face with plasticine eyes and a nose.
Mushrooms are easy to make from acorns by simply covering their caps with brown plasticine. If you wish, you can attach real leaves to them. Using plasticine, attach the fungi to the back of the hedgehog.
Such a handsome man will surely please your child, and will also allow you to enjoy joint creativity.
Dry leaf hedgehog applique
Did you pick up a beautiful bouquet of yellow leaves while walking in the autumn park? Great, add some more glue and cardboard to them - we will make a cute hedgehog.
All you need is to draw an outline. Your baby will be happy to glue the leaves. Just show him how it's done.

You can download the hedgehog template, we offer you 4 options:
Seed hedgehog applique
Did you like the idea of \u200b\u200busing seeds for the hedgehog's needles, but the bulky craft seems too complicated to implement? We have prepared another simple MK, which features a funny hedgehog, seeds and plasticine.
A little perseverance and you can make a surprisingly cute and simple craft for kindergarten.

Paper hedgehog
We bring to your attention one more idea that even children from the younger group can cope with. An original and cute applique using autumn leaves will not take much of your time. It also comes with a paper cut template to make parenting even easier.

Mushrooms
You have already loaded your head, how else to surprise the seasoned kindergarten teachers who are waiting for crafts from your child again and again? We offer to amaze their imagination with surprisingly realistic mushrooms from the simplest materials at hand.

For work you will need:
- cotton wool;
- water; starch;
- long nails or thick wire;
- cardboard;
- paints and brushes;
- pVA glue;
- dry tea or poppy seeds.
First, together with your child, choose the types of mushrooms that you want to bring to life. Cut out circles-bases from thick cardboard for their future hats.

Pierce each circle in the middle with a nail. It will serve as the base for the leg. You can use thick steel wire instead. But it is better not to bother and buy a dozen or two potential "mushroom legs" in the nearest hardware store.

Now it's time to cook the paste. Boil a liter of water. Stir 5 tablespoons in a glass of cold water. with a slide of potato starch. While stirring boiling water, pour the starch into it in a trickle. While stirring, bring the paste to a boil. It is ready to use, you just have to wait for it to cool down to room temperature.

Coat the mushroom blank with paste. Roll a ball for a hat out of cotton wool, dip it in paste and glue it to the hat. Wrap the leg of the mushroom with moistened cotton wool. Repeat this process several times until you get the desired size and shape of the fungus.

Do not forget to squeeze excess glue from the cotton wool! The resulting blanks must be completely dried on a battery or in a warm oven. Already at this stage, the mushrooms are very cute.

The moment of creative work has come - painting. It is she who will turn faded blanks into real autumn mushrooms. You can paint crafts with any paint: acrylic, gouache or watercolor.
Color the caps according to the selected types of mushrooms.

Wait for the paint to dry completely. Cover the end of the leg with a thin layer of PVA and dip it in dry poppy seeds or tea leaves - this will simulate the remains of the earth.

For extra shine and chic, you can cover the mushroom caps with any colorless varnish.
You can arrange a beautiful basket with mushrooms - your craft will not go unnoticed. And the secret of making realistic mushrooms will excite the imagination of everyone who is lucky enough to see them for a long time.
These hand-made handsome men are obtained as a result of the applied efforts.

Don't have a matching basket? No problem! The most beautiful composition using moss, coniferous or dry twigs and real dry leaves can be arranged in an ordinary cardboard box or on a small stump, or on your own.

Imagine and think outside the box - in kindergarten, and any other, creativity this is only welcome.
Autumn trees
Has your child already wondered why trees change their green outfit for bright yellow-orange decorations in autumn? So the time has come to satisfy his curiosity, and at the same time and craving for creativity.
Plasticine tree
We offer you a beautiful and uncomplicated plasticine application that even the youngest naturalists can handle.

For work, prepare colored plasticine and cardboard.
Draw a tree trunk on thick cardboard. Now let your child roll up a lot of thin and long plasticine sausages 2-3 shades of brown.

Glue them along the tree trunk, alternating shades for realism. Fill in the entire outline of the trunk and don't forget about the branches.

Add some more branches for a lush crown.

Roll out many thin red, orange and yellow sausages. Roll each sausage with a spiral snail. You will see, the child will really like this exciting activity.

Glue the spirals to the crown of the tree in random order. Form the tree to the desired size.

Make blades of grass out of green plasticine. Plant the grass near the tree.

Complete the applique with falling leaves.

Here is such a man-made beauty we got. And a bright frame will make the picture even more expressive.
Application "Confetti tree"
The original idea for an autumn tree is to decorate it with paper confetti. Check out the step-by-step master class by watching our proposed video. Confetti can be cut easily and simply with a conventional hole punch. With this technique, you can quickly grow a whole fantasy forest.
Pumpkin seed trees
Have you noticed how a pumpkin seed looks like a leaf? And creative personalities not only noticed this, but also used the similarities to create an original applique from this natural material.
See our step-by-step photo of MK and be inspired by your own masterpieces.

Unusual cereal trees
We continue to heat up the degree of creativity. Now, to create crafts, painted cereals will be used. Do you have rice, semolina or millet in stock? Then try to master this method of creating an applique.
Or this option:
"Macaroni" tree
The unusual shape and safe composition of various pasta makes it possible to use them in preschool creativity. Find pasta in the form of bows or leaves and "grow" your own unique tree.

Unusual "button" trees
And if a lot of unnecessary multi-colored buttons were accidentally lying around in your house, then we know how to use them for a good cause. Try to create a bright panel that will decorate a summer cottage or nursery. And armed with wire and pliers, you can learn the art of button bonsai.


Pumpkin
Autumn is harvest time. And even if you didn't plan to harvest a real crop, surprise everyone with a realistic nylon pumpkin. You can make it both for the competition of children's autumn crafts, or just for the soul, and at the same time you will get acquainted with the interesting technique of making nylon vegetables and fruits.

For work you will need:
- painted nylon;
- filler (foam rubber or synthetic winterizer, even ordinary cotton wool will do);
- needle and thread;
- thin wire;
- a small piece of wire;
- green teip tape;
- scissors;
- brush and paints.
From the selected filler, form a ball the size of a future pumpkin. Cover the balloon with yellow nylon folded in 3 layers. Tie the sheath with some string and trim off any excess.

Use a needle to thread the bridges. Do them at the same distance until you go around the entire workpiece in a circle.

From small pieces of thin wire, make round blanks for the leaves.

Cover them with green nylon, fix its ends with thread and cut off the excess. Warp the edges of the leaves a little, giving them a realistic look. Wrap the ends of the wire with tape.

Wrap the piece of wire with tape. Wind it around the handle and carefully remove the resulting spiral. We got a tendril twig, which we attach to the pumpkin.

Assemble the branch of the pumpkin, gradually connecting the leaves and tendrils with tape in random order.

At the top of the pumpkin, fix a piece of wire and wrap it with tape. Attach a twig with leaves to the tail.

To achieve realism, tint the dimples with orange. Blot off excess moisture with a tissue.

As a result of the efforts made, we got a wonderful handmade gift for autumn.
Ideas for inspiration
We have prepared for you a selection of unusual autumn crafts to motivate you to action. See and be inspired to collaborate.
Spectacular composition of natural materials
Dry twigs and grass, a bunch of viburnum, a few smooth pebbles, a pine cone and sand, thanks to imagination, turn into a cozy country courtyard with a wooden house under a thatched roof. This craft looks very unusual, and you can get it absolutely free. You just need to go for a walk to the nearest park.


Maple Leaves Bouquet
In the fall, fallen golden leaves are begging for hands. Walking in the park, it is so easy to pick up a whole maple bouquet, but its natural beauty instantly disappears in the apartment. It can be fixed. We will teach you how to make beautiful roses from maple leaves. Such a bouquet will create an atmosphere of autumn comfort in the room and will delight you with its warmth for a long time.

Kid's autumn book
Did the child bring a whole pile of leaves from the walk? This one can be turned into a small autumn book. With the help of our MK, you will learn how to design pages yourself, and your child will be happy to stick bright leaves on them. No one else will have such a unique, one-of-a-kind booklet.

The coolest ideas for implementation in various crafts are best borrowed from nature itself. Learn for yourself and teach children to see beauty in simple things: in the elegant branches of a thin birch tree, carelessly scattered bright foliage under their feet, a modest wildflower on the side of the path.
Trust nature, listen to the wishes of the child and your imagination. It is then that you can easily make the most original children's crafts on the theme "Autumn" for kindergarten.

 My daughter Katya in this wreath became the "Queen of Autumn" in 2007!
It is my deep conviction that our education, since Soviet times, has been built on the following principle:
“If you didn’t fulfill the teacher’s task in childhood, you will still do it when you help your child” :-).
So, dear mothers, since we met on this page, it means that your child was given the task to bring an autumn craft. Did you guess right?
I have no doubt you will breathe a sigh of relief now! I have collected a bunch of ideas, and your craft from autumn leaves will definitely delight the teacher! 🙂
In order not to interfere with the whole experience of mankind in this matter, I tried to combine collages and applications that are similar in meaning.
Let's start!
Portrait from autumn leaves
 I have not found many examples of people of their natural materials, but enough for inspiration. The face can be glued together from several fragments and an oval of the desired shape can be cut.
For hairstyles or hats, choose coarser plants. You can use spikelets or stalks of dry herbs.

Here are some more very cute characters "with mood". Mom. Don't try to find leaves of the right shape. To make the head, simply cut out a circle or oval from any sheet of paper. If there are no dried narrow blades of grass for your hairstyle, cut the large sheet into thin strips.
I also found kids for them, though not from leaves, but from acorns. To make them quickly, you need a glue gun and a permanent marker. A scarf can be made from pieces of felt or any other brightly colored fabric. Unmatched kids!

Butterfly Birds
This is the most common type of autumn creativity. We make cute animals and insects from dry leaves of different colors and shapes. Leaves in contrasting colors are the hardest to find, as almost everything turns yellowish brown after drying.
To have a choice, dry not only autumn, but also green leaves too, then the palette of colors will be much wider and you will definitely get something out of it. dry rose petals look great on the tail of a peacock, take note:


Here are simple and expressive birds. By the way, the leaves with small flaws look quite harmonious, there are always many unexpected spots in the plumage of birds. a couple of lines with a pen, and the beak becomes like a beak. Chickens are made in a minute, you can make a whole brood.

Impossible handsome ... Apple bit off :-). This collage is made using colored cardboard details. My version of the hedgehog is framed on the right. There we also sprinkled semolina porridge on PVA glue in some places. I hope the teacher will like it ...

Here's another option for those who can sketch these simple drawings. Draw the lion's head and fish large - on the entire album sheet. Cardboard is preferred. The rest is clear from the illustration!

Information for educators and teachers! , there is a lot of useful and accessible!
 More from ash seeds ...
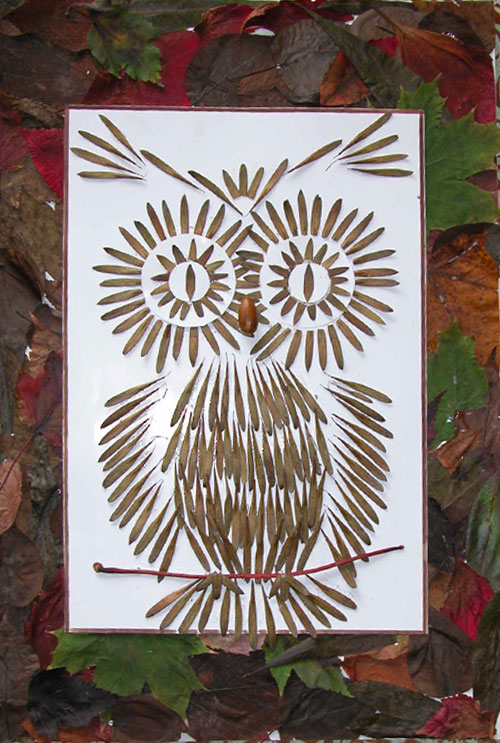
Here is our latest craft. This is a beautiful owl in a frame made of autumn leaves. Leaves were glued on PVA with an overlap on a sheet of A3 format cardboard along the perimeter. We didn't try very hard, because then they cut off the excess along the edge, and another sheet is glued to the inside, and with the applique of an owl from ash seeds, so you also don't need to try along the ruler. Our beak is made from half an acorn. Well, in my opinion ...
From these seeds, you can come up with a lot of interesting things (application) - roofs of houses, a field of dry grass, an animal skin or bird feathers. The work is long and painstaking, but if you did not have time to collect and dry the leaves, there is a way out. Plucked from a tree and glued immediately.
Here are some more examples for inspiration.

A mosaic of dried leaves and flowers can be added to the drawing. This looks very nice:


Dry leaf hairstyle
In these pictures of their leaves, sponges, eyes and even cilia are cut out, but you can simply draw a face, not lay it out with thin branches, but we make a shock of hair not just from individual leaves, but from whole branches with dry leaves. The fact that they are not dried in the same plane, but in volume, gives our work a special charm. Well, what a beauty ... I found it in my favorite social networks, I decided to post it here so that the idea is not lost.

Cutting out figures from fallen leaves
I have selected these collages separately, as the autumn leaves are used a little differently - it's just material for cutting out simple figures and letters. You need to do this BEFORE the leaf is dry, otherwise it will crumble ... First we cut out, then dry in the usual way in an old book or between newspaper sheets. You can cut out entire words and phrases this way.
To keep the letters neat, print them on a printer of the correct size.
Now we put copy paper on the autumn sheet, on top - your printout. We circle so that the drawing remains on the yellow sheet. Remaining cut!
This way you can make not only the letters of the alphabet, but also simple silhouettes (animals, houses, clouds).


Interesting examples of paintings from autumn leaves:
Thuja twigs are used here, and the desired shape is cut out of dry leaves for application. For the house, you will need thin dry twigs, but you can also collect from matches.


RA from this picture you can take an idea. The female profile is simply drawn, but the leaves in her hair may be not paper, but real ! Is it difficult to find them in different sizes and shapes to make such a beauty?
Here are cute little owls. A silhouette is cut out of the paper, then we glue the leaves, as shown in the figure, and at the end of the work we cut off all the protruding excess along the contour of the cardboard blank. We make the eyes from paper in a contrasting color. 

Colored collages
Autumn leaves are so beautiful on their own that they look great in frames and without any plot. Look how beautiful it is! The first layer is dark leaves, then put contrasting and most beautiful ones, so the volume will be felt. All under the frame.
I also liked the idea: on a collage of leaves we put a sheet of thick cardboard in which a letter or a simple figure is cut out with a clerical knife.

Another unusual technique, which for some reason is called Iris-folding
, I found on the site "Country of Masters". A detailed master class here: http://stranamasterov.ru/node/99098

Photo frame
For the autumn exhibition, you can make frames for photographs and for decorating essays and poems on the theme of autumn. Here are the options I found. In my opinion, very simple and effective. 

Interior decoration
Fall leaf crafts can be very romantic.
To make such a tree, you need to dry the leaves in advance, and only then reattach them to a beautiful branch with transparent adhesive tape.

We work with a hammer ...
Unusual technique. I saw on the American website, translation, etc. The point is that the fallen leaves are placed between watercolor paper and a napkin, carefully tapped over the entire surface with a hammer so that the coloring pigment remains on the paper.

