3D paper models. Paper models in half an hour - reality or fantasy? How to make a paper model
Paper modeling can be classified as an activity that never ceases to interest a person. Many orphanages for creativity always organize design clubs, because paper models not only provide an opportunity to get a new interesting figurine or toy, but with their help you can improve your knowledge of physics and mathematics.
Tools for work
To learn how to fold basic paper models, you will need simple tools such as scissors, a utility knife, PVA glue and a brush for applying it. Give preference to PVA construction glue - of all varieties, it has the thickest consistency; it does not spoil the paper, making it wet and sticky, like regular glue.
Different models are folded from different types of paper - from tissue paper to thick cardboard. Beginners are advised to start with 200 grams per m2 watercolor paper for large elements and drawing paper with a density of 140-160 grams per m2 when developing small parts.
Craftsmen create individual parts, such as masts, railings, and small finishing elements from polymer clay, plaster, plasticine, and self-hardening plastic. If you also complement your work with molded parts, stock up on various stacks and molds - like those used in ceramic floristry.
How to make a paper model
The workflow for creating a paper model takes place in several simple steps. Before starting the process, the master decides what kind of figurine he wants to construct. In fact, almost any product can be made from paper, but paper modeling often involves the following options:
- geometric figures, polyhedra with convex and concave corners;
- scaled copies of famous buildings;
- luxury car models;
- models of military equipment: tanks, armored vehicles, heavy guns;
- vehicles: airplanes, ships and submarines, trains.
Figures of humans, animals, and plants are constructed much less frequently than others. After determining the product category, the main part of the work process begins.
Creating a Layout
Three-dimensional paper models are made from several large and small parts - the diagrams of the elements must first be drawn on paper sheets of the desired color. A person cannot cope here without understanding certain knowledge of geometry and the ability to represent a three-dimensional image.
To make it easier for beginners to learn, many specialized magazines began to publish drawings of ready-made developments for paper models, by gluing them together to create a figurine.
You also need to cut out the layout according to the rules. For example, a solid line along the contour indicates the location of the cut, and a dotted line indicates the fold. But in each diagram the designations are individual, so before cutting you need to read the explanations for the figure.
Assembly
After the paper model drawings are ready, the model is glued together and finishing work is carried out, if necessary.
To make the surface of the product look realistic, craftsmen use different coatings: glossy varnishes, matting sprays, craquelure liquids, stains, etc.
Paper car models
A beginner in the business of paper modeling will enjoy this master class, which contains information on how to construct the famous model of a VAZ 21011 sedan car in just half an hour.
Stock up on thick drawing paper or a coated sheet if the figurine is being created as a gift for a friend.
- On an A4 sheet of paper using a color printer, print out the finished layout of the paper model with your own hands. If you want to enlarge the diagram, make sure that the proportions of length and width are maintained - changing the parameters may interfere with the correct joining of the parts.

- Have a picture of a real car of that brand in front of you to use the picture as a guide when assembling. Bend the development in the required places.

- Shape the blank into the shape of a car to mark the gluing areas for yourself. Only after this can you sequentially lubricate the white valves with glue and glue them to the necessary parts from the inside, fastening the parts of the machine to each other.
Please note that the tread strips need to be glued together to form rings that will be attached to the wheels in order to obtain the most voluminous paper models.
Paper tank models
Designing military equipment from paper is somewhat more difficult than creating civilian vehicles because the guns consist of many small parts that form the body.
To see this, try to create a difficult but very interesting model of the German Panther tank.

- On a thick A4 sheet, print drawings of the tank components using a color printer. It is better to cut out small parts from thin cardboard so as not to bend the narrow curled elements.

- You need to cut out the parts with sharp scissors to make the work easier.

- It is better to glue in blocks - separately connect the parts of the hull, propulsion system and turret, and then fasten the large elements together.
To glue the parts of the tank in the correct order, follow this video tutorial during assembly.
Sometimes the joints are connected with small errors, which is why white paper stripes appear on the model. You can get rid of them using felt-tip pens or pencils of a similar color to the armor.
Paper airplane models
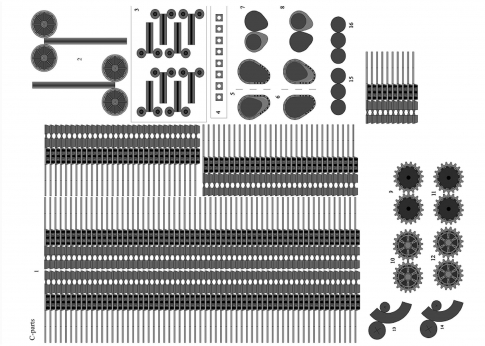
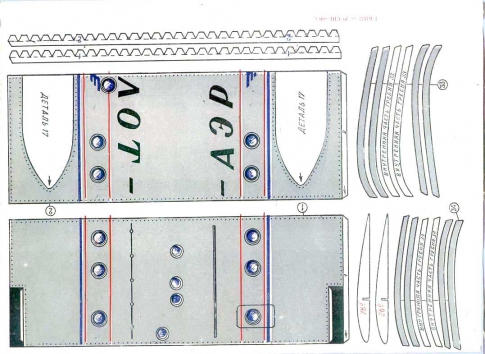
If you already have some skills in building paper figures, you will probably enjoy constructing a paper and cardboard model of the Tu-104 passenger aircraft.

- Print out the airplane drawings on thick paper.

- Glue the elements of the internal frame of the product onto thin cardboard - they are marked with red numbers.
- The parts marked with a cross - frames or frame - are transferred to the cardboard using a compass. In this case, you can calculate the radius of the circle by placing the needle of a compass in the middle of the cross and a pencil on the circle. Patterns of paper frames need to be glued to these cardboard blanks.

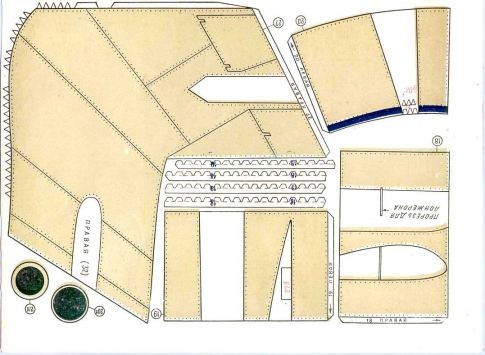
- After developing the frame, start creating the fuselage, or body of the aircraft. Please note that, unlike previous products, fuselage sections #1-8 do not have white securing flaps. They are connected to each other with special ribbons, represented on the patterns by the corresponding numbers in blue.
- The frames are glued into the joints between the fuselage sections.
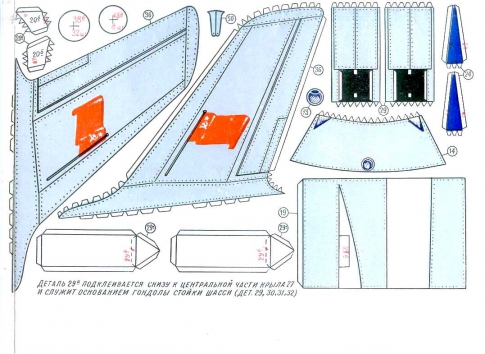
- While the glue in the airplane body is drying, glue the tail parts together.
- The engines of the device are assembled like a fuselage.

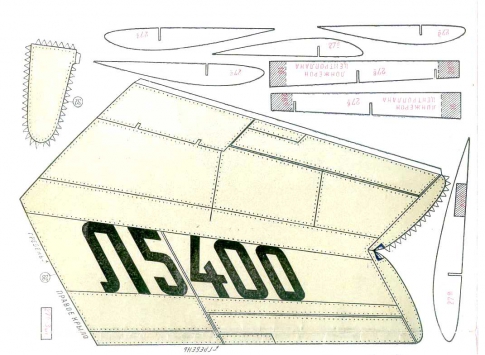
- Next, the wings are formed using cardboard and paper.

- Connect together the parts of the hull, wings, bow and cockpit.
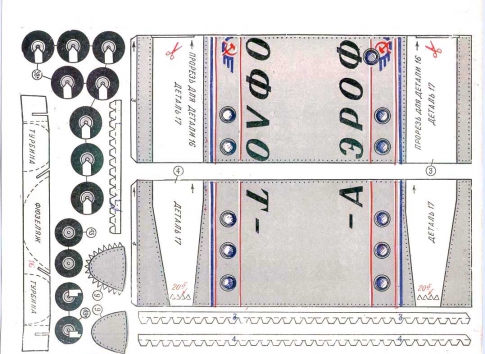
- The chassis is assembled in several stages - initially the wheels and their components are formed, after which the chassis is glued to the wings in a specially designated place.

- You can also use the pattern to cut out a wooden chassis - it will be stronger and last longer than paper and cardboard.
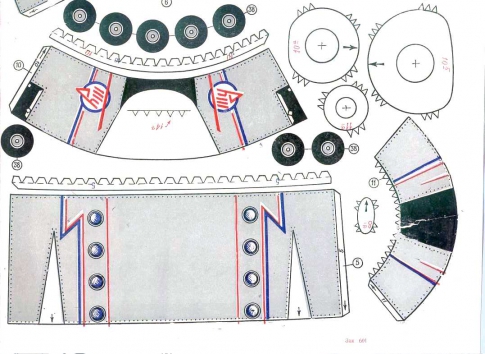
To avoid bends and creases on the body and tail, stuff the parts with cotton wool during assembly. Decorate the plane as desired using decoupage sprays and paints.
You can make a simpler model of a paper airplane with your own hands, following this video.
Take it for yourself and tell your friends!
Read also on our website:
show more
Any beginning modeler should know the basics of working with paper. The quality of the paper models created depends on this basic knowledge.
All the following techniques should be taught to children from a young age, so that at school they can do it without thinking. Like any good habit, the basics of modeling need to be brought to automaticity in the child’s mind. I’m not just talking about those children who want to do paper modeling, this applies to any child because any creativity and development of children begins with working with paper! This type of activity not only promotes creative development, but also develops perseverance, accuracy, and hand motor skills in the child. Let's move from theory to practice.
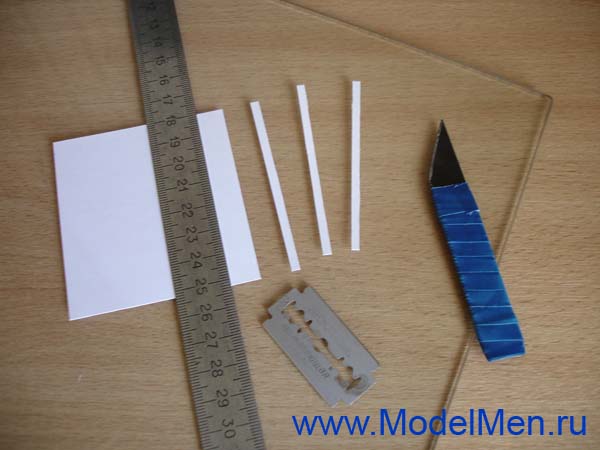
Workplace. Make sure you have a good, comfortable table and chair, the lighting should fall from behind your left shoulder, use a table lamp if necessary. To avoid staining the table with glue, cover it with paper, film, or place a sheet of glass with sanded edges to avoid cutting yourself.
Remember that your elbows should not rest on the glass - this is harmful to your joints!
Paper- this is what we work with. You should pay special attention to the quality of the paper, I like to work with good paper! Good and bad paper are like two cars, one a Mercedes and the other a Zaporozhets, choose for yourself which one you “drive” :) For initial creativity and simple paper toys, it is best to use ordinary paper, for printing on a printer, A4 format, “Snow Maiden” type ", it has good qualities and is the most snow-white in relation to other brands. The density of such paper should be 80 g/m.
More complex models and toys are made from thick paper or cardboard. Today, cardboard has begun to be produced of very poor quality and it is very difficult to find good sheets. A set of cardboard can be colored or white; you choose which cardboard you will glue the models from.
If you like thick paper, then I recommend purchasing thick paper for drawing. Please note that the sheets in the set are not secured along the edges with sticky glue; it is best when the sheets are simply folded without gluing. The thickness of drafting paper can vary greatly between sets, so when choosing, compare sheets from different sets and buy the whitest and thickest paper.

If you need super white and thick paper, then there is a wide selection of photo paper at your disposal. You can print color scans on this paper. Sheets of photo paper make the most beautiful and colorful models. For work, choose photo paper with a density of 200 g/m2 or more; sometimes photo paper is almost like thick cardboard. Depending on the future paper model, you can buy single-sided photo paper or for double-sided printing - this is very convenient!

Stationery (silicate) glue is suitable for gluing regular paper, but I still recommend using PVA glue, you will understand the difference when you try to glue with both. It may be possible to glue photographic paper with PVA glue, but it is better to use Moment glue. Remember, there are different adhesives on sale and cheap does not mean high quality, that’s why I’m giving you photos of what I use myself.
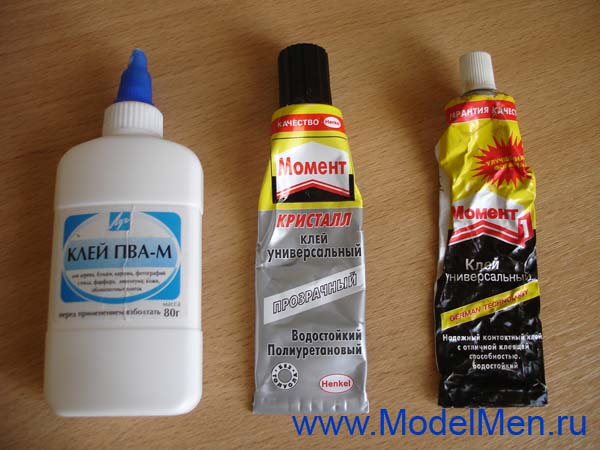
You can spread the glue with a brush or squeeze it out of the tube directly onto the paper part and spread it with a strip of thick paper (use scraps). If you glue with Moment, then ventilate the room, as the glue is very toxic!
Working with paper. Paper modeling does not require a lot of knowledge and tools.
Basic tools: pencil, knife, eraser, ruler, compass, scissors.
The pencil must be wooden, of medium hardness (letter designation on the pencil: TM, T, F), even with different markings, pencils may not match the quality, choose carefully. A pencil sharpening knife should not be too long!
Remember that it is easier to cut yourself with a dull knife than with a sharp one!
The eraser must be large and soft so that it does not smudge the pencil, but erases it!
The ruler is preferably metal, from 30 to 50 cm. Plastic rulers, even new ones, almost all do not have a straight line. The compass must be rigid, without loose parts, the lead or pencil must not move, otherwise such a compass is worthless!
Scissors can be of different sizes, the main thing is that they do not fit tightly and lie comfortably in your hand.
The most difficult thing in paper modeling is to draw the development of the model, and without drawing knowledge it will be difficult to do this. If you don’t like to develop models yourself, then you can take ready-made scans.
I will tell you about a common technique for high-quality paper folding so that the fold line is smooth and sharp. For example, I took two rectangles, I bent one with my hands without using any tools, the line turned out to be simply disgusting, it is very difficult to bend paper along a straight drawn line in this way. I will bend the second rectangle along the line made with a needle from a compass under a metal ruler. Many people advise doing such actions with a used ballpoint pen, but it’s difficult to find an empty refill and you still won’t make a line with a pen of sufficient quality, which is why I recommend using a compass. Attention, you can cut through paper with a needle, it is better if the needle is blunt; when you draw a line, bend the compass in the direction of movement, almost laying it on its side.
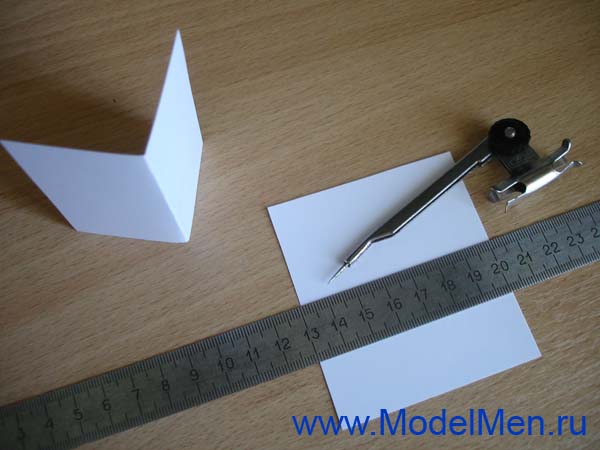
Look at the result, the fold on the left is terrible, and the fold on the right is very neat. Try to do this experiment yourself, you will see for yourself in my words.

Working with a pencil. Pay no less attention to this than to everything else, because the final work depends on the quality of sharpening the pencil. Whether your parts come together when gluing or not depends on the pencil!
Sharpen the pencil sharply so that it draws a thin, clear line. The point is not even in the quality and beauty of sharpening the “wood”, but in the sharpness of the stylus. Learn to sharpen pencils with a knife or blade, but forget about the sharpener forever!
Be careful with cutting tools!

Now let's talk about cutting. You need sharp scissors to cut paper! Do not sharpen scissors by cutting sandpaper, the scissors will be sharpened, but at the same time you will scratch their inner side edges, they will cut sloppily and tear the paper. Better ask someone who knows how to sharpen scissors for help!
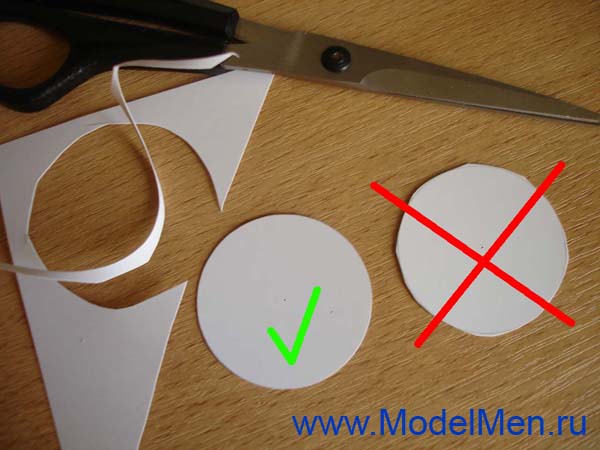
The most difficult element to cut out is the most ordinary circle. Children without skills cut out a polyhedron instead of a circle; you need to show and teach them how to do it correctly! First, you need to cut the part around the line at a distance of 2-5 mm, so that nothing else interferes, then cut along the finishing line.

The cut circle should not have any corners, just a clean, straight line!
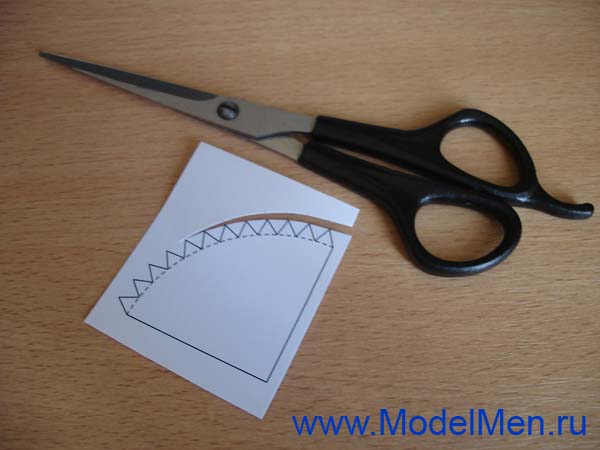
Often you have to cut out complex parts with small triangles for gluing (see photo). Before cutting out such a part, you must first go through all the folds with a compass; they are drawn with a dashed line. Next, use scissors to cut off the excess paper along the tops of the triangles.
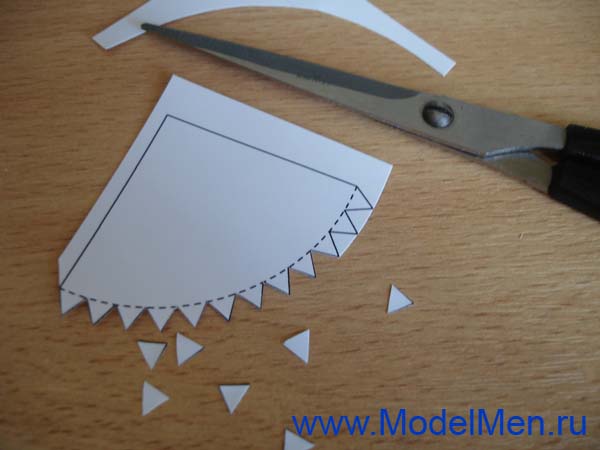
In any direction, make cuts along one side of the triangle to the fold line.

Then, on the back side of the triangle, make a second cut until the piece of paper falls off on its own; no need to pull it out of the corner with your hands! You will get a neat piece, and the corners will be easy to bend thanks to a pre-drawn line with a compass needle.
To cut strips long or short and save time, use a metal ruler and a sharp knife or blade. You need to cut on a sheet of plastic or glass so as not to spoil the table! Press the ruler firmly, otherwise it may move and ruin the paper.
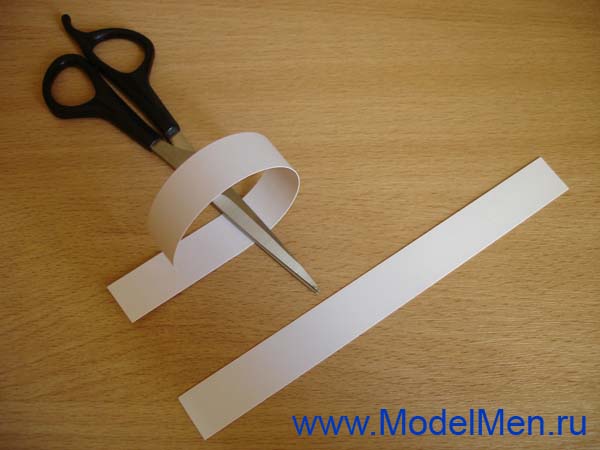
Often, to glue a cylinder, for example a car wheel, you need to glue the paper around the circumference so that the paper does not resist; it can be bent with scissors or on the edge of the table. To do this, take the folded scissors in your right hand, in your fist, place a strip of paper on top and press it with the thumb of your right hand, now with your left hand pull the strip of paper so that the strip rubs against the edge of the scissors. You can also do this by stretching a strip along the edge of the table.
This is where I finish my acquaintance with the basics of paper modeling, if I didn’t tell you something in this article, I will tell you in others or you will learn it yourself in the process of work. I wish you creative success and will be happy to look at your paper models!
At all times, paper products have been especially popular, since the material itself is not expensive, and the products look decent. We are all familiar with the origami technique, but humanity has stepped further and a new type of art has arisen. Translated from English, it means craft paper and implies geometric modeling from cardboard or paper, living and inanimate objects.
Penguin and baby
Various designs have conquered all ages and are now one of the most popular types for family leisure. Some creations require special care and time. If this is your first time encountering this technique, then a step-by-step master class on paper modeling will help you understand the topic

These can be living objects or creatures, children's favorite fictional characters, and whatever your imagination desires. This activity is usually perceived as a vacation that brings the whole family together. Agree, it’s not often possible to spend family leisure time usefully.
Set of polygonal paper shapes
In order to have an idea of what the blanks of the future product look like, we bring to your attention the available polygonal paper shapes and their templates for cutting. Animals are in great demand for production.


3d shark in decor
Modeling from cardboard or paper is a delicate process of making a variety of geometric shapes and products.

night light in the form of a whale

papercraft elephant
This is a general instruction that describes the basic principles of operation. Each set is offered with a separate one in printed form.
Creating and editing flat patterns
For full operation, you need to download the appropriate work programs. Pepakura comes in two types: “Viewer” and “Designer”. “Viewer” allows you to view available scans; they are easy to find in Internet resources. “Designer” provides the ability to edit ready-made layouts, often for simplification. You can also rotate in any of these programs for a better look, select parts on a 2D scan to look at the gluing and fold lines.
Nuances. Most of the free designs, which can be freely viewed and printed in “Viewer,” are not available for full editing in “Designer,” due to copyright issues.
You can limit yourself to Viewer to begin with. The files are in pdo format. Choose by difficulty level. Most often it is written about in the description, depending on the number of pages and small details. Select, download, open through Viewer and print. My personal advice is to start with completely white blanks. But if you downloaded it already with built-in textures, then it’s easy to remove them - click on the cube and they will disappear.
Master class on three-dimensional modeling and design from paper
Models are assembled from pre-prepared and bent parts. Developments must be printed on paper with a density of 170-200 g/m². This will guarantee the strength and durability of the structure.
For assembly you will need:
- scans or diagrams
- glue (do not use PVA, it will deform the paper after drying) or thin double-sided tape
- brush
- needle for applying glue in hard-to-reach places
- metal ruler
- sharp scissors, almost any straight scissors or a stationery knife, which is often supplied in a purchased set, will do
- dots for pressing folds
- any flat surface for cutting
- In order not to spoil the desktop, you need to put a piece of linoleum, plywood or glass on the surface
The main material for production is paper. In principle, you can use ordinary A4 sheets with a density of 65-80 g/m3, but if the creation is large, then it is better to use whatman paper or drawing paper (160-180 g/m3), for the smallest details you can try (if you find it, of course, I don’t smog) cigarette. When constructing paper polyhedra, I recommend working as follows: After the required pattern has been downloaded and all the tools are at hand, proceed to cutting and gluing.
Cutting out a shape from paper according to the diagram
Before you begin assembly, you need to prepare your work area. Then, print out the blanks. Make sure the parts are numbered. If there are no numbers, write them in the margins with your own hands. This will save time when gluing large crafts. There are three types of lines according to which blanks appear. Solid line - cut off a piece of paper using scissors. The dotted line bends inwards on models without textures, and bends outwards on models with textures. Dash-dotted - without textures outward, with textures - inward.
Cut out the blanks carefully, do not forget to leave “adhesive margins”. Thanks to them, the different parts of the product will connect to each other. Bend everything along the fold lines. If it is very long (more than 8 cm), then use a ruler.
Folding and assembling papercraft from paper
Preparing folds. In order for the part to bend in the correct position, you need to go step by step along all the lines. A non-writing pen will help you with this. Bend the element along the dotted line. Try to fold as evenly as possible and don’t be afraid to apply force, everything will be in its place when assembling. The bent edge on the outside is generously coated with glue, or you can use narrow double-sided tape, as you prefer. Look for identical numbers and connect them. The process is simple. It develops attentiveness well. The gluing is hidden inside the craft so as not to expose unevenness to everyone.

Don’t rush to connect everything at once; if your method of fastening is with glue, then you should wait for it to dry completely and then proceed to the remaining parts. From personal experience, we recommend using double-sided tape. Take this as an option. Its use will save your time and nervous system. In addition to the usual thick adhesive tape, there is also a narrow one. Often, it turns out to be better and lasts longer than regular glue. True, working with it is quite a painstaking task, so immediately prepare tweezers in order to easily remove the protective paper. But be careful, use logic and calculate the order of fastening the parts so that there are no inconvenient moments at the end of the process.
For a beginner, paper modeling seems like a rather labor-intensive process, but you just have to try it, and this activity will become one of your family’s favorites.
The gluing procedure is a very responsible matter, as it requires perseverance and maximum care. All joints must match - this is the main secret of success during the joining process. Apply a thin, even layer of glue on both sides. You should move the parts slightly to ensure even distribution. After the parts are in the correct position, they should be pressed tightly and wait until the glue dries.
From time to time you need to use tweezers. These tools are especially useful in the final stages when you have to work inside through a small hole. You should move the parts slightly to ensure even distribution. After the parts are in the correct position, they should be pressed tightly and wait until the glue dries. From time to time you need to use tweezers or, better yet, surgical forceps. These tools are especially useful in the final stages when you have to work on the inside through a small hole. We use super glue for gluing small parts or if you need to quickly connect something.
We would like to warn you that even the smallest defects of a few millimeters can ultimately deform the entire picture.
But if it’s glue, then you should understand which company to give preference to. Check it for stickiness. It is necessary that after complete drying it does not shrink the creation and does not leave marks. In addition, gluing should occur in 15-25 seconds, this moment will show you the quality. You should also remember about safety precautions. It should not be toxic. In addition, it should set quickly enough, but not instantly. The last but very important requirement is that the glue should not be toxic. Often crafts are decorated with garlands or light bulbs, turning them into night lights.
Processing flat patterns for paper modeling
If the product is colorless or you decide to repaint it, then special paints are best suited. They are nitro-based, dry quickly, the paper does not get wet from them, the only thing is that they are expensive, several colors will cost the same as a whole plastic product. Therefore, try to carefully cover the surface with thick gouache, making sure that it does not get wet.
Strengthening a paper model in papercraft
Important: almost all of them do not have an internal frame and are easily dented when pressed, or even under their own weight, so I recommend strengthening them during assembly by gluing in at least a few spacers.
Safety precautions
- A dry place will protect against unnecessary moisture.
- Carry out the gluing process at the table, and not somewhere on the sofa or floor.
- The finished product on the edge of a table, shelf, cabinet will definitely fall.
- Wipe off dust from the finished product with a dry cloth.
- Keep your workplace in order, since the work is very painstaking and you definitely don’t need unnecessary chaos in the workpieces.
Simple paper model for children
To develop the baby’s logic and fine motor skills, experts decided to create figures, but with a lower level of complexity. The child will be happy if you offer him an assembly of funny figures.
Cardboard modeling in examples.


Schemes of animals, birds
They occupy a special place in a person’s life. And nature without animals would be incomplete. Why don't we plunge into this wonderful world. Just look at the birds, by making them using the technique, you will be able to bring a piece of life and beauty into your interior. And if the bird serves as a gift, then for the owner it will bring freedom to difficult areas.
The polygonal raven is a complex design that requires skill.

You can download light paper figures for children and their designs on the website ru.dreamstime.com by inserting our referral number res25459430 to get a discount on paid subscriptions and gain access to free ones.

Doves of peace will decorate any kindergarten and become an educational craft for a child.

Complex polygonal


You can download patterns of these wonderful black birds for bird decor on Etsy.

The wise owl is ready to inspire you to make smart decisions.


Just look at this beauty! The wall parrot will become a favorite of both children and adults.

Low poly 3D white dove.

A panda is an excellent detail in a minimalist, monochromatic interior.


The sly fox will bring a forest atmosphere to your home.


Predatory panther and black cat symbol of grace in your design


Creative design cat relax
And also, a wonderful souvenir - a heart. It can be cardboard, iron or plastic, it’s up to you to decide which material to choose.


Simple paper shapes
Colorful creations will decorate any interior and will be a pleasant gift. Choose the layouts that you like. Spend time together collecting wonderful figures.

creative photo masterpiece of horse head
The unicorn is a mythical creature that girls love so much. A three-dimensional figurine will be an excellent addition for a little princess.

The trophy is a mountain deer in black and red colors.

A pink elephant can be a decoration for any YouTube blogger who films reports about the animal world of Asia.

Paper plastic in diagrams and templates for beginners
This type of creativity lies in the fact that volume is the key characteristic of the product, while the details are realistic and plastic.


Not all paper products require reinforcement. For example, for interior items (animal heads), the rigidity of cardboard is sufficient. If you are making a fancy dress costume or a superhero mask (which will be actively used), it must be strengthened. Strengthening with epoxy resin. First you need to prepare the adhesive mixture: mix the resin with the hardener, then dilute it with alcohol until it is liquid but viscous. Apply the composition to the inside of the product in one layer, wait until it dries completely. Paint the outside of the piece with resin, then lay down a thin layer of glass wool (can be substituted with a bandage) and reapply the epoxy. During drying, the resin may leak, so the product must be placed on a blank and taken outside, or a large number of newspapers should be laid on the floor. Waves and smudges are removed with a hairdryer. Finally, the product must be sanded and re-coated with a thin layer of epoxy.
DIY paper sculptures in examples
- A statue of iron Arnie worthy of the hand of a sculptor.


Iron Man himself

the mighty and imperturbable Hulk

decor sculpture
Papercraft for beginners in video tutorial