Manicure tools. What tools should a manicurist have at the start (checklist) Manicure tools for a beginner
Content
A neat manicure for a woman is not a luxury, but a way to feel beautiful and confident. Regular visits to salons take time, but if you have supplies and professional nail design tools, you can take care of them at home. The list of necessary devices will help you make the right choice.
Nail care materials can be purchased at specialized sales points or online stores. Professionals do not recommend purchasing a ready-made manicure kit for beginners. The tools in it are often of low quality, and most of the items are not useful for work.
Conventionally, all devices can be divided into several groups:
- Polishing. Tools for shaping nails - files and soft buffs.
- Decoration. This group includes painting brushes, rhinestones, stickers and other design accessories.
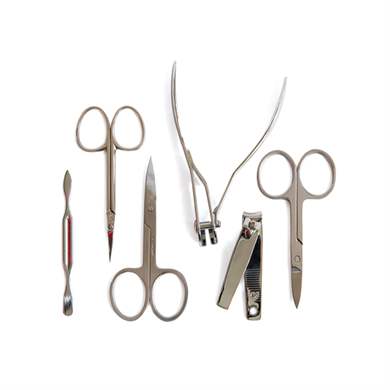
- Manicure. To care for the nail plate and remove the cuticle, tweezers, scissors, special scrapers and pushers (sticks for pushing back the cuticle) are used.
Any novice master will sooner or later want to diversify the varnish coating with drawings and unusual designs. Special brushes are used for painting. Tools for manicure and nail design allow you to improvise with patterns, create colorful pictures and monograms. Brushes vary in shape and the materials from which they are made.
To work with liquid paints you need to buy brushes made of synthetic bristles, for thick varnish - natural ones.
Flat for base
This brush has a wide working surface, and the tip of the bristles is evenly trimmed. When designing nails, it is used to draw flowers, paint in the Gzhel style, distribute powder or glitter. Many masters prefer to apply the base coat for gel polish with such a brush. It lays flat and does not flow under the side bolsters.
Fan
In such a brush, the bristles spread out in a semicircle around the base. She gets manicures with glitter, abstract and landscape compositions. A fan brush is convenient for creating ombre designs. Apply several colors of polishes to the base coat one at a time, then gently brush from the base to the tip of the nail.

With beveled edge
The second name for this brush is dagger-shaped. It has a flat base, but the fibers are not cut straight, but at an angle of 45°. Dagger-shaped instruments are universal. With their help, three-dimensional paintings are created with acrylic powder and subtle patterns with paints.
An angled brush is convenient to use when drawing the edges of a French manicure.
Striper Brush
It is also a liner, or a hair. This is a small brush with thin bristles up to 2 cm long. It will be convenient for drawing monograms, long lines or arbitrary curls. The liner is also used to design fashionable geometric manicures and when working with floral motifs.
This nail design tool has iron tips in the form of balls of different diameters at the ends. It is suitable for decorating manicures with dots, drawing stamens in flowers, and painting using the Khokhloma technique. To prevent dots drawings from blurring, apply the paint with smooth and slow movements.

Orange sticks
Manicure devices - long wooden skewers - are pointed at one end and scapula-shaped at the other. They are made from orange wood and are used to push back cuticles during unedged manicures or to remove gel polish manually. Use the sharp end of the stick to remove dirt and dust from under the nails. It is also convenient for them to remove excess varnish from the side rollers if you wrap a little cotton wool around the tip and dip it in an acetone-free liquid.
Tweezers and small scissors
Good manicure tools will last for several years. To trim your nails, choose scissors made of durable steel with rounded blades. Use them only when working with your fingers; when performing a pedicure, choose tongs. For design, it is convenient to have simple small scissors on hand. They can be used to cut stickers or other paper accessories.
A good tweezer with thin edges helps to decorate designs with elegant beads, beads or stones. Anything that sticks to varnish requires precise application. Otherwise, the manicure will look sloppy.
It is convenient to use tweezers to remove small debris or lint from the uncured coating, then you need to go over the surface of the nail plate with a new layer of varnish.

Lint-free cotton pads and sponges
Disposable wipes are used to remove any unsuitable coating or design and to wipe off the sticky finish. Do not use cotton wool for this purpose, as its lint may ruin the design. Using lint-free wipes, it is convenient to degrease the nail surface and tools.
When creating unusual or abstract nail designs, you can use soft sponges. With their help, splashes, a stone or faded effect, and an ombre-style coating are created on the surface of the varnish. Sponges are sold not only in nail shops, but also in the cosmetics department.
As a last resort, you can use a piece of kitchen sponge to wash dishes.
Cuticle remover
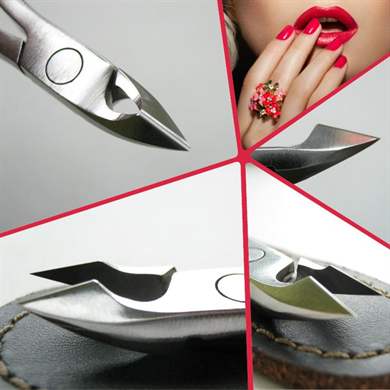
Manicure accessories include nippers for working with the cuticle - the skin at the base of the nail. They differ from nail clippers in the type of spring and the shape of the blades. Cuticle nippers have a smooth stroke and a sharper cutting part.
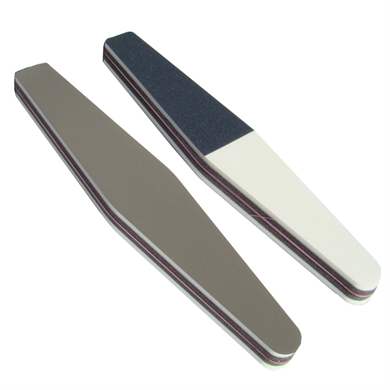
Buffs for manicure

Files with low abrasiveness (surface roughness) are designed for polishing the surface of the nail plate before applying varnish. In appearance they resemble a simple file, but the buff is softer to the touch.
It can be used not only to treat the nail, but also to remove the top layer of varnish.
Accessories for design
The choice of materials and tools for nail design - creating patterns and decorations - is huge. Conventionally, all these funds are divided into 2 categories:
- To create a flat manicure. This group includes foil, stickers, ribbons and other materials for nail extensions that do not rise above the main coating.
- Tools for 3D design. These are voluminous beads, rhinestones, bouillons, intertwined threads. They may protrude above the surface of the nail.
Stickers, ribbons and foil
The most popular design accessories:
- Stickers are drawings on a durable adhesive base. They are applied to dry varnish and covered with a quick-drying transparent layer.
- Ribbons. There are different textures (from fabric to metal) and colors (plain, patterned, fabric design). They also have a sticky base and are applied to a dry coating.
- Foil. This is a special film with amalgam coating. The master applies it to the painted nail and presses lightly. The foil print is secured on top with transparent varnish.

Glitter powder
It is not necessary to have a shiny polish in your arsenal - you can always add a little brightness to your nails with the help of a special powder. Small glitter comes in small plastic packages and can have different shapes: round, square, triangular, diamond. Glitter is applied to the top coat of varnish using a brush.
You can also add shine to your nails using special rubs. This is a fine powder with different shades. It is applied to a painted and dried nail and rubbed in using a sponge. Remaining powder can be easily removed with a brush.
The most popular rubbing effects are metallic, holography, chameleon.
Beads and rhinestones
Colored glitters and films can be used alone or mixed with other design components. The most popular accessory for decorating nails is rhinestones. They are attached to a small drop of varnish, acrylic or embedded in gel. Rhinestones give a manicure design a special charm.
The beads are slightly larger than rhinestones and will rise noticeably above the surface of the nail plate. Professional masters use them only for decorating manicures that will be worn for no longer than 7 days. Beads are attached to acrylic or topcoat. There is also a smaller version of beads on sale - broths. They are used in the “Caviar manicure” design.

Stamping
If you don’t have the skills of an artist, you can always use ready-made drawings.
Stamping is a method of applying patterns to nails that does not require additional painting.
This is a nail art tool kit equipped with a stamp, stencil and scraper. Before applying the design, coat your nails with polish of the desired color.
Apply some paint to the stencil. Holding the scraper at a 45° angle, remove excess varnish. Press the stamp firmly onto the stencil with paint and roll it back and forth and on the sides a little. Use the stamp to create decorations on your nails by pressing it onto the desired area. Remove any remaining polish from the skin with a lint-free cloth.
Base and top coat
To ensure that the gel polish sticks well, a base coat is used. This is the first transparent layer that evens out the nail plate, hides minor imperfections and bonds the polish to the surface.
It is better to apply the base coat with a flat brush and dry it in an LED lamp for about a minute.
The top transparent coating is called topcoat. Its purpose is to fix the entire manicure and protect the varnish from external damage. The top can be matte (creates a coating without shine), with a sticky layer (this must be removed with a lint-free cloth) and without stickiness. It is recommended to apply the topcoat after creating the design. It is advisable to purchase the top and base from the same company.

Nail restoration products
With frequent use of gel polish, nails can peel off, become brittle and dull. The following tools will help fix the problem:
- Keratin masks. They contain liquid keratin, medicinal oils and vitamins. The base should be applied to clean nails and left for 5-7 minutes. Rub in the remaining mask with light movements.
- Strengthening varnishes. They contain calcium, wheat proteins and other beneficial substances. The varnish is applied once every 2-3 days to clean nails. The treatment course is 10–15 days.
- Revitalizing oils. They additionally contain vitamins and minerals. Such products not only strengthen the nail plate, but also make the cuticle softer and more pliable. The oil should be rubbed into the surface of the nail every day. The treatment course is 7–14 days.
Lucky
The choice of colors of gel polishes for manicure is huge, as are the manufacturers of these coatings. Experts recommend giving preference to proven brands. Such varnishes remain stable for 10 to 20 days, have a dense consistency and lie evenly on the nails.
To create a design and a regular coating in your arsenal, it is important to have the following color combinations:
- Basic. Pale pink, opaque white, red and black polishes are classic. These colors are used more often than others when creating different designs. When purchasing, pay attention to the weekly varnish CND VINYLUX No. 105, 181,111 and 108.
- Nude shades. Pastel shades are ideal for women who don't like bright colors or have short fingers. These varnishes visually lengthen your nails. Check out CND Vinylux, color 195 Naked Naivete, Mavala – Mini Color Rose Shell 9091162.
- Metallic colors. Polishes with gold, purple, blue or silver glitter can be combined with any other shades. They will highlight the beauty of your hands even without additional accessories. Buy the following products in the set: CND Creative Play No. 448 Urge To Splurge, Sandy Planet Nails (155).
- Glitters. Glitter polish is the most unpretentious. It will not show the mistakes of a novice master or unevenness of the nail plate. For decoration, try these products: varnishes CND Vinylux Emerald Lights No. 234, Brigitte Bottier, Silver Collection No. 452
To create a good manicure you need to have a high-quality set of necessary tools. Each master himself determines which tools to carry out certain operations, but it is impossible to do without some devices, such as scissors, wire cutters, files or a pusher.
Files. Needed to give the desired shape to the nail and correct it. There are different types of files: wooden, plastic, glass and ceramic. Each of these files has its own use.

Buffs. This is a special file, which is a voluminous rectangle. Used for grinding and polishing the nail plate before applying the coating. The abrasiveness of the buffer determines what type of nails it will be used for.

Nippers for cutting cuticles. The main difference between nippers is the length of the cutting surface and the shape of the “shoe”. In addition, the cutters differ in the type of spring and the design of the connecting part, which in turn affects the smooth running of the blades.

Nail clippers. In shape, they are practically no different from cuticle nippers, but for nails they are more massive. And they differ from cuticle nippers in their “shoe” shape. They don't have to be very spicy.

Knipsers used to shorten particularly thick and strong nails. Can be used to cut toenails.

Scissors. Can be divided into two types: for cutting the free edge of the nail and for removing the cuticle. Scissors h rounded and with a thin working surface - for removing cuticles and hangnails. To trim overgrown nails, both straight and curved scissors with a wide working surface are used.

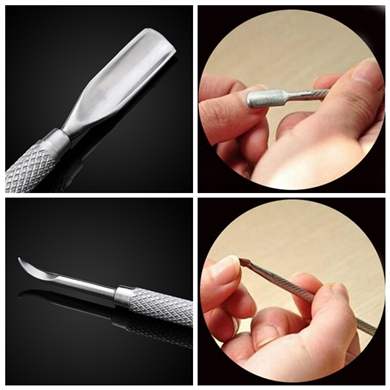
Shovels and pushers. The pusher is used to prepare the cuticle for removal. A scraper is a universal metal tool that combines a pusher and a spatula.

Trimmer. A tool used to remove cuticles. Its working part resembles the letter “V”.

Sterilizer. This is an integral device for every master, which allows you to keep your instruments in a sterile condition.

High-quality tools are not afraid of aggressive environments, so they do not rust and, even with intensive use, retain their factory sharpness for a long time. The cutting part of the tool can always be restored in a special workshop if it becomes dull.
Shared
A manicure in a salon is most often an expensive service; you need to make an appointment in advance and figure out the time. Masters do not always do quality work or misunderstand the client’s wishes; the rule “depends on your luck” applies. Problems that arise can be solved by self-care. For a manicure at home, you need special tools for correcting nails and the periungual space; toothpicks, stationery scissors and other improvised means will not work. It is important to purchase high-quality professional supplies so as not to get hurt, not to get infected, and as a result to get neat and beautiful nails.
The manicurist's starter kit includes tools for treating the nail plate, cuticle and skin folds located next to the nail bed. A disinfectant for sterilizing instruments is a mandatory attribute of a case for a professional manicure.
Even if the equipment is used by only one person for personal purposes, the equipment still needs to be regularly cleaned to prevent infection and the development of contamination.
Bacillol AF - a transparent solution with an alcohol odor, disinfects the surface
Use, for example, Bacillol AF:
- First lay out all the items on a clean napkin.
- Spray the product onto the tools.
- Wait until completely dry, do not wash off.
When purchasing manicure tools, pay attention not only to the price, but also to the reputation of the manufacturer. Your work tools should be made of surgical steel and have comfortable handles. Compliance with these conditions guarantees durability of use and safety in use.
15 accessories for smooth and beautiful nails
A beginner manicurist’s case should include the following tools:
It is best to keep all these miniature accessories in a special case equipped with holders for fixing tools. This approach will allow you to keep everything in order, and during nail treatment the necessary item will always be at hand, which eliminates the risk of loss.
The tool storage case should also be regularly treated with a disinfectant.
Choosing a manicure router
A milling cutter is a device for professional processing of the nail plate.
The milling cutter is used to perform hardware manicure and is necessarily included in the manicurist’s starter case.
When choosing a router, you need to consider what purpose it will serve. Devices intended for home use have low power and are fully justified by their affordable price. If a milling cutter is required to provide professional manicure services at home, then the selection criteria change.
The high power of the router will give it the opportunity to work for a long time without the risk of burning out or breaking, so it is better to choose a device with a resource intensity of 20 W or more and a rotation speed of more than 25 thousand revolutions per minute.
This milling cutter can also be used to work with gel polish, when the device requires long-term operation at maximum load.
You need to purchase special attachments for the router - cutters, sometimes they come included. For a novice manicurist, you can purchase a starter set of cutters, it includes:
The ceramic cutter “Corn” is used to remove any artificial materials from the surface of the nail.
Ceramic cutter delicately and quickly removes artificial material from the nail
You can also use it to process nail folds, and the wear-resistant material from which the cutter is made will allow you to use it for a long time for both manicure and pedicure.
The felt cutter is designed for polishing and grinding the nail plate. This cutter is not suitable for an artificial nail, but it can make a natural nail shine.
The felt cutter is made in the form of a cone and requires regular replacement
The fissure cutter is mainly used for processing cuticles and nail folds. It is also used to clean the space under the nail.
The fissure cutter glides gently across the plate and is suitable for use on brittle and vulnerable nails
The cutter is made with natural diamond coating and carefully removes rough, dry pterygium.
Pterygium is a thin film of necrotic (non-viable) cells near the base of the nail, it is also called the lower layer of the cuticle.
The silicon carbide cutter is used to correct artificial nails and very rough cuticles. It is better to choose it in the shape of a cone, as it is better and more convenient to work with.
Mills with fine abrasive diamond coating are also suitable for processing natural nail plates
A silicone manicure cutter allows you to perform professional polishing of the nail plate without using a buffer or cuticle oil. This cutter eliminates all unevenness on the nail.
A silicone cutter can also be used to polish artificial nails.
There should be at least ten orange sticks in the manicurist’s case. Such sticks are traditionally made from orange tree wood, but in rare cases bamboo is also used. Orange tree wood is famous for its strength and at the same time softness, which makes the sticks safe to use and non-traumatic.
These are ordinary sticks in appearance, only on one side there is a pointed nose, and on the other the instrument has a flat shape.
Orange sticks absorb water well, so they cannot be treated with an antiseptic. After use, throw the stick away.
Sticks are used to clean the nail plate from dirt and to move the cuticle away from the base of the nail bed.
Cuticle nippers
Nail clippers are necessary for performing trim manicures, during which the rough cuticle is removed. The highest quality and most durable wire cutters should be made of durable and hardened surgical steel.
The basis of any high-quality trimmed manicure is professional nippers made of durable steel.
You need to purchase this tool only in specialized stores. If you buy cuticle nippers at a kiosk or small hardware store, then there is a high risk of injury while performing a manicure.
A little secret: if you are a beginner manicurist, it would be more appropriate to choose cuticle nippers with narrow blades. This will make your manicure more neat and safe.
When purchasing, be sure to check the cutters for clearance between the blades. A high-quality tool cannot have a gap between them; the blades must be perfectly fitted to each other. Otherwise, trimmed manicure using them will injure the cuticle, causing inflammation and infection.
Surgical steel pliers require virtually no sharpening and can be used for a very long time. If the blades of the wire cutters do become dull, you can use a multi-layered diamond stone for manual sharpening.
When sharpening with a diamond stone, the outer cutting edges of the tool should be carefully processed.
During operation, the pliers must be held tightly, but without excessively squeezing the handles and spring mechanism. Ideally, the pliers should be held in a firm, yet relaxed hand.
Clipper
Clippers (otherwise known as cutters) are designed to cut the free edge of artificial nails. It is better not to use this tool for natural nails, as aggressive action can lead to injury. An exception is the use of a clipper for men's nails, since the man's nail plate is sometimes so hard and thick that the use of ordinary nail scissors is impractical.
The free edge of the nail is placed into the clipper, and then the handle is pressed, which lowers the sharp blade onto it
Masters specializing in nail extensions call such a tool a tip cutter or guillotine.
There should be a fairly wide space between the clipper blades to allow the use of a high-arched nail tool.
Files for processing the edges of the nail plate
Manicure files for artificial and natural nails are designed to correct the free overgrown edge of the nail and differ in the intensity of the abrasive coating. A manicurist's case should contain at least five types of nail files.
Under no circumstances should you use a nail file made of metal! Such a tool leads to delamination of the free edge of the nail and looseness of the nail plate. A metal nail file can only be used for artificial gel polish coating.
When choosing nail files, it is important to consider the degree of hardness (abrasiveness) of each manicure tool
The abrasiveness (hardness) of files is measured in grit. For example, for correcting the free edge of natural nails, files with an abrasiveness of 190 to 300 grit are suitable, but for processing artificial coating, a hardness of 90 to 180 grit is required.
The following materials are used to make professional manicure files:
Scissors with straight tips for trimming overgrown nails
Nail scissors must be made of medically hardened steel, and their blades fit tightly to each other. A professional tool can withstand long-term use without requiring constant sharpening.
High-quality tools are characterized by easy and smooth running, as well as a smooth cutting surface.
The main working area of manicure scissors is concentrated precisely in the tips; the convenience and safety of its operation depends on how easily the tool cuts off the overgrown surface of the nail plate.
There should be no nicks or cracks on the cutting parts of the scissors. This can lead to splitting of the nail and infection under the skin.
Experienced professionals, before cutting the free edge of the nail, use hot baths with the addition of valuable natural oils or soda, thanks to which the nail plate becomes more pliable. There is a trick: the smaller the step of the scissors when correcting the shape of the nail, the smoother the cut and the neater the manicure.
If suddenly an injury occurs during a manicure and the skin is damaged, then the affected area should be wiped with alcohol tincture of calendula or pure medical alcohol.
Scissors with rounded blades for removing cuticles
In addition to nippers or nail tweezers, scissors with rounded blades are used to remove rough cuticles. Thin, elongated cutting blades are capable of carefully and safely cutting the cuticle and correcting the periungual ridges.
Narrow, sharp scissors, sharpened using a special technology, clearly cut the periungual skin
These scissors are a salon tool and are present in the case of every experienced manicurist. With their help, you can cut the cuticle with the thinnest, narrow strip without affecting healthy skin and without leaving hangnails that can lead to infection and bacterial contamination. Before performing a trim manicure, be sure to steam the skin of your hands and push the cuticle to the side.
When choosing a tool, you need to pay attention to the professional marking of the hardness of the steel alloy. The best indicators are 40x13 or 30x13 markings.
It is worth purchasing cuticle scissors with an adjustable screw fastening, since in this case the tool can be tightened if its components become loose.
Corrector
The corrector is designed to remove excess nail polish or any other coating from the skin of the window and nail space. This product allows you to achieve the perfect manicure without taking a long time. A manicure corrector is often called a manicure pencil.
The most successful in form and content are pencils with a sharp cut, which allow you to remove excess varnish from the most difficult areas
Professional craftsmen choose pencils that come with replacement tips from the manufacturer. One tip is usually enough for a couple of months of intensive use. This approach allows you to save a little on creating a case.
Some correctors are designed in such a way that they can be disassembled and refilled with ordinary nail polish remover, thereby extending the life of the tool.
There is one more secret from experienced specialists: if the tip of a manicure pencil becomes frayed and loose, it can be processed with a sharp blade, giving it the required shape. This will also significantly extend the life of the corrector.
The corrector in the form of a pencil is ideal for beginners in the field of manicure, removing all the flaws when applying decorative varnish.
A curette for removing dead epidermal cells located under the cuticle is a professional tool for a manicurist. It must be used with great caution, since in the process of working with it microtraumas of the skin often occur. It is not recommended for beginners to use a curette, however, it should be present in a professional case.
The curette not only cleans the areas of the nail plate under the cuticle, it can also effectively clean the subungual space.
It is suitable to use such a tool when working with thin and soft cuticles that do not require complete cutting. In this case, you simply cannot do without a manicure curette.
It is worth purchasing a curette whose length does not exceed 15 cm, otherwise it is very inconvenient to work with.
Using a curette when performing a manicure minimizes the risk of ingrown nails, and for people suffering from diabetes or reduced blood clotting, it is a necessary measure.
The working attachments of the manicure curette must be made of surgical steel marked 30x13, and the handle is equipped with corrugation to reduce the risk of injury. Using this tool, it is convenient to control the growth of pterygium and apply a decorative pattern in the form of peas and dots to the gel-varnish coating.
Silicone mat
A convenient silicone mat is useful for both nail art and regular hygienic manicure at home. A good silicone mat can easily be folded several times and does not lose its shape for a long time.
In addition to their main function, silicone manicure mats are used to mix the color palette of decorative varnish
The mat protects the workspace from stains of varnish or other consumables and prevents the hand on which the nail is being processed from slipping. After use, it can be easily wiped with a disinfectant solution or nail polish remover to remove decorative elements.
A manicure trimmer is used to process cuticles and is a slightly angled two-pronged fork.
You should purchase a trimmer equipped with a protective cap, so the manicure accessory will be less dull and last longer.
It is strictly forbidden to insert the trimmer under the cuticle!
While processing the cuticle, you need to hold the tool with the teeth up and at a very small angle to the nail plate, that is, almost parallel.
This tool is also a professional one and is not recommended for use by beginners in the manicure industry. The tips of the teeth are quite sharp and can easily injure the skin and cause infection.
The trimmer cannot be used if there are burrs and cracks in the area of the periungual ridges. It is also not recommended to use a manicure trimmer to treat cuticles more than once a week.
The buff is made in the shape of a massive rectangle. The main functions of the buff are polishing and grinding the nail plate.
Buff is a universal tool that can be used both at home for self-correction of nails and in beauty salons.
Some buffs are made from disposable materials that are not intended to be treated with a disinfectant, but most buffs are reusable.
Using a buff, the nail plate is prepared for applying a decorative coating; the tool is also used to correct natural nails. High-quality and well-executed polishing is the key to a good manicure.
Buff polishing blocks are less abrasive than regular files, but nevertheless, it is still worth focusing on the amount of grit.
There are buffs:
A manicure spatula is one of the master’s main tools and is used to process the cuticle and periungual ridges. Typically, such a spatula has two sides intended for different purposes. At one end of the tool there is a flat pusher for pushing the cuticle to the side, and at the other there is a scraper in the shape of a hatchet or spear for trimming manicure.
Double-sided spatulas are very convenient for home use
When choosing a manicure blade, you need to take into account the following features:
The brush is made of synthetic bristles and is used to remove dust that appears on the surface of the nail plate after filing. The tool is necessary both for manicure of natural nails and for applying artificial coatings.
The brush is suitable for thorough care and cleaning of hands and nails during manicure.
A brush for removing nail dust must be present in the case of a serious manicurist. Without it, the manicure will not be so neat and complete, and if the nail is being prepared for artificial coating or extensions, then the smallest particles of dust will not allow the material to form a tight adhesion (adhesion) to the nail plate.
Sometimes a manicure brush has long bristles and looks more like a shaving brush
Professional masters often use a manicure brush to wash other tools, thus taking care of the cleanliness of its synthetic bristles.
Protective screen for the master
The polymer screen is designed to protect the eyes and respiratory system from filing products and strong-smelling liquids for treating the nail plate. In addition, when cutting the free edge of a natural nail or extension materials, small fragments can jump to the side and cause injury, and the use of a protective shield protects the nail technician from such surprises.
A high-quality screen is perfectly transparent, does not turn yellow and does not distort
Such a screen can be easily washed with warm water and soap, and the frame that holds the protective device on the face should not put pressure on the bridge of the nose.
Sometimes safety glasses are used instead of a screen.
Glasses are designed to protect the eyes from the front, top and sides from exposure to particulate matter.
It should be noted that safety glasses do not provide respiratory protection, so if there is a frequent need to use volatile substances with a pungent odor, then it is preferable to purchase a polymer screen for the manicurist’s case.
It is better to purchase all the tools that you will need to perform a manicure at home separately. Ready-made cases often contain a lot of unnecessary accessories that are unlikely to be in demand. The most convenient way is to fill the starter case with exactly those tools that are ideal for performing a flawless manicure.
The delicate skin of your hands needs constant care, which is why women constantly get manicures. Good and proper hand skin care can be organized even at home. However, in order to do everything correctly and, conversely, not harm the condition of your hands, you must not only have certain knowledge and skills in performing manicure, but also a set of tools necessary for this. Let's look at what tools are needed for a manicure in more detail.
List of tools

Many professionals do not recommend purchasing complete manicure sets due to the fact that many of the tools in them are simply superfluous and will never be needed. The best option would be to collect the necessary tools for manicure separately, in a cosmetic bag. You don’t need to fill it right away either, let it happen gradually. Important criteria for choosing tools for manicure are safety, good reliability and quality of the tools.

Modern manicure is divided into two types: edged and European (not edged). Each of them, naturally, requires a completely different set of tools, as well as certain skills and abilities when performing the work. What do you need?
- Manicure scissors;
- File;
- Polishing file;
- Tweezers or nippers;
- Pusher;
- Manicure stick.
This list of materials cannot be considered exhaustive, but it includes the necessary minimum. If your home manicure is more complex or even designer, then you can add a couple of brushes, wide and thin, toothpicks and needles, as well as stencils to your home set.

Nail scissors
They are definitely the most important tool, so just any will not fit here. Using scissors, the shape of the nails is corrected, and if necessary, existing hangnails and rough skin are removed.
Correctly selected, high-quality scissors consist of high-quality stainless steel and are well sharpened. Therefore, when choosing this tool, you should not cheap out. Well, the main rule is that nail scissors should be used only for their intended purpose, you cannot push back cuticles or clean anything with them, there are still other special manicure tools for this.


Nail file
Using a nail file, the nails are adjusted and shaped. There are quite a few varieties of them, and its choice depends primarily on the type of manicure. You shouldn’t choose metal files if your nails are too brittle and peeling; they are only suitable for very thick nail plates. The most suitable file material for nails with thin and medium nail plates is wood or glass with a fine-grain coating. Choosing a flexible shelf or giving preference to a more elastic one depends on convenience, and the color range of nail files is presented in all the colors of the rainbow.


Nail clippers
They were developed as a means for removing (trimming) the cuticle; less often they are used to correct the shape of the nail. Tweezers are very convenient to use to eliminate defects that ordinary nail scissors cannot handle.
You need to choose them so that they are not only convenient, but also safe to use. To do this, when purchasing a tool, as with scissors, you need to check the sharpness of the sharpening. If it is not too sharp, this can lead to the fact that the tweezers will simply tear the hangnails and damage the skin.

Polishing file
A polishing nail file is used in the final part of the manicure and is needed to smooth the top part of the nail plate and make it more shiny. They are made from suede. There are no special criteria for choosing such files, but it should be remembered that they cannot be disinfected. Therefore, it requires constant updating.
Pusher
Pushers are considered to be blades that are used in manicure to push back the cuticle that has grown to the nail plate. They are distinguished by shape - rectangular and oval. The last one is suitable only for a round base of the nail, while the second one, rectangular, is suitable for the owner of a more straight one.

Every novice craftsman or simply a representative of the fair sex does not always understand exactly what tools are needed, how to choose them, what they are intended for and how to use them. Exist...
Every novice craftsman or simply a representative of the fair sex does not always understand exactly what tools are needed, how to choose them, what they are intended for and how to use them.
There are a lot of different tools of different quality and different purposes, thanks to which your manicure will become professional and no worse than in the salon.
For most women, incomprehensible tools in a manicure set remain incomprehensible. And today we will try to solve this problem.
So, there are several main tools:
Cuticle lifter (pusher)

Manicure spatula or pusher (this is a subtype of shoulder blade slightly narrowed towards the end) in almost 100% of cases it goes in a set with a manicure hatchet. It is this double-sided tool that is called a scraper. The manicure spatula itself must be made of medical grade stainless steel.
The blades may differ slightly in shape. There are round ones, there are rectangular ones, in the form of a drop or narrowed towards the end. This difference in shape exists because each person has a different shape of the nail plate and you need to choose a pusher that suits the shape of your nails. And, if you work in a salon, you will need all shapes of blades.
The instrument itself designed for o, to raise the cuticle for further work with it. This should be done with the convex side of the scapula towards the top, pushing the head of the scapula under the cuticle itself, but this must be done carefully, since the tool can be quite sharp. Also, the shoulder blade should be almost pressed against the nail plate.
Manicure hatchet 
Manicure hatchets also vary slightly in shape and size, but each is shaped like a triangle and has a sharp tip and tapered edge. The hatchet starts working after the spatula. Its purpose is to clean out all the skin under the already raised cuticle.
With a hatchet you need to clean absolutely everything under the cuticle. You also need to hold it while working so that the blade is pressed almost closely to the nail plate.
This tool is also made of stainless steel medical steel. You need to select it so that it fits snugly and comfortably in your hand.
Manicure scissors

There are several types of manicure scissors, but now we will look at 2 main types, the first of which will be nail scissors. They have a relatively wide and slightly rounded blade. These scissors are made from nickel, medical steel and zinc. If the scissors are made of other materials, you should not choose them. Also, never use scissors to cut nails. you can't cut the cuticle.

The second type of nail scissors are scissors that are used for cutting cuticles. They have a thin and curved blade, which is convenient for cutting the prepared cuticle. The tool must be very sharp so as not to tear the skin.
Knipsers (clippers)

Clippers, or as they are also called, clippers, are a tool that masters around the world use in pedicure and manicure.
This tool, like scissors, is made of stainless steel. The clipper most often includes a nail file in its kit.
The advantage of this product is that it is universal and is suitable for both cutting nails and trimming cuticles and hangnails.
Clippers cut the nail at an angle of 90 0, so the nail does not split. The nail clipper can always be carried with you, which will allow you to constantly keep your hands in well-groomed condition, without allowing nasty hangnails to ruin your day.
Nail files of varying hardness 
Files are divided according to the material from which they are made into:
- Paper files. The basis of these tools is cardboard coated with granite, quartz or Teflon. Such files are not durable and most often act as a disposable tool, since they cannot be disinfected. The advantage of such files is safety.
- Plastic files are among the most expensive. Their more budget options are made of regular or foam plastic. These files are gentle and are great for correcting natural nails.
- Metal files for nails - this is the most durable and strong file of all possible, but such files, due to rough spraying, damage the nail, as a result of which it can delaminate. But metal files are an excellent option for extended nails.
- Glass files. These files are made for particularly fragile and weak nails. The only drawback of this material is fragility. That is why it is better to keep it in a case or case.
- Ceramic nail file for nails is an incredibly fragile, but at the same time incredibly durable tool if handled carefully. Files made from this material are excellent for correcting natural nails.
- Laser nail file this is new material. It features laser stripes in the shape of a honeycomb, and its tips have small notches that are used to remove cuticles and hangnails.
- Straight, which are used for both manicure and pedicure.
- Blocks (buffs). They are used for grinding and polishing nails, both artificial and natural.
- Boomerang (banana), the shape of which allows you to hold the nail file in the most comfortable position. Incredibly convenient for both home and professional use.
- Curly files come in various forms. Such files are generally not the most convenient, but attract buyers with their appearance.
A very important thing when choosing a nail file is its hardness (abrasiveness). Abrasiveness is the degree of roughness of the tool. The higher the abrasiveness, the softer the file, and the lower, the harder the file.
The roughness of a nail file is measured in grits.
Number of grits and purpose:
- 80 grit - the hardest file, intended for processing only artificial nails;
- 100 grit - used for polishing artificial nails;
- 120 - hard file, which is also intended for acrylic or gel nails;
- 180 grit - a file that is used to give the nail shape;
- 220 grit in the file means that it can be used for natural nails;
- 320 grit is a soft file (mainly buffs and grinders), which are designed for polishing the natural nail and removing the glossy layer of the natural nail;
- 400 grit is also mainly used in buffs or for weakened thin nails;
- 1000 - 4000 grit are buffs and polishers.
Disinfection of files is carried out by “bathing” or spraying the files with any disinfectant, or using special equipment.
For a home manicure, simply wipe the nail file with a cotton pad soaked in alcohol.
Stores nail files best in cases and in low humidity. Polishers

Polishers also come in different shapes and are made from different materials.
Polishing files come in straight, zigzag and diamond-shaped shapes.
The abrasiveness of such files varies from 400 to 1000 grit.
Nippers (manicure cutters)

Nippers for manicure and pedicure, despite all their similarities, are completely different. They differ from each other in their functionality, and they are used to remove hangnails and cuticles.
The nippers are:
- For a manicure;
- For pedicure;
- For removing cuticles.
- Nail clippers are an alternative tool to scissors. They are used to trim hard corners of nails. By using nail clippers, the likelihood of nail splitting is significantly reduced.
- Pedicure clippers have a more massive appearance, wide blades and a reinforced body. And thanks to all this, they make it easier to deal with thick toenails.
- Cuticle nippers are used primarily to remove hangnails, cuticles, and side ridges. Their blade is thinner, and the body is not as massive compared to pedicure or manicure ones.
You should also remember that:
- Nippers should be purchased from stainless steel;
- Gaps and irregularities cannot be allowed between their cutting edges;
- When working, the nippers should not be too tight or loose;
- When choosing cuticle nippers, you should check them on polyethylene; the tool should not tear it;
- Also, the nippers should fit comfortably in your hand.
- To store nippers, as well as other tools for manicure and pedicure, you should use a special pencil case;
- Do not drop the cutters as they may break;
- Nippers that become dull can always be sharpened;
- At least once a month, the cutters should be lubricated with household or machine oil;
- After use, the cutters must be washed in a special disinfectant solution.

A buff is a polisher that can have several sides that differ in abrasiveness. The buff has the shape of a block and can be used to remove both the glossy shine from the nail plate and polish it.
The abrasiveness of the buff can vary from 320 to 4000 grit.
Disinfection

Disinfection is one of the most important stages in the manicure and pedicure process. The health of the client and the nail industry professional depends on compliance with hygiene rules and proper disinfection of tools.
If you do not follow the rules, especially when it comes to a salon manicure or pedicure, the client or master can become infected with hepatitis, HIV, herpes and many other diseases.
To avoid this, any manicure should begin with disinfection of the hands of the master and the client.
The purpose of this procedure is to destroy any microorganisms on the hands by rubbing the hands with an antiseptic.
- Be sure to remove all jewelry from your hands (rings, bracelets), since a large number of microorganisms can also live on them.
- The antiseptic must be with a spray bottle to avoid any contact.
- Apply an alcohol-containing antiseptic only to dry skin.
- A mandatory item is the presence of disposable latex gloves on the hands of the master.
The second and no less important stage is the preparation of tools.
- Cutting instruments (scissors, scissors, clippers) must be disinfected separately from the rest in a special solution.
| Stage name=""> | What's happening at this time | If you missed this step |
| Disinfection | During this stage, various infections, fungi, microorganisms and viruses are destroyed. | There will be a risk of infection spreading in the environment while cleaning the instrument. |
| Cleaning | Surface dirt (blood, skin particles, etc.) is destroyed. Cleaning can be done mechanically (brush, vibration) or chemically (in a solution). | Dirt becomes even more firmly attached to instruments rather than removed after sterilization, degrading their performance. |
| Sterilization | Microorganisms and their spores are destroyed under thermal influence and pressure. | Microbial spores can grow after a certain time due to the unsterility of the instrument surface. |
Instruments should be stored in a UV sterilizer with bactericidal lamps:
