Crochet chair rugs. Soft seat mat for a stool. How to crochet a round rug
Every woman wants to add comfort to her home. And various cute knitted items are designed to help with this. After all, they immediately fill an ordinary room with warmth and family happiness. In this article we will look at how to crochet a square rug for a stool. It turns out that it is not difficult at all and is suitable even for beginners! We will provide step-by-step instructions, diagrams and photo descriptions.
Before you start knitting chair rugs, you need to turn to useful tips and recommendations from already experienced needlewomen.
First of all, of course, you need to take care of the yarn. And there are many options here! A beautiful rug can be made even from old things or rags. The result will look no worse.
If you prefer to work with purchased yarn, then it is better to choose synthetic yarn. The most popular are acrylic or cotton with synthetic fibers. Please note that the threads must be very thick. Then the finished rug will be dense and warm. When knitting openwork patterns, it is better to choose, on the contrary, thin yarn.
Before knitting the rug itself, knit a small square with the same pattern and yarn that will be used in the planned product. Then wash and iron it. This will help you find out the number of stitches needed to knit a rug. Just count the stitches in ten centimeters and multiply by the desired size!
The scheme itself can be anything. You don’t have to look specifically for diagrams for stools; you can take the description of a floor mat or a cushion cover and simply fill in your measurements.

There is no need to buy new yarn if you have leftovers of different colors lying around at home. It's easy to make a beautiful product out of them. However, remember that the thickness of the yarn should be the same, so collect the threads carefully.
If it seems to you that the finished rug will quickly lose its shape, then you can make the base from thick fabric. Just sew them to each other. Be sure to eventually tie the rug with additional rows to make the product look finished and beautiful.
Rectangular

A simple option, whose knitting we will consider step by step.
- In the first row you need to knit a chain of double crochets of the length that the finished product should be. Then turn it inside out.
- In the second there are single crochets, the hook is placed under the front wall. When you finish a row, turn the piece over again.
- In the third, knit single crochets, the hook is placed under the walls of the loops.
- The fourth duplicates the second row.
- In the fifth, return to double crochets. The hook is also under the back wall.
Then simply continue the pattern from rows two to five until you get the size you want.
Square seat

The square one can be knitted according to the same pattern as the rectangular one, or you can make a more original colored version. In this case, the knitting goes from the middle in a circle.
Make rows with single crochets under the front wall. On each row, add stitches at the corners to create a square shape. In the second row, in the corners, place the hook under the air loops.
Using the same pattern, you can even knit a hexagonal rug, the main thing is to evenly add loops at the corners.
The diagram below will help you navigate. If you don't follow it, some difficulties may arise. For example, uneven expansion of the mat, bumps or depressions. Wrong proportions.

With a tight knit

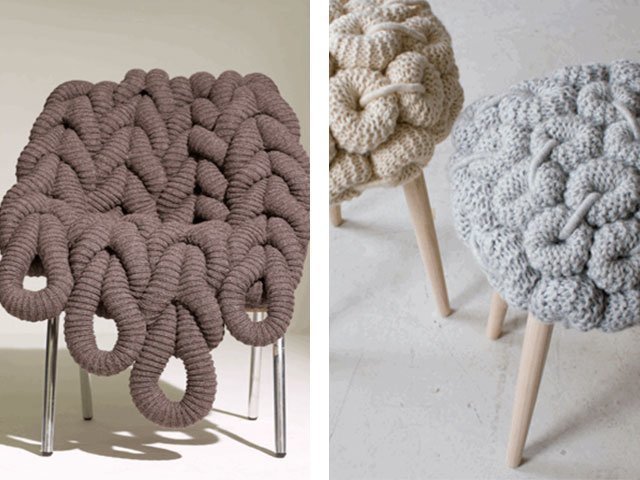
A very bright and interesting option that can be used to decorate a nursery. Of course, if you choose calmer colors, then such a seat will look beautiful in the kitchen or living room.
Please note that the yarn should be thick - from 5 mm. If you don’t find one, then knit in two threads.
First, make a chain the length of the desired finished product. Knit all rows in half-columns without crochets. You need to finish knitting when the length is equal to the width. The edges can be decorated with matching or contrasting ribbons.
"Granny Square"

The essence of this technique is the constant alternation of threads of different colors. You can take five shades of the same color or five completely different colors. The choice depends entirely on your imagination, the main thing is that together they look beautiful and harmonious. Below we present several diagrams from this technique that will help you figure it out.

Please note that the yarn should not be very thick, as in the previous version. In this case, the finished rug will look rough and the design will be inexpressive. You can use acrylic or wool mixture, and take a hook one and a half times thicker than the thread.
Using this pattern, you can knit individual squares. Then they are carefully connected and you get a cute and beautiful rug.


There is also an openwork version using the granny square technique.

If you don’t want to spend a lot of time fiddling around and connecting different elements, you can knit a rug from one piece. The diagram shows this clearly. It can be used for both single-color and multi-colored products. But the pattern looks more beautiful and expressive when using several colors or shades.

As you have seen for yourself, knitting a seat mat for a chair or stool is not at all difficult. In addition, it is small in size, so you can finish knitting very quickly. But the result will delight and warm you for a long time!


1.
2.
3.
4.
5.


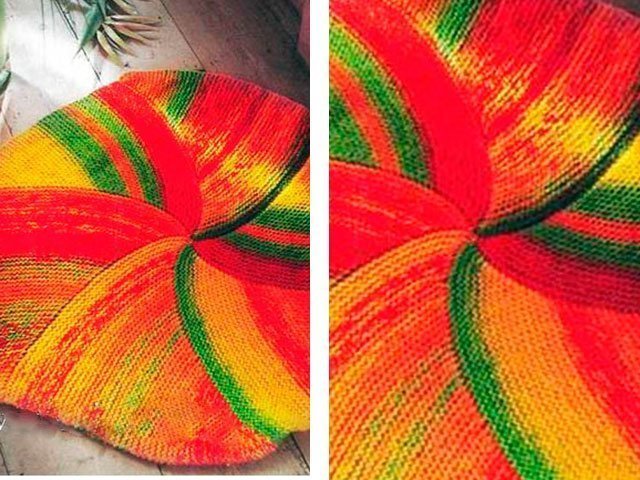
Not long ago on the Internet I saw photos of bright crocheted rugs of stunning beauty, apparently from Japanese magazines. I tried to figure out knitting patterns and technology. These new ideas turned out to be very easy to implement and I want to talk about them, and of course show off what kind of rugs I made.


The materials you will need are a few remnants of wool or synthetic yarn of different colors, but of the same thickness, and a hook No. 2 -2.5. The threads must be of the same thickness in order to obtain a high-quality, even product.
To make such rugs, you need to knit four strips of different colors separately according to the pattern:

First, we knit a chain of 60 loops (the result is a rug measuring approximately 30x30 cm, but this also depends on the thickness of the threads), we tie the chain with non-woven stitches.
- 2nd row: 4 stitches for lifting, 1 double crochet from the first stitch of the previous row, 14 double crochets, 4 double crochets from one loop of the previous row, 14 double crochets, 4 double crochets from one loop of the previous row, 28 double crochets, 2 double crochets from one loop of the previous row. You already get a strip with 4 rounded corners.
From the 3rd to the 6th row, knit with double crochets; in the corners for rounding we make increases as follows:
Upper and lower right corners (at the ends of the strip)
At the beginning of each row, instead of the first stitch, we knit 4 loops for lifting.
- 3rd row: 2 double crochets in each of the 2 corner stitches of the previous row,
- 4th row: *2 double crochets from one double crochet from one corner of the previous row, one double crochet*, repeat one more time,
- 5th row: *two double crochets, 2 double crochets from one double crochet corner of the previous row*, repeat once,
- 6th row: *2 double crochets from one double crochet stitch from the corner of the previous row, three double crochets*, repeat once.
Upper left corner
- 3rd row: 2 double crochets in each of the 4 corner stitches of the previous row,
- 4th row: 4 groups of 2 double crochets from one double crochet from one corner of the previous row, between them one double crochet,
- 5th row: 4 groups of 2 double crochets from one column of the corner of the previous row, between them there are two double crochets,
- 6th row: 4 groups of 2 double crochets from one column of the corner of the previous row, between them there are three double crochets.
We knit the lower left corner in a special way, which gives an additional effect to the rug:
- 3rd row: 2 unfinished double crochets, knitted together, in each of the 4 corner stitches of the previous row and 1 chain stitch (CH) between them,
- 4th row: 2 unfinished double crochets, knitted together, 1 ch, 2 unfinished double crochets, knitted together, from one group of corner stitches of the previous row, knit 2 more such groups, 1 ch between them,
- 5th row: we knit 3 groups similarly to the 4th row, between them there are 2 unfinished double crochets, knitted together,
- 6th row: we knit 3 groups similarly to the 5th row, between them there are two times 2 unfinished double crochets, knitted together.
- 7th row: we tie all the loops with non-woven stitches.
The finished strips need to be sequentially sewn together: to the long side of one strip we sew the short side of the second and so on.
Now the resulting long colored knitted ribbon needs to be intertwined as follows, as shown in the diagram:

I knitted small colored strips for a sample and will show you how to weave them. I sewed the stripes in the following order: gray, turquoise, burgundy, pink.

We place one strip of the resulting colored tape (gray) on the table, and bring the entire tape up under the gray strip.

Since the stripes have rounded corners, they themselves turn where they need to. We wind the tape to the left, then down and to the right under the gray and turquoise stripes.

Then we turn up onto the gray stripe, left and down under the turquoise stripe, and bring it out in the middle part of the receiving rug above the gray stripe.

We bring the ribbon under the burgundy stripe down, bring it above the gray stripe and then turn it to the right over the turquoise stripe and up under the burgundy stripe.

If, perhaps, it is not immediately clear from the drawing how to weave a ribbon from strips, then during the manufacturing process this will become more obvious.
We connect the ends of the strips (in my case, gray and pink) and for strength, so that the strips retain their shape and do not move, we grab them from the wrong side with threads.
It turns out to be a wonderful, original, bright rug that can be used for stools, for example.

To make a floor mat, you can knit according to the pattern and sew on the base.

We start knitting from the center and knit a square with double crochets, making increases in the four corners first with two VPs, and then in the same way as when knitting stripes.
If you are familiar with knitting, then you can practice your skills in chair covers. Crocheting here is more relevant than knitting, since the patterns created will not be so original.
A crocheted chair seat can not only significantly decorate the interior, but also protect the surface of the furniture from dirt and preserve its original appearance longer.
Crocheting for beginners is very interesting. This can quickly become a good hobby for many mothers who want to update their home decor.
Before you start crocheting rugs for chairs, you need to select suitable threads.
Here are some tips:
- Experts advise choosing a yarn called “Iris” for the rug. They have a rich mass of colors, are easy to hook and are not too thick.
- If you decide to knit a cape with your own hands to insulate the surface of a chair, then it is better to turn your attention to wool yarn.
- Will your crochet chair seats consist of several shades? Choose the same type of yarn so that they are the same size both in appearance and feel, this will simplify the work.
These simple lessons will help you decide on the right yarn. Fortunately, now you can find anything on store shelves and the selection process will not take much time.
Knitting methods
Knitting pattern for a square of cones Pattern for a square cape Another pattern for a square cape
A crocheted chair cover will look original if you use several ways to make it. There are many videos and various diagrams on the Internet that will help you make your choice. The main ones are the following types of loops:
- single crochet;
- double crochet, double crochet, stirrup, and so on;
- double crochet artesanal;
- pico;
- brushes;
- ring.
Chain loop (v.p.) Single crochet (dc. b/n) Half double crochet (half crochet. s/n)
Double crochet (art. s/n) Artesanal double crochet (art. s/n) Pico
Connecting post (connecting post) Brushes Ring
Round cape

Cover on a round chair
Standard knitted capes are made round, because this greatly simplifies the work. The crocheted chair seat should be small in size, and therefore one product can be made within a day. The mats for the stools will look more beautiful if you use several shades to make them. To crochet, you need to remember a simple procedure:
- It all starts with picking up air loops, which are finally connected into a ring.
- It is advisable to make the first column with single crochet loops wrapped around the ring.
- Next, the chair cover can be crocheted using any pattern, the main thing is to carefully monitor the number of stitches.
Circle one, two and three Circle four and five Circle six
Circle seventh Circle eighth Circle nine
Circle tenth Circle eleventh Circle twelfth
Circle thirteen Other options for round covers
Knitted chair rugs are ready for use immediately after completing the last round of stitches. Knowing how to knit can create stunning patterns and uniquely decorate any space.
Square cape

Knitting a square cape
Crocheting chair covers is not limited to round options. Square ones can also surprise with their attractiveness, and their production can be carried out in an economical mode. A square crocheted chair rug is made in the form of knitting strips on which you can use the remains of any yarn. The order of operations can be as follows:
- Before knitting the rug, measure the seat of the chair, because the length of the strips should be equal to it.
- Knit as many strips as are expected for the same stool size.
- After this, they are folded into one sheet and tied to the edge with cap loops.
- A knitted chair cover can be decorated with a border, which in turn will prevent it from sliding across the surface.
- You can also diversify the napkin with small tassels running along the edge.
We will weave our cover from multi-colored stripes. The stripes are knitted like a double crochet (dc). This cape required 22 strips.
We collect 11 strips into a single canvas. We tie them along the narrow edge. We knit RLS (single crochet). This is what the tied edge of the work should look like. We also tie the other 11 strips.
Then we intertwine the strips in a checkerboard pattern so that we get squares. We tie these squares along the contour and connect them into one fabric. We tie the resulting fabric along the edge with an RLS (single crochet). Next, we knit 2 VP (chain loops) lifting, knit the next row with a dc.
We tie the edge and finish the work with a series of arches from 3 VPs, repeat after 4 columns. We make a fringe like this
Knitted seats last a long time and do not require special care. They are washable in a washing machine only at low temperatures - the only condition for their use. A crocheted chair cover would be a good gift for a resident of any country.
What are they needed for?
We knit blankets more for personal enjoyment or design updates than for practicality. Descriptions of each bedspread can be viewed online, so there are no obstacles to starting work. Every Russian person should have such beauty in their home.
Such an insignificant thing as a rug on a chair can greatly change the interior of a room and create a unique feeling of coziness and comfort. And if it was made with your own hands, and a piece of care and love was put into it, then, undoubtedly, it will attract the attention of not only household members, but also guests. It’s not at all difficult to make and there’s no need to buy special yarn for it either, because there’s always at least a little extra thread left after knitting. And now let’s look at a few examples of how to crochet an unusual and warm rug for a chair of various shapes.
Crochet a square rug for a chair with diagrams and descriptions
Square-shaped stools are often found in our everyday life, so such a rug will certainly be useful to many.
For knitting you will need several colors of yarn: from white to dark shades of any color and a hook.
- We form the first circular row. To do this, we make a ring from the working thread and knit three chain stitches. Next we make a square: 2 columns s/neck, 3 v.p., 3 columns s/n., v.p., 3 columns s/n., 3 v.p., 3 columns s/ nak., 3 v.p., conn.st. into the third lifting loop.
- The next row is 3 vp, then from each arch of the bottom row we knit 3 sts/s, 3 chs, 3 sts/s. In the last arch we make 2 pillars. and conn. column in the third point of the rise.
- Then again 3 ch, and knit the elongated loops two rows below (now this is the center): yarn over, hook the thread through the center, pull it out and knit a stitch.
Then another 1 column.s/nak.
From the corner 3 columns with / on, 3 v.p., 3 columns with / on.

The next side is from the middle of a group of 3 pillars. we knit 3 stitches, the middle one with an elongated loop. Then we repeat from the corner arch to the end of the circle.
- The fourth row repeats the same as in the third, only we make the elongated loop correctly, because the two rows below are now between the first and second rows.
- In each subsequent row, the number of column corner groups increases, and on the sides - the number of elongated groups. loops. At the same time, we change the color of the yarn, creating a contrast of elongated loops against a background of a different color.
Another tip: you don’t need to tighten the loops so that the sides don’t pull towards the center.

Having reached the required size, we knit 4 rows without stretching. loops, and in the corners only columns. - these are the sides of the rug.

You get such interesting touches.
Trying to make an unusual round rug in a master class
A round rug can easily be placed on a square chair and this will not spoil it in any way, so this shape is preferable to a square one.
Let's look at two diagrams and descriptions.
Knitting density: 10 cm width = 7 stitches with double yarn.
For lifting the first column.s/nak. replace with v.p., st. s/2nk. – on 4 v.p.
Lush stitch - knit an unknitted stitch.s/2nak. (there are 2 loops on the hook) - twice in one loop, you get 3 loops on the hook, and we knit everything in one pass.
A knitted rug according to this description will measure about 38 cm.
- We connect 4 vp in a circle, the second row 10 b/c.
- Next 2 columns/2nak. in one loop in a circle.
- 1 column b/nak., 2 column b/nak. in one loop - the whole row.
- Then a row of 2 lush pillars. in one loop, ch 3, skip 2 loops.
- Then 1 column b/nak. x 2 times, 3 columns b/nak. into the arch of the bottom row - in a circle.
- 2 columns/2pok. in one loop, 1 post/2nd. x 4 times – and so on.
- Last row – 1 column b/n., 1 v.p., 1 column b/n. x 3 times, 1 vp, 1 column b/n. x 2 times.
The knitting pattern can be seen below.
The product according to this scheme will have a diameter of about 51 cm.
- We dial 4 v.p. and connect them in a circle, knit the second row 12 stitches.
- Then 2 columns/2nak. into each pillar.
- Further in a circle, 1 column b/nak., 2 columns b/nak. in one loop, 1 column b/nak., 2 column b/nak. in one loop.
- Next circle: 2 columns/2k. in one column., 1 column.s/2nak. x 2 times, 2 columns/2k. in one column., 1 column.s/2nak. x 2 times, etc.
- Then circle: 1 column b/nak. x 3 times, 2 columns b / nak. in one loop, 1 column b/nak. x 4 times and repeat further.
- Lush column, 3 ch, skip 3 loops, 2 lush columns. in one column, 3 ch, skip 3 loops, fluffy column. and further in a circle.
- 1 column b/n., 4 columns b/n. in the arch of the bottom row, 1 column b/nak. x 2 times, 4 columns b/nak. in the arch, 1 column b/nak. - round.
- Then row - 1 column with / 2 back. x 11 times, 2 columns/2k. in one loop.
- Next 1 column b/nak. x 6 times, (1 st. b/n., 1 v.p., 1 st. b/n.) in one loop, 1 st. b/n. x 6 times. etc.
The products are ready, you can try them on. Of course, sizes may change after washing, so take this factor into account when knitting.
As you can see, there is nothing complicated about this and, if you follow all the instructions, you will get a nice seat for the chair.
If you have experience in knitting, you can make a chair cover from individual motifs. It looks very nice, but requires a little more effort.

Rugs crocheted or knitted bring not only aesthetic pleasure, they can also hide the shortcomings of chairs or armchairs well. Thus, by replacing old seats with new ones, you can periodically change the decor in the house and update the interior.
Video for beginners on the topic of the article
The video below will help you figure out some unclear aspects of the work or get a new idea for making a rug with your own hands.
An original and inexpensive way to easily transform your room and interior is to create a rug with your own hands. A fluffy, beautiful carpet will help quickly transform your home. But the most important thing is that you can create it yourself: choose the size, color, pattern, technique, so that the product has a unique character. You can buy knitted rugs in a store, but you must agree that creating one yourself is much more enjoyable!
How to knit a rug for beginners
Knitting rugs for beginners – the activity is very simple, but very interesting. Today we propose to familiarize yourself with the technique of knitting a carpet from white yarn with a beautiful central “braid” pattern and fringe on the sides of the product. This - a wonderful option for a knitted bedside rug . Its design is very simple, but in the end it will look very creative. Why is the model white, since it is intended for the floor? Since this rug is knitted as a bedside rug, and not for a hallway or bathroom, it will not get dirty as much and will last a very long time.
You will need:
- 400 grams of white yarn (we chose this shade, but it can be replaced with any other if desired)
- Knitting needles 4 mm
- And a hook with the same number. We will need it for tying, but it is quite possible to do without a hook.
Knitting density:
A 10*10 centimeter square should contain 28R. 17 P. 

Process description:
- Necessary dial 58 P. + 2 K.P.
- 2 rapports with a “tangle” (see C/X 1).
- Scythe on Agricultural 2 + 2 rapports on Agricultural 1.
- Knit like this for 42 cm.
- You can, if desired, tie the product around the perimeter using a S.B.N. hook.
- Fringe: brush in every second P.
All is ready! As you can see, the product is not very difficult to knit, does not require much time, it can even be used as a blanket, laid on a bed or sofa - this will add coziness. You can also leave this little thing for your pet - it will be very comfortable for a cat or dog to lie on it.
Popular articles:
Do-it-yourself rugs
Do you want to make your home more comfortable? Our next master class: knitting a rug with knitting needles from leftover yarn. This decorative element is knitted from small balls that the needlewoman has left over from previous projects, so it is very easy to adjust its future size: more threads than we have in the pattern with the description, or less so that it fits on a chair, for example. So, let's take a step-by-step look at what we might need for this work. 
Materials:

Description of work:
- Let's start by crocheting a chain from V.P. Here, of course, try to choose threads that are similar in thickness. You should end up with a fairly large ball of V.P. chain, as in the photo below.
- All the chains you make should be sewn together into balls.
We continue to knit with knitting needles, using the resulting ball like regular thread. We chose 8/10mm knitting needles. - You need to dial the loops to the width you want to make the future product and continue L.G. (L.R. - L.P., I.R. - I.P.).
- If you want a more durable option that will better hold its shape, do each row of L.P. garter stitch.
- It will turn out to be very heavy and dense, it can be used as a rug in the hallway.
- In the same way, you can do a long path to the corridor or children's room. Or, using all the colors of the rainbow, a rainbow rug with knitting needles. This will turn out to be an excellent children's option. Another advantage of such a product is that it can be square or rectangular.
Knitted round rug
How to knit a round rug for a chair with knitting needles for beginners - with our description and knitting pattern it’s very easy to do! The short row technique will be used here.
Materials:
- 12 skeins of yarn (50 grams each)
- Knitting needles 8 mm
Description of work:
We knit in garter stitch, the thread is folded in half, make six parts. 1 shot L.P. (S.L.P.) = remove P. as L.P., knit behind the product. 
- We dial 53 P.1 R.: S.L.P., 52 L.P.,
- 2 R.: 51 L.P., 1 S.L.P.,
- 3 R.: 52 L.P.,
- 4 R.: 50 L.P., 1 S.L.P., thread in front of the canvas, turn it over.
- 5 R.: 51 L.P.
- 6 R.: 49 L.P., 1 S.L.P., thread in front of the canvas, turn it over.
- 7 R.: 50 L.P.
- 8 R.: 48 L.P., 1 S.L.P., thread in front of the canvas, turn it over.
- 9 R.:
49 L.P.
Follow all the steps below: before removing P. – turn the product over – U.B. 1 P. at the end of the next R., then every 2 R. Continue in this way until we reach the next R. - 100 R.: 2 L.P., 1 S.L.P., thread in front of the canvas, turn it over.
- 101 R.: 3 L.P.,
- 102 R.: 2 L.P. All 102 rows are one part of the carpet. There will be six of them in total. We connect the motifs with a knitted seam. Tighten the loops and secure.
Various knitted rugs
You will find very beautiful carpet models for inspiration in photo selection
below. They can be knitted using absolutely any technique and from any material: from thick yarn, from scary things, rainbow or educational for a child, from bags. Moreover, the shape can also be any: unusual - a star, round, containing a pattern. 


How to knit a rug by hand without knitting needles or a hook
How to knit a rug video
Rug knitted from thick yarn
A beautiful rug made of thick yarn will look very good on the floor of a bedroom or living room
. You can put a coffee table on top of it, lay it next to the bed - it will decorate any floor! It's easy to do. 

For it you will need:

Process description:

Knitting educational mat
How to knit a star rug with knitting needles?
Here it comes again garter stitch , we knit each “piece” in turn, in the process we tie them all together.
- The process begins with a yellow thread: 5 P., garter stitch, in each P. after 1 P. and before the last one. P. – P.R. 1 P. Each R. + 2 P.
- Next, a dark shade of yellow U.B. from one side – 2 P. together (first). On the other side – P.R.
- Next comes the blue color , from the side of the first shade. On one side - U.B., on the other - cloves.
- Then the color blue. Again on one side - U.B., on the other - cloves. Repeat steps four times.
If it’s difficult for you to knit all the details with one fabric at once - they can be sewn together at the end
.
 Another version of such a product, where different colors alternate and 3 R. - L.P., 1 R. - I.P.
We knit a plaid rug knitted in different directions with knitting needles
A beautiful rug with a diameter of 124 centimeters.
Because it will be rainbow accessory
– take 8 skeins of thread of different colors. 3 mm circular needles, you can use stocking needles first. But this option is only for convenience.
We crochet 8 stitches and begin knitting in two directions using garter stitch knitting needles. The first P. in each R. is removed. Each 2 R. – P.R. To change the shade, we intertwine the threads. To attach one motif to another, we make a P.R., pulling out the P. from the first wedge. After 24 R. – we move the drawing. In half all P. We weave the thread of the previous R. with the working one. Knit to the desired size. The last R. can be tied using a hook for beauty and the finished look of the canvas: V.P., S.S. Either cut off all ends of the threads or hide them. Our beautiful rainbow is ready!
As you can see, this technique can be used to knit not only a bedding for a chair, but also a small rug for children or a hot stand. But in this case, do not use wool threads, only cotton ones! 
