Rooster made from plastic spoons with his own. What can you make from plastic spoons? Instructions for a DIY Christmas rooster toy made of felt
On Easter, the house should be elegant and festive. Bright colorful crafts made together with children will help you decorate your home for Easter. Any spring theme will do: flowers, birds, chickens, but most of all, of course, Easter eggs, a symbol of the holiday.
Easter wreath made from egg cartons
Don't throw away the cardboard egg carton - it will come in handy to make a very beautiful flower wreath for Easter!

You will need a ring cut from a flat piece of cardboard - this will serve as the basis for the wreath. We cut off the cells from the egg packaging, form them into flowers and give the petals a variety of shapes. It’s good to make some flowers double or even triple, nesting flowers of different sizes inside each other.

Now we paint the resulting flowers in bright colors. They can be not only plain, but also with tints and specks.

We paint the base in the color of greenery and after drying, attach the flowers to the wreath using PVA glue.

In the middle of the wreath you can hang an egg cut out of cardboard on a ribbon.
Paper flower garlands
Garlands of paper flowers will serve as a wonderful home decoration for Passover.

To make greenery, it is most convenient to print the proposed template directly onto colored paper.

Now you need to fold the sheet in half and carefully cut out the parts to get symmetrical stems and leaves.

You don't need a template to cut out flowers - you can use a regular glass. We cut out circles from paper of different colors, fold them in quarters and make cuts to make petals. Don't forget to stick on the contrasting center.

Now we glue the flowers to the petals and get ready-made links of the garland chain. We begin to join them to each other, adding leaves at the junction points.

Ready-made garlands can be hung around the room - a festive mood at home is guaranteed!

Simple flower garland
Another version of a flower garland-liana is made even simpler, and kids can easily handle it.

Simple strips of green paper are used as a basis. At one end they are attached to a painted cardboard roller (a paper towel roller will do). Simple five-petal flowers are glued to the ribbons at equal distances.


The finished garlands are hung on strings and become a wonderful spring decoration for a group in a kindergarten.
Easter crafts made from plastic spoons
Very original crafts for Easter can be made using ordinary plastic spoons.

Using a cotton pad, paper and a plastic spoon, you can make this funny cockerel that will decorate a flower pot.

By wrapping a spoon in colored paper, we get a cheerful yellow chicken.

To prevent the paper from slipping, coat the spoon with glue.

Using only the top of a spoon, shaped like an egg, you can make an entire Easter wreath with bright, multi-colored eggs. Or you can place the eggs in a conzinka or in a nest.

Chicks in the nest
A toilet paper roll and a piece of cardboard will make a cute and funny chicken. Step-by-step manufacturing instructions are shown in the photo below.


Paper plate chickens
You can make cute, naive chickens from disposable paper plates using scissors and a couple of markers.

The plate needs to be bent in half and cuts made, as shown in the photo. You will get a stand for future crafts. Then the front part of the product is shaped: the feathers on the tail are cut out, the head is made round.


Using a stapler, we attach the beak and comb, draw a wing and decorate the Ryaba hen with an ornament.
Colorful birds
Birds can also be a symbol of Easter and Venice, because at this time they return from warm countries. Children can make these colorful appliqués themselves, but they may need help preparing the pieces.

The parts for the colorful birds can be printed directly onto colored paper from this template:


Useful tips
Often, when we go outdoors and have a picnic, we take plastic spoons with us.
After this, as a rule, there are still many of these spoons left, and they are stored in the cabinet for a long time.
Don't throw away plastic spoons. Even more than that, buy a few more spoons so that you can make a beautiful craft or even several crafts.
Here are some interesting crafts that can be easily made using plastic spoons:
1. Plastic spoon crafts: decorate your kitchen wall
You can use both plastic spoons and stainless steel spoons (as in this example), but it is much cheaper and more logical to use plastic ones.

You will need:
Spoons
Acrylic paint
Brush
Glue (superglue)
Wooden tablet.


2. Create a beautiful DIY flower vase using plastic spoons.

You will need:
Can
Plastic spoons
Scissors
Acrylic or spray paint (if desired)
Brush.
1. Prepare a tin can. You can paint it.
2. Use scissors to cut off the top of each plastic spoon.

* It is advisable to first decide how many rows of spoons will cover the jar and how many spoons are in each row. In this example there are 8 rows of 15 spoons.
* If you want to paint spoons, then place them on a flat surface, prepare the paint and come up with the color you want for the future vase.

* If you use spray paint, you should paint outdoors and preferably while wearing a protective mask.
* You can combine paints - one row of one color, the other of another.

3. When the spoons are ready, think about which direction they will face and start gluing them to the jar.

Here's what you should end up with:
3. Crafts from disposable spoons: sun-shaped clock

You will need:
Plastic spoons (in this example there are 250 of them)
Scissors
Superglue or hot glue gun
Styrofoam
A watch, photograph, small mirror or other interesting item
Bolts and screwdriver
Stationery knife.
1. Cut a circle from foam plastic. In this example the diameter of the circle is 45 cm, but you can make a circle of any size.
You can cut using a stationery knife.

2. Find the center of the circle and mark it to attach a photo, mirror or other object. For the watch, you need to cut a hole of the required size in order to change batteries, wind the watch, etc.
3. Cut off the tops of the spoons using scissors.
4. Begin to carefully glue the spoons in a circle, completely covering the foam. You should start from the edge of the circle and, gluing in rows, move towards the center of the circle.

*If you wish, you can paint the spoons. Use spray paint, but you need to paint outdoors or in a well-ventilated area (garage, open balcony).

*In this example, I had to add a couple of squares of foam to attach the clock to the foam.

* Instead of a clock, you can glue any photograph, picture or small mirror.

4. How to make a Christmas tree from plastic spoons

You will need:
Plastic spoons (in this example there are 100 of them)
Superglue or hot glue
Scissors
Acrylic or spray paint
Brush
1. Use scissors to cut off the top of the spoons.
2. Start gluing the spoons to the cone, starting from the bottom. Glue in a checkerboard pattern and continue all the way to the top of the head.

3. Paint the Christmas tree any color. You can use acrylic or spray paint. You can also leave the tree white or use spoons that were already painted when you bought them.

5. Crafts from spoons: tags for the garden

You will need:
Plastic spoons (in this example there are 4 pieces)
Acrylic paint
Brush
Sandpaper
Brush
Toothpick (if desired)
Black marker
1. Sand each spoon to remove shine.

2. Paint each spoon a certain color, leaving 4-5 cm at the bottom unpainted, because the spoons will be in the ground.

3. When the paint has dried, write the name of the plant, flower, etc., on each spoon with a marker.

3. Using a toothpick and paint, you can make dotted patterns on the spoon - if desired.

4. Let the paint dry before using your tags.
6. Garland of spring flowers and other flowers made from plastic spoons.

You will need:
Multi-colored plastic spoons (in this example, pink and blue)
Thick cardboard or fiberboard
Acrylic or spray paint
Brush
Pompoms (you can buy them or make them yourself)
Super glue or hot glue gun
Thick thread.

1. Prepare cardboard or fiberboard and cut out three identical triangles. If you wish, you can color each triangle.
2. Cut off the top part of each spoon - these are the future petals of your flower. This can be done with scissors or by heating a knife so that it smoothly cuts the plastic - this method is dangerous, so it is better that an adult handle this step.

3. For one flower you will need 6 spoons, and there are 3 flowers in total in the garland. Mark the middle of each triangle and begin gluing plastic petals in a circle.

4. Glue one pompom into the center of each flower.

5. Make two holes in each triangle and thread a thick thread through them to create a garland.

7. What can be made from spoons: the maracas musical instrument

You will need:
Plastic egg or box that was inside a chocolate egg
2 plastic spoons
Scotch tape or washi tape

1. Fill a plastic egg with a small amount of rice and close it. You can add different amounts of rice for different sounds.
Making a rooster from plastic bottles with your own hands is easy; step-by-step instructions are proof of this. The first version of the craft is perfect for working with kids, and the resulting souvenir will look great at home or on the property. The second craft made from this material is a more complex craft that requires certain additional materials and knowledge.
Now you can start making the paws, for which you will need copper wire. You need to bend the shape of the legs, and then create the desired effect from the corrugated tube. Insert the tail between the two tubes and secure everything with glue for strength. Cut the claws from the bottom of the bottle, they must be long and narrow, and attach using glue. Using a can of spray paint, paint the existing parts of the cockerel.


While the body and legs are drying, you can start creating the head. First, it should be cut out of foam plastic using a stationery leg. The cuts should be sharp, but in no case torn. If it is difficult to cut out the head at once, you can cut out its parts separately and then fasten them with glue. Sandpaper will help remove unevenness, and then treat the surface with acrylic lubricant. Then apply a layer of regular glue and, when it is completely dry, paint the bird’s head with acrylic paints and make eyes.
Now fit the head to the body. Prepare a mold for the wings and attach the long wings to the back, leaving it open. Color everything, make a tail. To do this, cut long feathers from a two-liter bottle, paint them on both sides and attach them to the body, again using wire. To finish the feathers on the back, cut out short 2 cm feathers from bottles and attach them to the back; you will need self-tapping screws for this.


Step-by-step instructions first or second will help you make a rooster out of plastic bottles with your own hands. The first version of the craft is easy, requires a minimum of raw materials, and such a cockerel can be made even by children. The second bird turns out to be large, serious and delightful in appearance. If you want to build it, it should also work out without any special problems. A simple and quick craft -
You can create beautiful and original products from almost any material. The main thing for this is the desire to create beauty with your own hands.
Ordinary plastic spoons are perfect for home crafts. You can make bright, interesting, creative compositions from standard and unremarkable items of disposable tableware.

This exciting activity will appeal to both adults and children.
What can be made from spoons
We invite everyone who wants to please themselves and their loved ones with the results of their creativity to the “Crafts from Spoons” master class.

You will see step by step the entire process of forming crafts from plastic spoons.

Tulips
In order to make a charming bouquet of tulips, we will need:
- spoons (5 pieces for each flower);
- colored corrugated paper;
- glue with a brush;
- scissors;
- green electrical tape.

Cut red paper squares. We wrap spoons in each square and seal it.

Then we collect the tulip. To do this, we fasten 2 spoons, add 3 more to them and fix the resulting flower with electrical tape. We cut out the leaves from green paper, attach them to the stem and tie them with ribbon.

We make a bouquet and put it in a beautiful vase.

Water lily
To create a plastic water lily you need to prepare:
- spoons of different sizes,
- glue gun;
- regular glue;
- paints;
- scissors;
- green plastic bottle.
After cutting off the handles of the spoons, attach the future petals with a glue gun. You should now have an inner layer of petals.

Make the outer layer of the flower in the same way. Cut a strip measuring 12x3 cm from the bottle and make a fringe along one of its edges. Roll the strip and secure it with glue.

Paint the fringe yellow and let it dry.
Make leaves from the bottle as shown in the photo.

Attach the dried strip to the inside of the petals - this will be the center of the flower. The magnificent snow-white water lily is ready!

Garland of flowers
A bright flower garland will look very impressive, for the manufacture of which you will need:
- 18 multi-colored spoons;
- scissors;
- glue;
- thick thread;
- dye;
- pom-poms;
- thick cardboard.

Cut out 3 triangles of the same size from cardboard and color them.
Note!


Cut off the handles of the spoons. Mark the middle in the triangles and stick petals around it (6 pieces per flower). Place a pompom in the center of each flower.

Make 2 holes in each triangle and thread a thread through them, thus connecting the flowers into a garland.

Flower vase
Making a cute flower vase will require you to have:
- spoon;
- tin cans;
- scissors;
- glue;
- paints.
Paint the jar your favorite color. Cut off the handles from the spoons. Paint the rounded parts of the spoons in the desired colors.

Glue the spoons to the jar, placing them in even rows.

Note!

ladybugs
You can make a cute ladybug from spoons using:
- spoon;
- glue;
- large voluminous button;
- paints;
- scissors

After cutting off the handles of the spoons, paint the oval part of each of them. Glue the wings together. Attach a button head on top.

Candlestick
To create a sterile original candlestick, you only need the spoons themselves and glue.

By gluing the spoons together as shown in the photo and attaching a candle to the top of the structure, you will get a stylish decorative element that will brighten up any holiday.

Decorative frame
You can also use disposable spoons to create original frames that decorate various interior items.

Note!

For this you will need:
- spoons in large quantities;
- scissors;
- glue;
- polystyrene foam or thick cardboard;
- a watch, a small round mirror, a photograph or another item that is valuable to you.

After measuring the diameter of the desired object, cut out a circle of the appropriate size in cardboard or foam plastic.

Place a watch, photo or mirror in the resulting frame and secure it. Cut off the handles of the spoons. Glue the rounded parts of the spoons to the frame in rows in a circle, from the edge to the center.

Color the finished product of your creativity the way you want.
Christmas tree
Among crafts made from disposable spoons, picturesque Christmas trees are very popular, for the manufacture of which you will need:
- paper cone;
- glue;
- scissors;
- dye.

As usual, cut the spoons into 2 parts;
Glue the oval part of the spoons to the cone in a checkerboard pattern.

We paint the resulting Christmas tree any color or leave it white and admire our creation.

Maracas (musical instrument)
Creating this unusual instrument will take you very little time, but is guaranteed to delight your children.

Prepare the following materials for this:
- 2 spoons;
- plastic egg;
- scotch;

Place a small amount of rice into the egg and close.
Press the sides of the egg with spoons.

Cover the resulting model with tape.

Pumpkin
To make a large bright pumpkin from spoons, you need to prepare:
- yellow or orange spoons in large quantities;
- foam ball.

Cut the handles off the spoons.
Attach the rounded part of the spoons to the ball in a checkerboard pattern from bottom to top.

The top of the resulting pumpkin can be decorated with a small branch.

The process of creating all the described compositions is reflected in the photo of crafts made from spoons. We talked about the most popular and beautiful products made from this material and shared secrets on how to make crafts from spoons with your own hands.

We hope that our master class was useful to you and gave you aesthetic pleasure.

Photos of crafts made from spoons

Easter is a wonderful holiday that not only adults, but also children enjoy. This Christian holiday has its own traditions. But it is worth saying that it is customary to make all kinds of crafts for such a holiday. Today we will offer you interesting crafts for Easter 2017 that you can make with your own hands from cotton pads. Don't be surprised by this. After all, you can make many interesting crafts from cotton pads. Of course, to create such crafts you will need handy materials. So remember this point.
Easter crafts from cotton pads
Cockerel made from a plastic spoon.
A fun craft - the Cockerel is very easy to make. Prepare for this occasion a couple of disks, a plastic spoon, white paper, glue and parts for decorating the face.
Progress:
- You should cut out wings from a sheet of white paper.
- Then you should attach a spoon to the wings.
- Next, glue a second cotton pad to the spoon.
- Now let's design the cockerel. We attach to it the parts that were previously cut out of colored paper.

Owl made of cotton pads.
This craft is simple to make. Adults and children can participate in its creation. To create a craft, take:

- cotton pads and PVA glue,
- colored cardboard of any color and colored paper,
- buttons and scissors.
Progress:
- To make an owl craft, all the details should be cut out symmetrically. It's worth starting with the head. You need to cut off a third from the first cotton pad. In this case, most of the disk will be the head. And the smaller part of the disk will imitate the eyebrows of an owl. Therefore, the smaller part should be folded in half and cut. In this case, it is worth making even cuts along the rounded side.
- To make the body, you need to take the second disk and fold it in half. You also need to make cuts on this disk that will imitate the feathers of an owl.
- To create wings, you need to fold another disk in half and cut both parts along the rounded side.
- Glue the blanks that you cut out to the cardboard. First the wings are glued, and the body needs to be glued on top of them.
- After that, you should glue the head and place the eyebrows on it.
- Now it’s time to glue the button eyes and a paper triangle, which will be the nose of the craft.
- Next, you should complement your composition with a tree branch and stars.
Easter composition made from cotton pads.
Easter crafts made from cotton pads can be a wonderful gift for anyone. In addition, such products can freely participate in the Easter exhibition. So, in order to make this craft you need to prepare:

- gouache paints and a sheet of cardboard,
- brush and foam swabs,
- cotton pads and glue,
- brown wool threads,
- sequins and plasticine,
- braid, seeds and scissors,
- cocktail tubes.
Progress:
- On a sheet of paper you need to draw a green background. Use a tampon for this.
- We paint cotton pads yellow.
- You need to make a tree from brown threads.
- You need to make willow buds from cotton wool.
- Next, you need to make chickens from cotton pads.
- We make the letters XB from the braid and glue them to the composition.
- It’s worth making a frame for the Easter picture. Use cocktail straws for this.
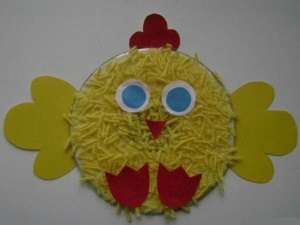
Cockerels made from cotton pads. Various options.
The first version of the chicken is created from cotton pads. Take 3 cotton pads. And be sure to color them. Cut out individual elements from paper and glue to the chicken. Also, don’t forget to sprinkle cereal on your chick.

To create the next chicken, you should take yellow yarn. Lubricate the disk with glue. Cover it with yarn. The remaining parts are cut out of colored paper and also glued on.
Another cotton pad chicken.

And the creation of this composition will involve a chicken, which can be made from simple cotton wool.

Application - sheep.
The sheep applique is very easy to make. In your work you should use cotton swabs and disks. You will also need colored paper to create flowers. To create such a picture, be sure to choose a bright colored cardboard on which the remaining parts will be attached.

Postcard using cotton pads.
You can make a wonderful card if you use individual elements of cotton pads. For work you will need:
- cotton pads and colored paper,
- finger paints and PVA glue,
- eyes.
Progress:
- First of all, you need to cut out two chickens from paper.
- We use cotton pads to cut out egg shells.
- You must cut out grass from green paper and stick it on.
- Now glue the eyes and beak to the chickens. You can also add a bow for decoration.
- After that, use finger paints to paint the grass and clouds.

Easter bouquet.
If you take blue cardboard and draw a twig on it with black paint, and make leaves from cotton pads, you can get a beautiful willow twig.

Finally
In this article we have listed for you interesting crafts made from cotton pads for Easter. Of course, you can supplement these crafts with your imagination or additional details. As a result, you should end up with something stunningly beautiful.